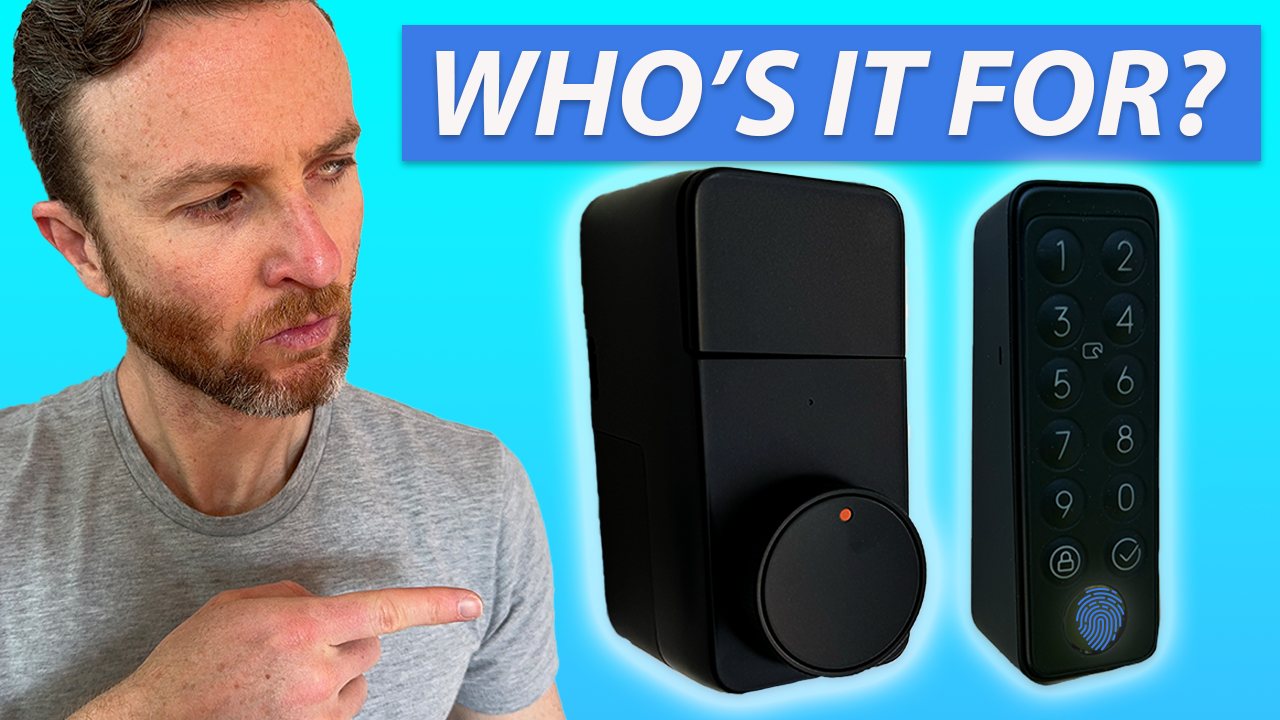
SwitchBot Lock Pro, Keypad Touch, and Hub Mini Matter Enabled Review
Review of SwitchBot Lock Pro, Hub Mini Matter Enabled, and Keypad Touch, including what you get, how to install and control, what it does well, and what could be improved.
Introduction
If you’re at all interested in smart home tech, chances are you have a smart lock, or you’re thinking about getting one. Many smart locks replace your existing deadbolt, requiring you to uninstall your current door hardware before adding something new. But, what if you could just add a smart lock onto the deadbolt you already have — would that be easier? Or, what if you could control that lock locally using Apple HomeKit or Home Assistant, and with the cloud using Amazon or Google? And what’s it like to connect a lock using Matter — does it live up to the hype?
To find out, I’m taking a look at three devices: SwitchBot Lock Pro, Keypad Touch, and Hub Mini Matter Enabled.
We’ll find out if retrofit locks like this setup are any easier to install than a deadbolt replacement. We’ll also walk through the steps of adding a Matter-enabled, smart home device for local control. I’ll also show how you can control this lock using a physical keypad, your fingerprint, an NFC card in your wallet, and home automations. At the end, I’ll share what what it does well and what to improve.
Main Points
Unboxing
Lock Pro: Before I go over installation and configuration, let’s see what you get. Lock Pro comes in a matte black finish. Because it’s a retrofit over your existing deadbolt, this lock is bulkier than most at 4.7 inches tall x 2.3 inches wide x 3.3 inches deep. For comparison, the Yale Assure 2 that I have on my front door is about the same height and width, but roughly half the depth, so it doesn’t stick out as much from the door. SwitchBot Lock Pro has a rotary knob, and screws on both sides for mounting to a plate on your door. The battery compartment is accessed from the front with a magnetic latch, and it comes with four AA batteries that should last 6-9 months. It comes with a door sensor to know if the door is open or closed, along with a mini screwdriver, tape, and various screws.
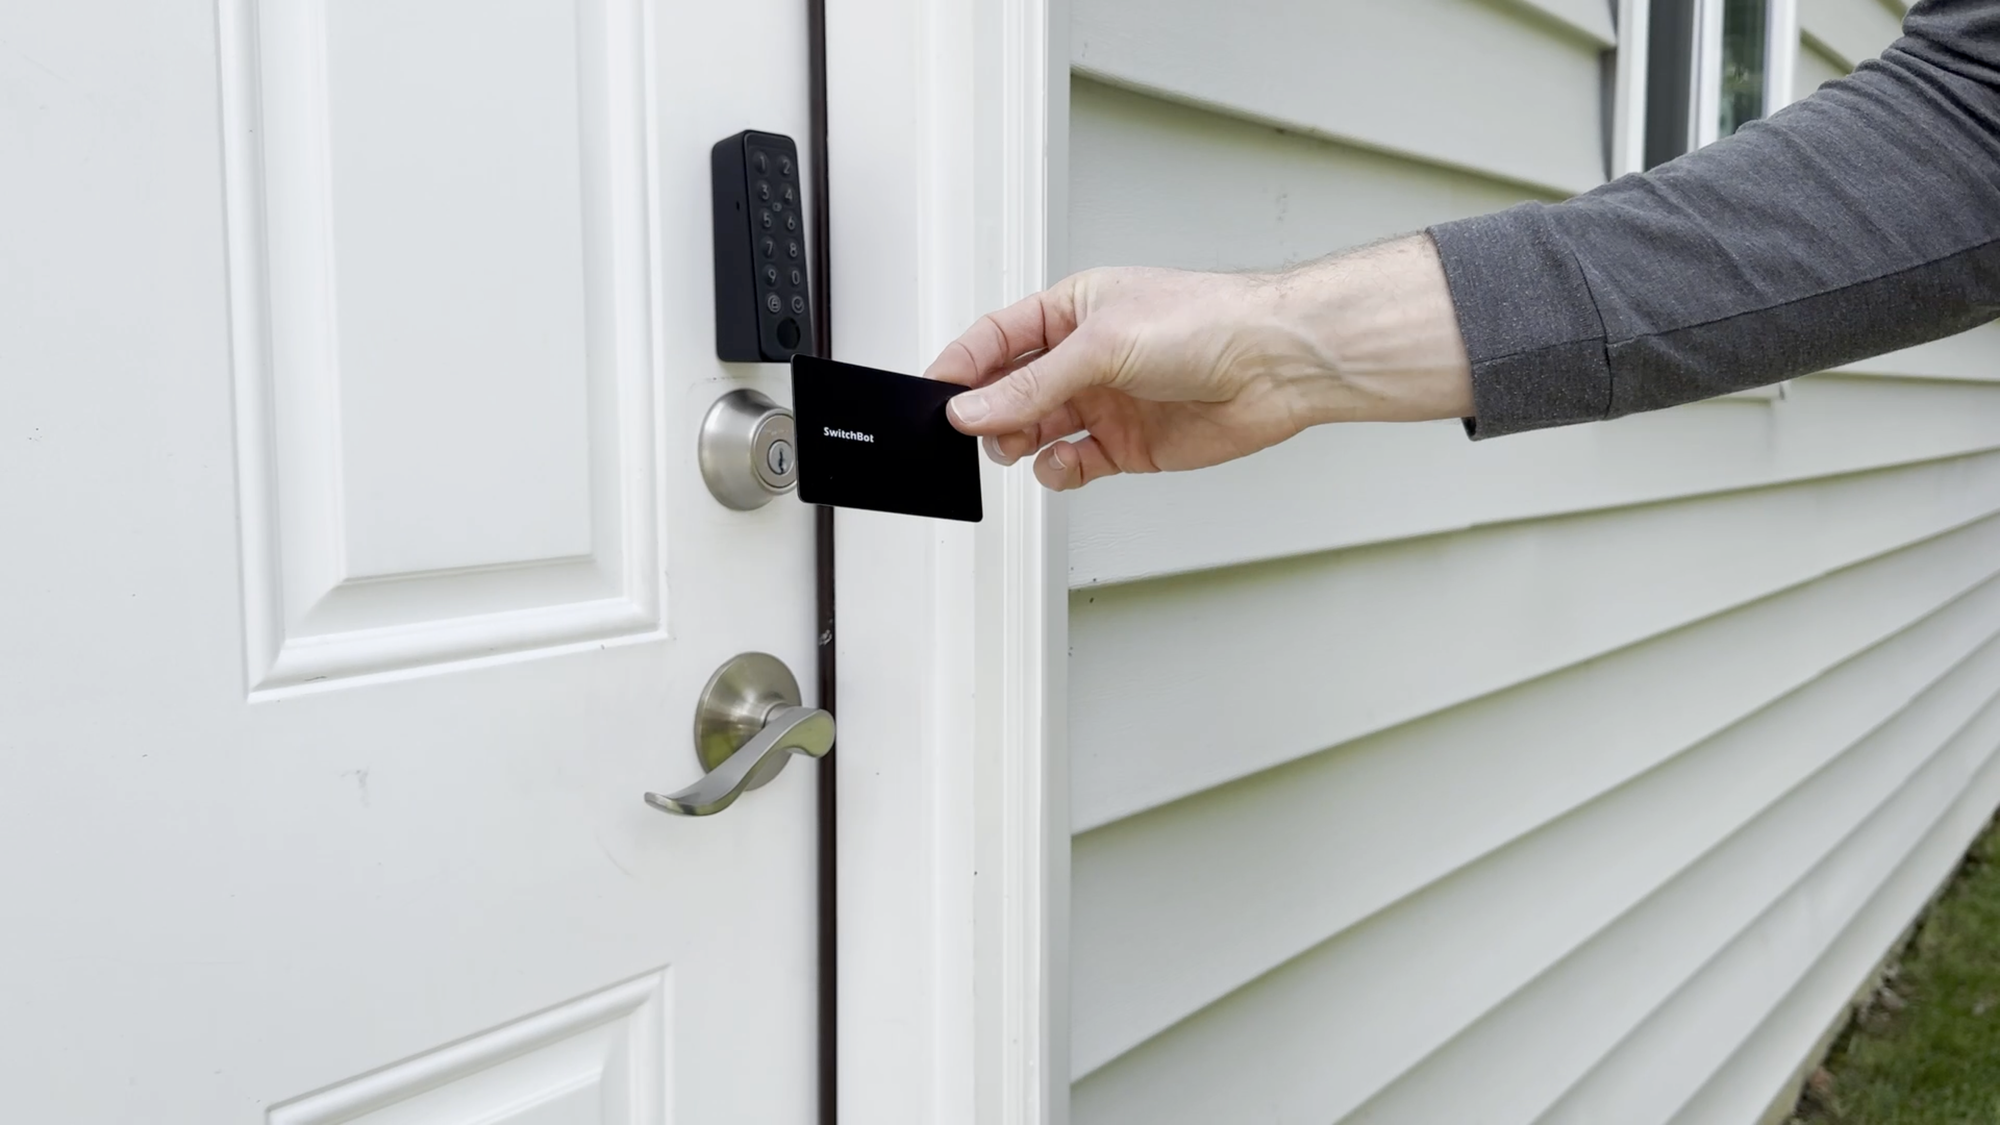
Keypad Touch: Keypad Touch is plastic and lightweight, with a battery compartment on the back. It comes with a mounting plate, screws, and adhesive for a couple different mounting options that I’ll cover in a bit. An NFC card is also included as an alternative way to operate the lock.
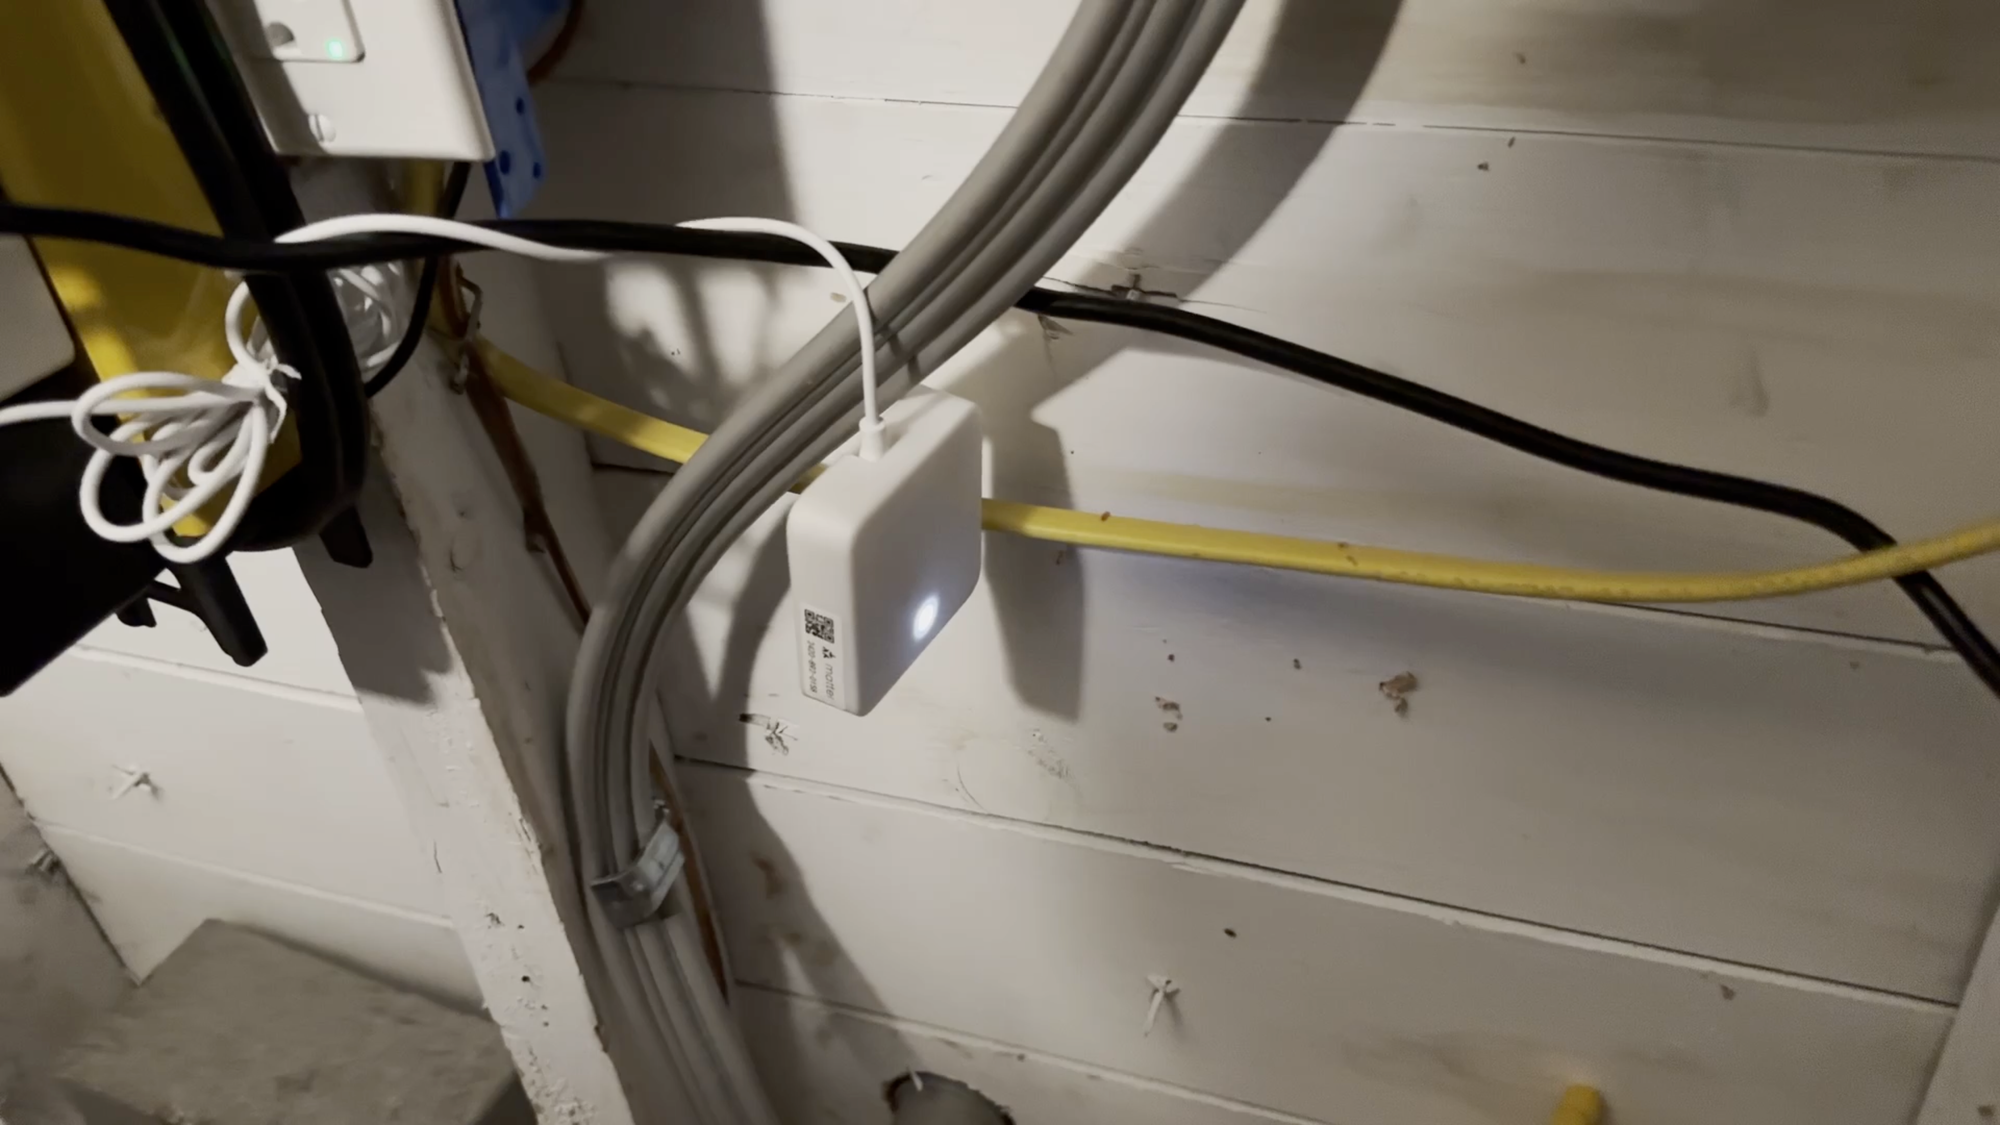
Hub Mini Matter Enabled: If you want to use Lock Pro with other smart home platforms, you’ll need Hub Mini. This one is Matter-enabled, and works with Apple, Amazon, Google, SmartThings, and Home Assistant. The Hub Mini is a small, lightweight plastic bridge, and it comes with a power cord that has USB-C on one end and USB-A on other. It does not include a power brick.
Installation
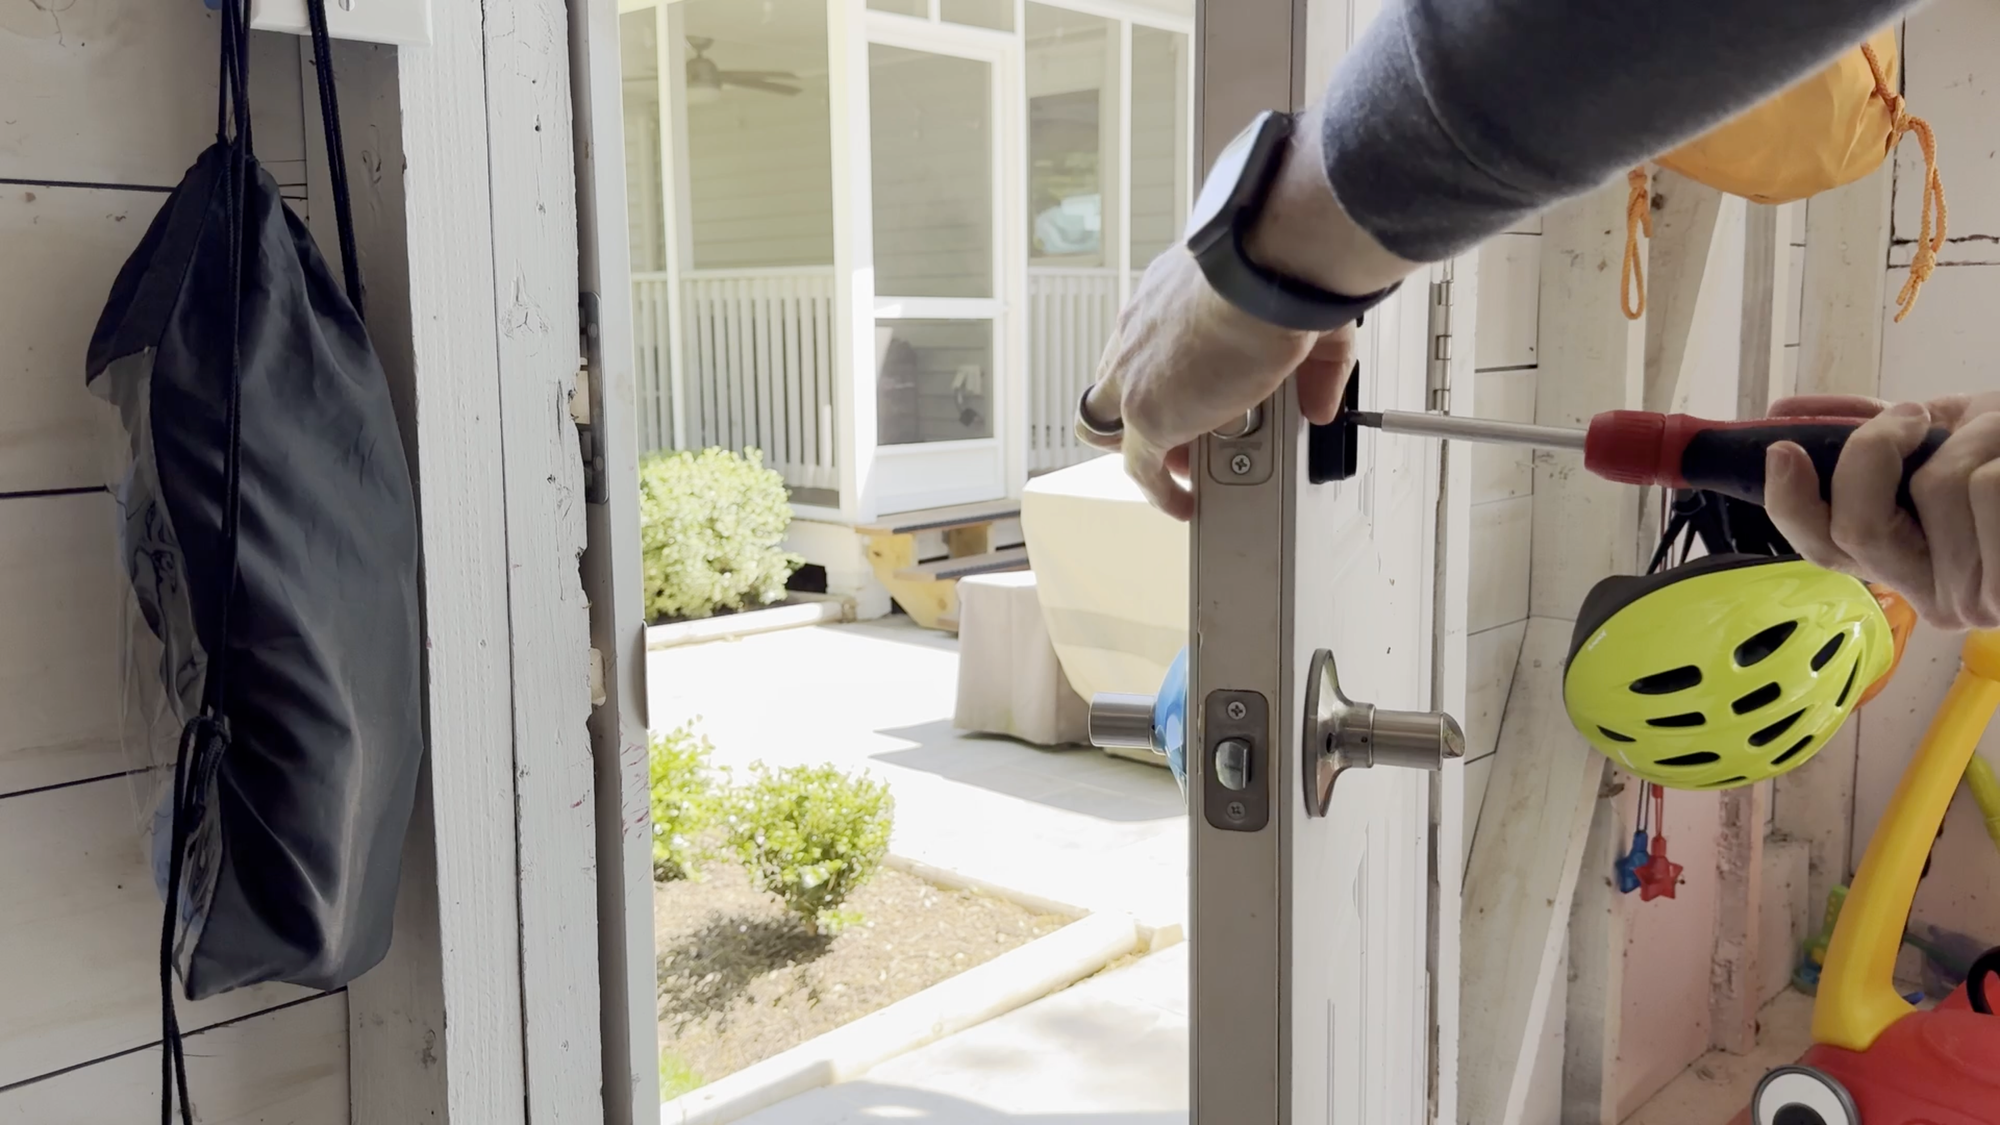
Installation begins by placing blue tape over the outside of your deadbolt to keep it in place. That’s because the next step is to remove the interior portion of the deadbolt, and you don’t want the exterior end falling to the ground. Next, you’ll attach the lock’s mounting plate to the interior part of the deadbolt using the provided screws. Make sure the mount is nice and level.
Then, grab the included cylinder attachments and find one that’s shaped for your deadbolt cylinder. Put it on, and test turning the deadbolt by hand. Now, you’re ready to put Lock Pro on the mount. I had to jiggle it a bit to find the right alignment.
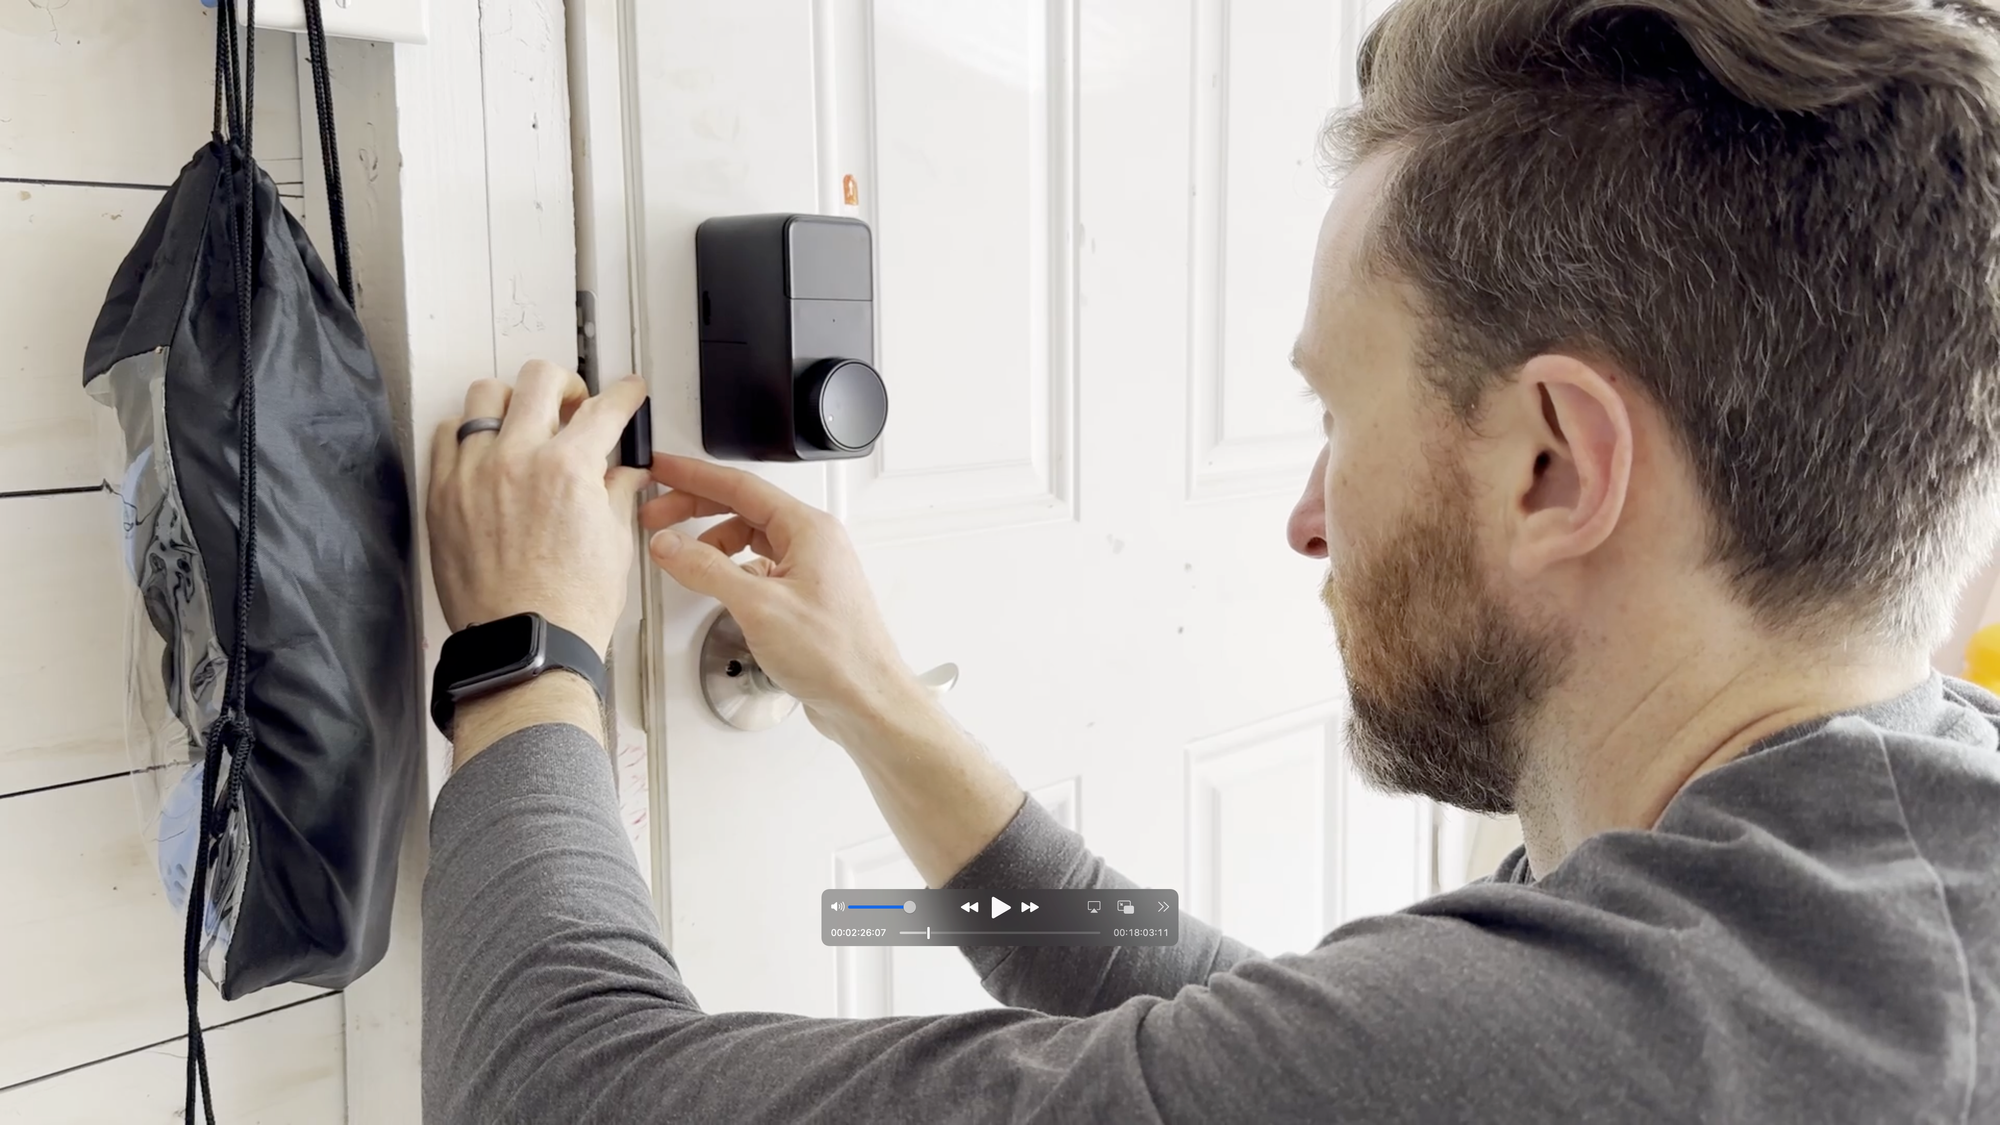
There are four impossibly small screws that you use to attach Lock Pro to the mount using the included Allen wrench, with two screws on each side of Lock Pro. Give the lock a tug to make sure it’s nice and snug, and then you can remove the blue tape from the exterior side of the deadbolt.
To install the door sensor, choose a spot on the door frame within 1.5 inches of the lock, and wipe the area clean. Then, press the sensor to the frame using the adhesive on the back.
Now, it’s time to add Lock Pro to the SwitchBot app. Click ‘add device’ and it should find Lock Pro using Bluetooth. Remove the battery isolation tab, and a light on the lock should flash blue. Then click connect in the app. Name your device and assign it to a room.
Next, you’ll go through a few, guided steps in the app to calibrate the lock and sensor. At this point, you’ll be able to lock and unlock from the SwitchBot app when in close proximity and connected to the lock via Bluetooth from your phone.
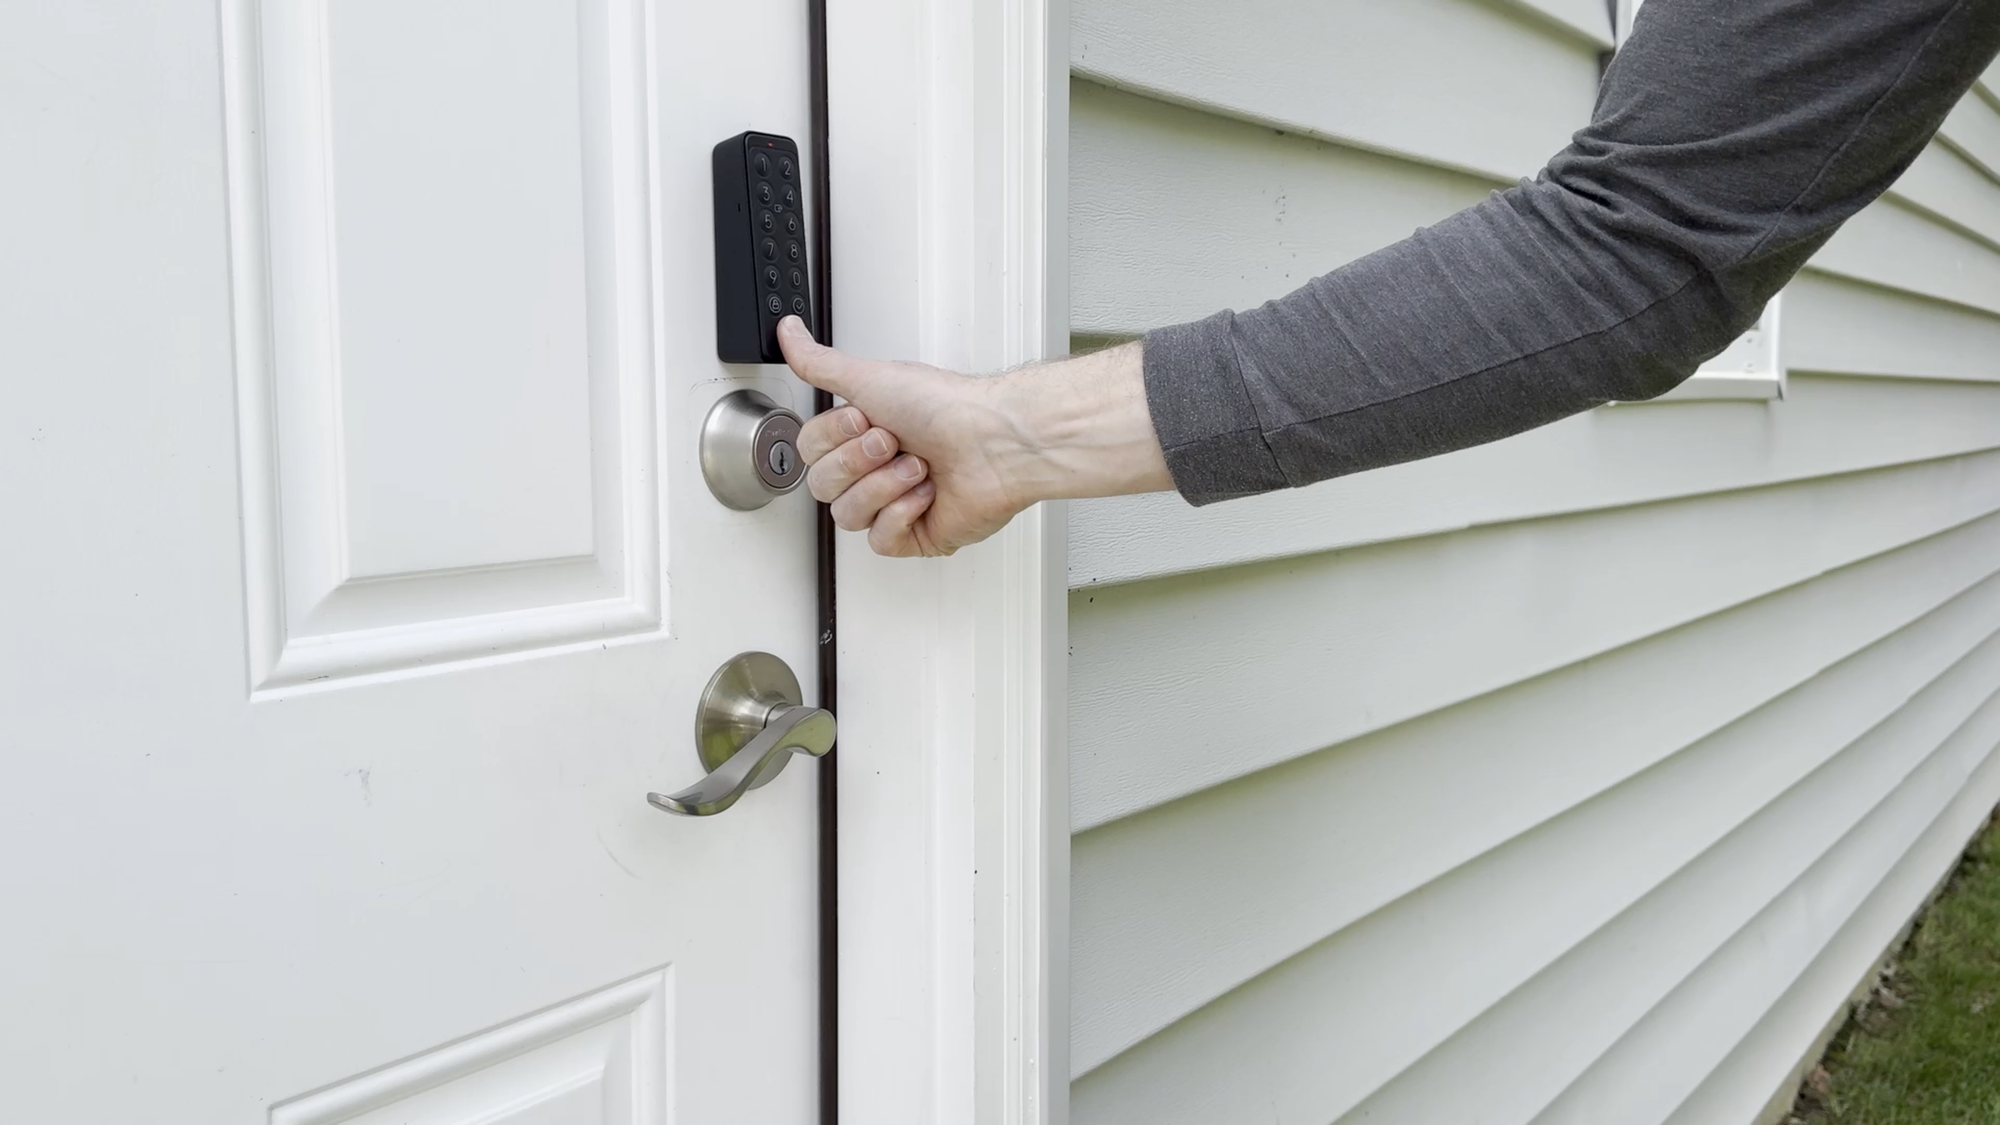
Now, it’s time setup the keypad. Start by inserting the included batteries. Then, from the SwitchBot app, go to add devices, and scroll down and select Keypad Touch from the list. After connecting it to the app, you can give it a name and assign it to a room. To connect Keypad Touch to Lock Pro, bring the keypad and you phone near the lock, and enter the test code shown in the SwitchBot app. Once you’ve confirmed it’s connected, it’s time to install the keypad where you intend to use it.
You can choose to screw it in place for a more secure installation, or you can mount it using an adhesive. I chose the adhesive since I didn’t love the idea of drilling into my door, door frame, or exterior siding. Just know that if you install using adhesive, it would be pretty easy for a thief to remove the keypad. To install it with adhesive, wipe the surface clean, and pay close attention to how the adhesive should fit onto the keypad mounting plate, as it’s easy to confuse the orientation. Press the plate with adhesive to your chosen spot for up to two minutes. Then, push the keypad onto the mount, starting with the bottom contacts.
Be aware that if you don’t mount it right on the first try, and then remove it, it will sound a theft alert. This alert is good in theory, but should not be activated during installation. It took me a good while to figure out how to disable the alert in the SwitchBot app, which was a little annoying.
From the SwitchBot app, you can configure your passcode and start adding fingerprints, plus the included NFC card. At this point it’s a good idea to test out each method to ensure it’s all working as expected. I didn’t have any issues, and found the NFC surprisingly quick at unlocking, and it made me feel like I was entering a hotel room. Pro tip: If you’re unlocking by fingerprint, don’t be shy about pressing your finger firmly against the biometric fingerprint sensor.
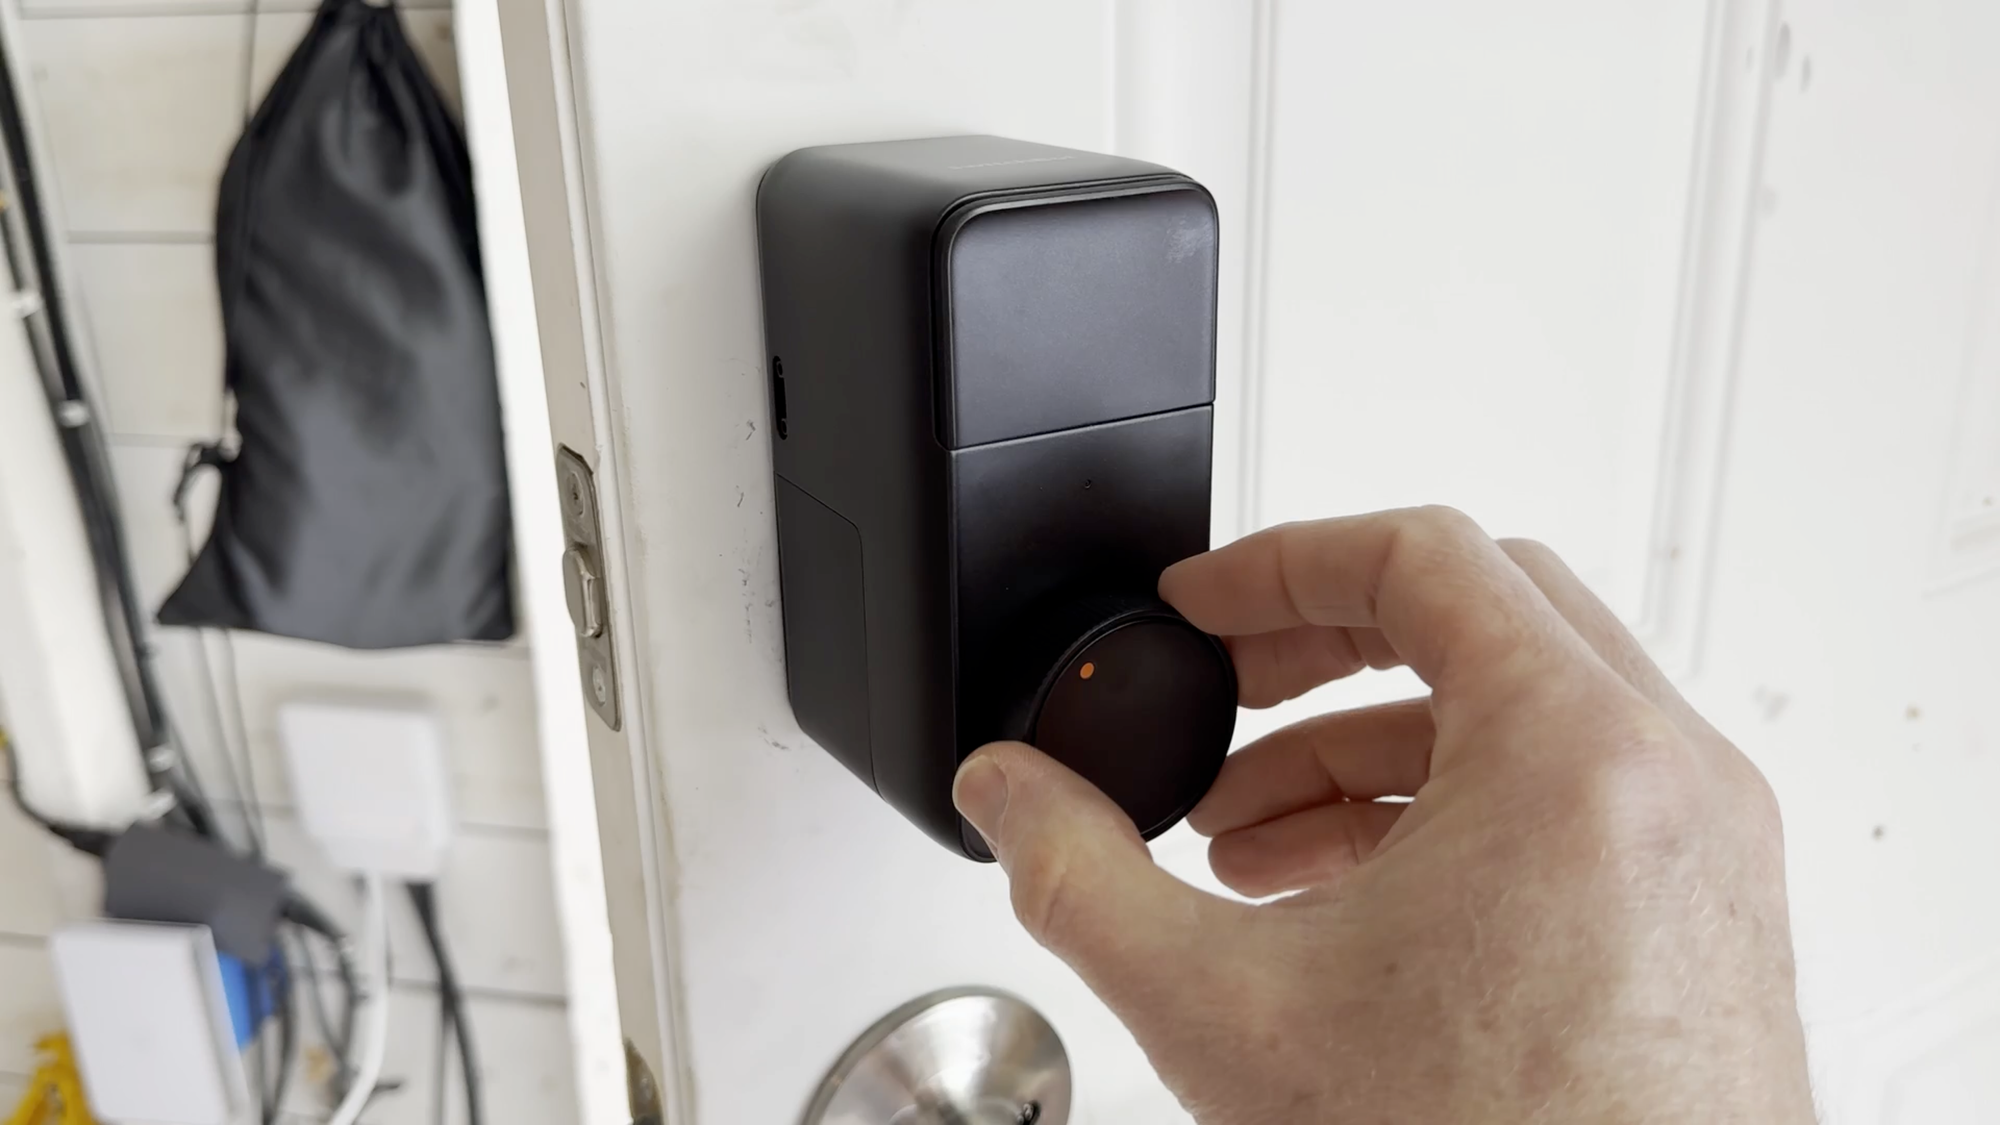
And for the third and final installation, you’ll want to plug the Hub Mini into power in order to enable remote access.
It’s important that you choose a location near the lock. This was not self-evident to me, so I first installed it alongside my other smart home hubs and bridges in the basement. But since the Hub Mini must be in Bluetooth range of the lock, I quickly realized this wouldn’t work, so I moved the hub out to the garage just a couple feet from the lock.
Open up the SwitchBot app and select the Hub Mini from the add device screen. You’ll then need to press and hold a button on the hub for three seconds, and then connect to a WiFi network. Note that it only works on a 2.4GHz network, like most smart home devices. Once connected, you can name the hub and assign it to a room.
At this point, should now have Lock Pro, Keypad Touch, and Hub Mini Matter Enabled all visible in the SwitchBot app, but you can only control the lock when standing next to it, either through physical controls on the Keypad Touch, or using the SwitchBot app via a Bluetooth connection from your phone.

Installing and testing SwitchBot Lock Pro, Keypad Touch, and Hub Mini Matter Enabled
Configuration
To view and control Lock Pro remotely and using other smart home services, like Apple, Amazon, and Home Assistant, you need to have the Hub Mini Matter Enabled.
The order of steps you take here seems to really…matter.
First, let me tell you what didn’t work for me. After I paired the Hub Mini to the SwitchBot app, I added the hub to Home Assistant using the Home Assistant Matter integration. Then, I added the hub to Apple HomeKit.
To make Lock Pro also viewable on those platforms, I added it as a secondary device in the Matter settings of the SwitchBot app.
While I was able to add the lock this way to Home Assistant and Apple HomeKit, I wasn’t able to control it.
Instead, what you need to do, is go to the Hub Mini settings in the SwitchBot app, and choose Matter Setup. This will walk you through the steps.
What this revealed to me is that in order to use Matter, you actually need to reset the Hub that you just added by holding down the button on the device for 15 seconds until the light turns off, and then back on again and starts blinking slowly.
Then, you’ll need to copy the Matter setup code, and open up the Apple Home app.
In the Apple Home app, click add Accessory, more options, click ‘my accessory isn’t found,’ and enter the setup code. This will add the SwitchBot Hub to Apple Home.
Go back to the Matter settings for the Hub in the SwitchBot app, click on secondary devices, and add the lock.
Lock Pro should now be visible in the Apple Home app.
Be default, you’ll get notifications from the Apple Home app and the SwitchBot app each time the door is locked and unlocked. You might want to change this in the app settings, because it can be a lot.
If you’d like to add the lock to Home Assistant as well, go the Hub Mini in the Apple Home app, click ‘Turn on pairing mode,’ and copy the code.
Now, open Home Assistant on your mobile device, and go to settings, devices and services, add integration, and search for Matter. It may take a few minutes to add.
Once added, go to devices, then add device, and choose add Matter device. Click on ‘Yes, it’s already in use’ since the lock was already added to Apple Home.
Choose Apple Home, and then paste the code that you copied from Apple Home.
Now, Lock Pro should finally visible in both Apple Home and Home Assistant.
The two key takeaways for me were 1) you must reset the Hub Mini prior to setting up Matter, and 2) start with Apple Home, and then add to Home Assistant.
To add the SwitchBot Lock Pro to Amazon or Google smart home platforms, go back to the settings page for the Hub Mini in the SwitchBot app, click on cloud services, and from there you can connect that service.
If you use Amazon’s smart home platform, the default setting only allows you to lock using the app. You need to go the lock settings in the Amazon app to enable unlock by app or by voice. I believe this is true for all smart locks added to Amazon, not just SwitchBot.
What it does well
Alright, so what does this setup do well, and how could it be improved?
Well, I like all the options you have to control Lock Pro. You can continue to use the original, mechanical key to operate the deadbolt, which is super unique in the smart lock space…but also kind of boring and probably not why you bought a smart lock.
Instead, you can use permanent, temporary, or one-time passcodes on the KeyPad Touch. This can be great for nannies, a cleaning service, or guests. Or, you can use biometric fingerprint access, also on the KeyPad Touch, which is even more convenient. You can also control the lock remotely and in home automations using the SwitchBot app, or local control with Apple HomeKit or Home Assistant which is my preference, or using a cloud service like Amazon or Google. Additionally, you can use voice, Apple Watch, or iOS widgets.
Oh, and there’s also an NFC card, which you could keep in your wallet. This might be a nice option to give your guests if you’re an Airbnb host since it replicates that hotel room card experience. Basically, it offers something for everyone in terms of control options.
Additionally, the hardware seems really solid and well-built. I like the matte black finish for my garage. Turning the dial is also really satisfying — it has just the right amount of tactile feedback. As much as I love digital input, there’s something really nice about physical knobs, buttons, and switches.
What to improve
Turning to what could be improved, the setup itself was a little involved.
I expected a retrofit smart lock to install faster than a deadbolt replacement, but this wasn’t true. You still have to remove half of the deadbolt…and then you have to install a separate keypad and a separate hub, and all three devices must be added to the app separately. With deadbolt replacement smart locks, the keypad is typically built-in, and some even have WiFi built in, so there isn’t a hub. It’s one installation, and one app setup. With the SwitchBot, you’re installing three separate physical devices and then connecting each to the SwitchBot app and to each other, and this is just more time consuming.
I also had issues with setting up remote access. While the Hub Mini connected to my WiFi without issue, it struggled to maintain its connection, even though it was two feet from my UniFi access point.
And I was unable to control the lock using Apple HomeKit or Home Assistant at first. It’s hard to tell if that was because of the Hub’s intermittent WiFi, or because I setup Matter without first resetting the Hub Mini. Regardless, once I reset the hub, everything worked. But it required a lot of time identifying the issue, resetting the device, and going through the Matter setup process for both Apple Home and Home Assistant all over again.
In defense of SwitchBot, the app does tell you to reset the Hub Mini to enable Matter, but it was buried several clicks away in a settings menu, and resetting a device that I just added was not a required step that I expected.
Additionally, there a couple limitations of using Lock Pro with Matter. Unlike the SwitchBot app, you can’t get battery level information or see the opened or closed status of the door using Apple HomeKit or Home Assistant. While not a deal breaker, I wish those additional entities were exposed.
I also wish the lock came in more colors so I had the option to match it with the door hardware inside my home.
The lock also protrudes quite far from the door because of the retrofit design. This doesn’t bother me much in our garage, but it might be less appealing if located inside the home.
Finally, the rotary style knob makes it more difficult to see at a glance from a distance if the door is locked or unlocked. A thumb turn style lock just provides a better visual of the lock’s state.
Conclusion
The SwitchBot Lock Pro, Hub Mini Matter Enabled, and Keypad Touch can be purchased as a bundle for $200. Or, you can just pick up Lock Pro by itself for $120. But, I don’t know why you’d do that. The question I kept asking myself with this lock was, who is it for?
As a retrofit lock, I assumed this would be targeted to renters, or those looking for a simpler install. But even with this retrofit lock, you still have to remove half of the deadbolt. On top of that, you also need to install a separate keypad, which SwitchBot recommends that you drill into a wall. But drilling into a wall doesn’t sound like a good fit for renters.
And because Lock Pro also needs the Hub Mini to enable remote access, you have to install and configure three separate pieces of hardware: the lock, the keypad, and the hub. So if you’re looking for simpler setup, this isn’t it.
Lock Pro offers great hardware and broad smart home compatibility…but so do other smart locks, and without the confusion or limitations of Matter, which still doesn’t feel like it’s ready for primetime.
But hey, at least the NFC card makes me feel like I’m at a hotel.
Watch on YouTube
Featured Tech
Get 10% off SwitchBot Lock Pro, Hub Mini Matter Enabled, and Keypad Touch when you use coupon code 10UPQIZHBUZ9W2 at https://bit.ly/3QlsrIM.