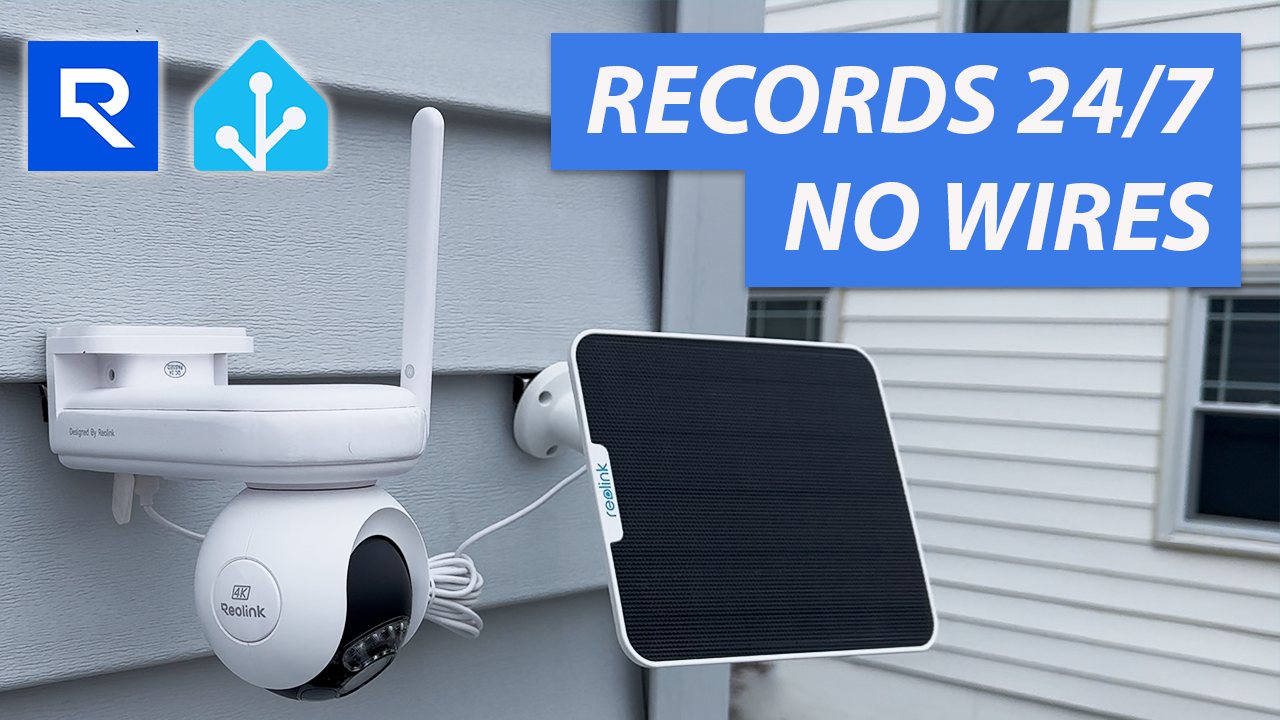
4K Wireless Security Camera WITH 24/7 Recording: Reolink Altas PT Ultra Review
Review of the Reolink Altas PT Ultra, Solar Panel, and Home Hub, including the features, setup, installation, smart home integration, and test results.
Introduction
This does something that no other security camera does: 24/7 continuous recording without any wires. That means you don’t have to struggle with installing PoE cables, or running a power cord to the one outdoor outlet you may have at your home. Just place it within reach of your home’s WiFi network, and you’ve got 360-degree tracking, 4K image quality, and a color night vision security camera. No wires and no subscriptions required.
I’ve used dozens of different home security cameras, both wired and wireless, so I understand the pros and cons of each. I’m going to review the Reolink Altas PT Ultra, including the features, setup, installation, and smart home integration. I’ll also show you the results from my day and nighttime testing, so you know what to expect. But that’s not all. I’m also going to show how to use this with the Reolink Home Hub and Solar Panel for a complete solution.
Main Points
Features
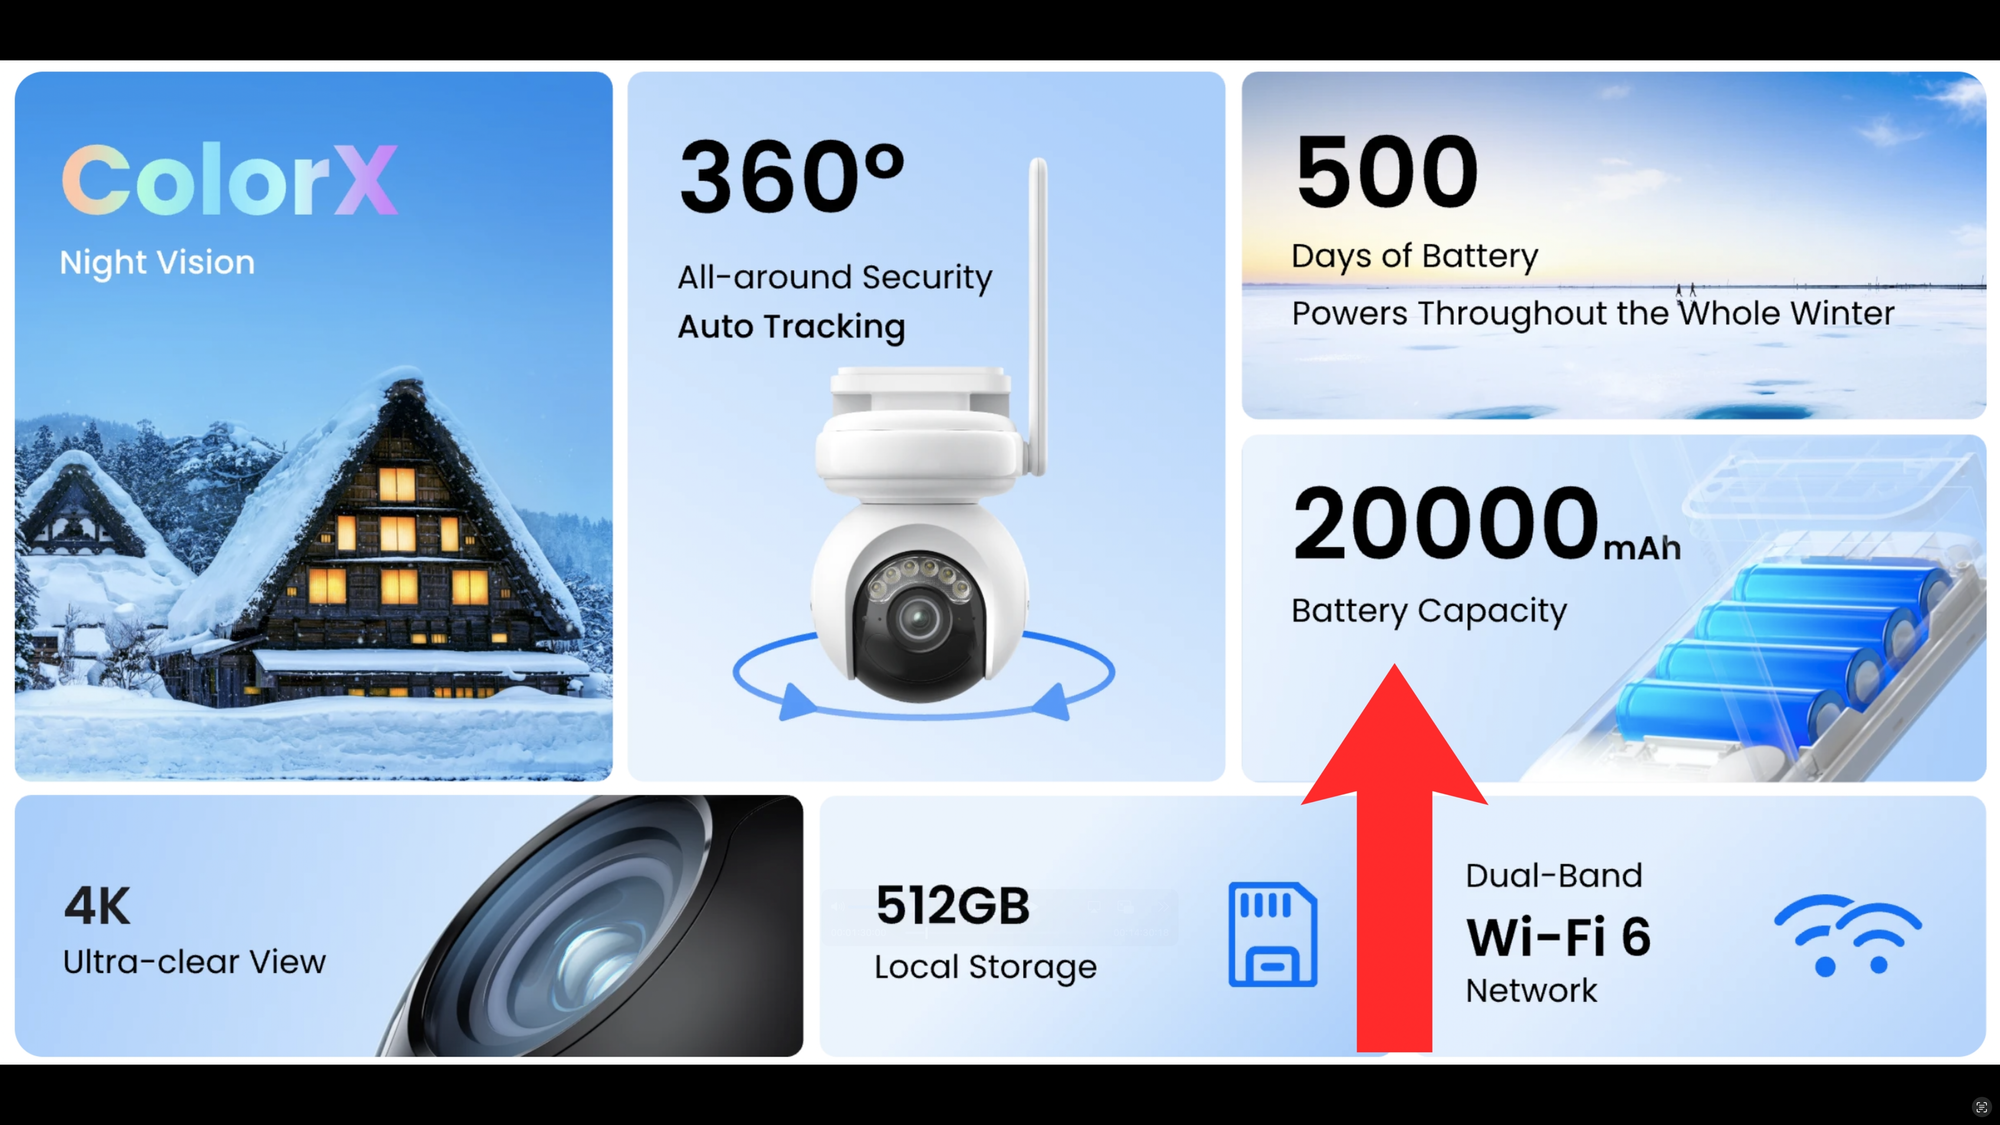
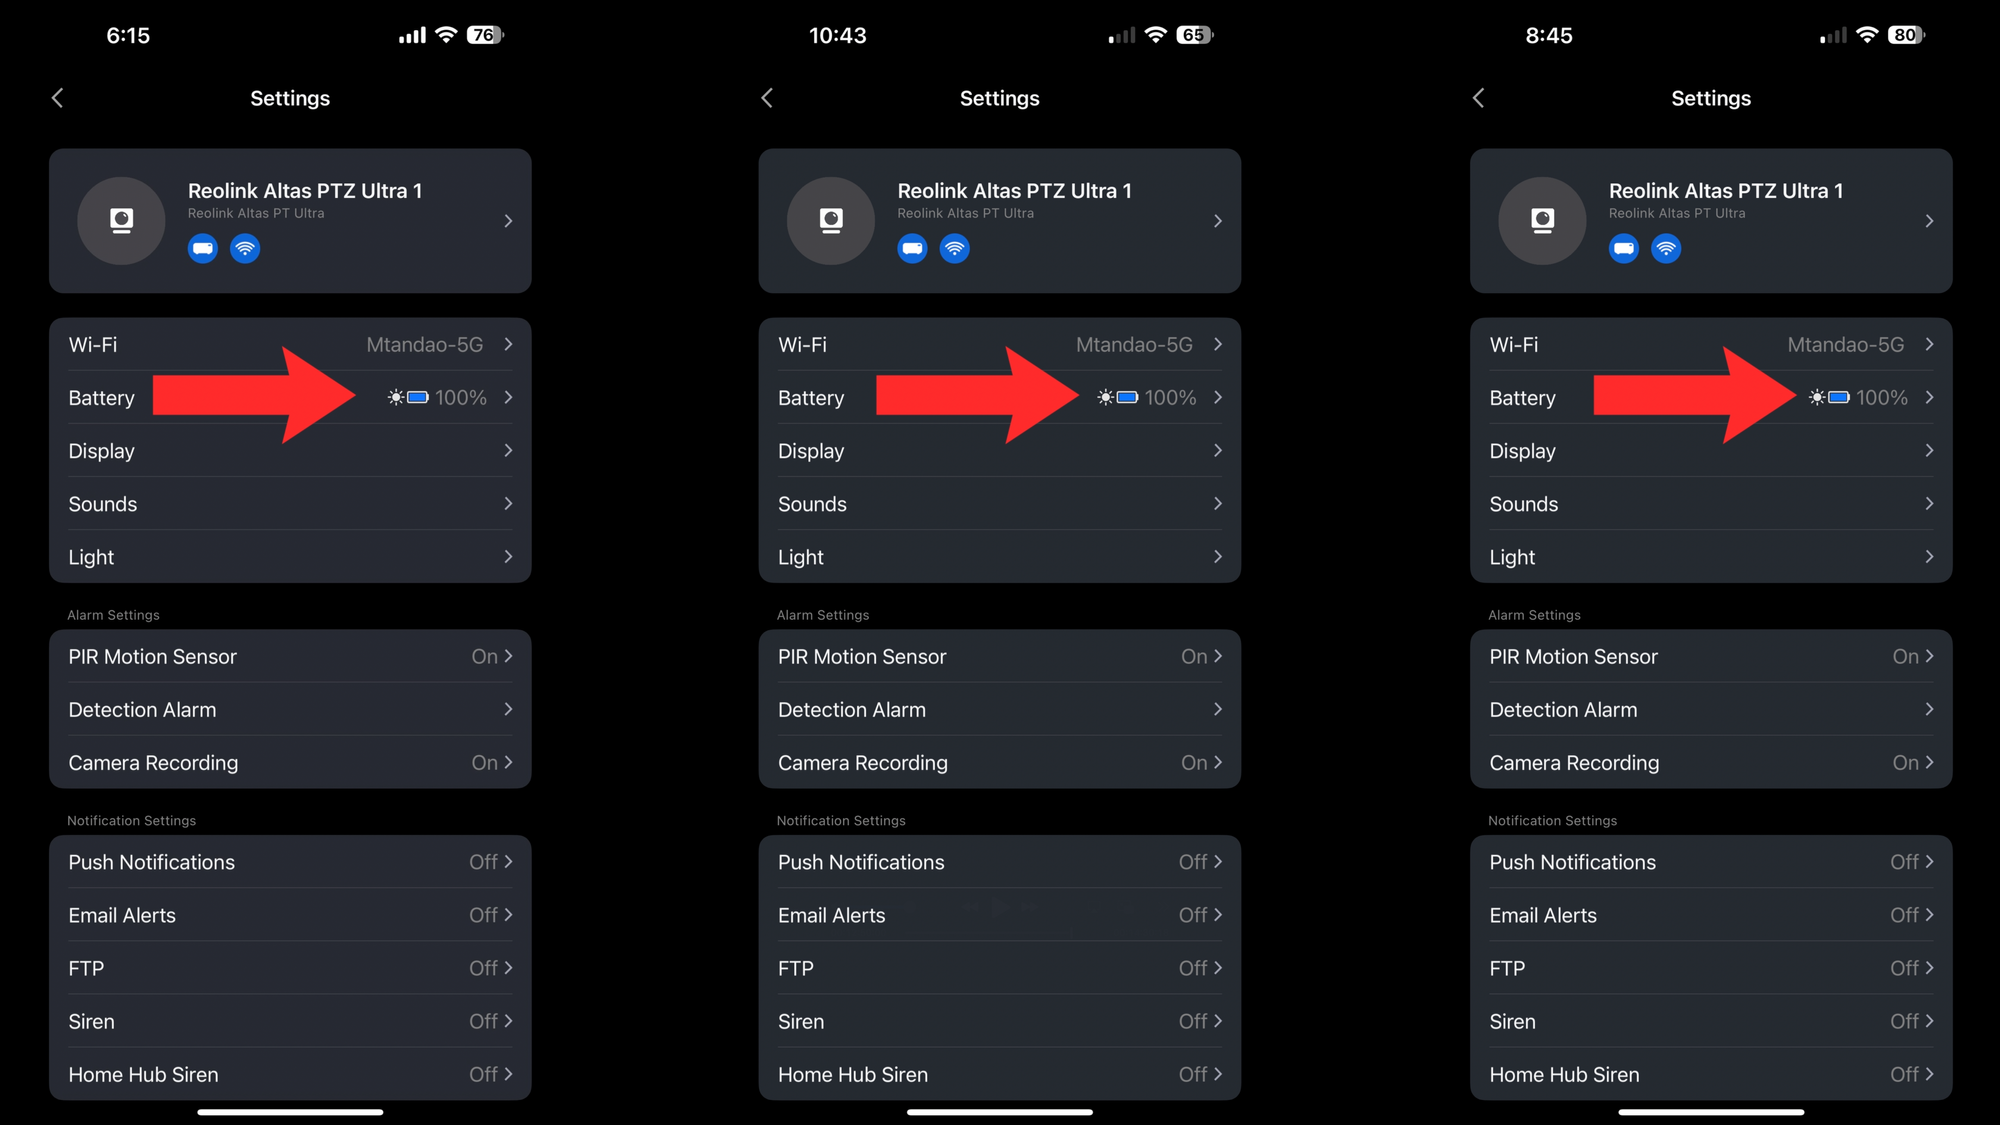
What sets the Altas PT Ultra apart is it’s 20,000 mAh battery combined with software improvements that offer 24/7 continuous recording — a first for a battery-powered camera. Reolink claims the battery can last 500 days in standard Motion Trigger Mode, based on 300 seconds of recording per day. Your mileage may vary depending on how much traffic your camera sees, or adjustments to motion sensitivity or other settings.
My camera has remained at 100% battery for several days in a row on Motion Trigger Mode, thanks to a solar panel, but more on that later.
Reolink is not cutting corners to give you continuous recording: this is a 8MP, 4K ultra-high definition image with support for ColorX, a feature that provides full color recordings even in low-light and nighttime conditions. This makes it much easier to discern what you see in a recording compared with traditional black and white nighttime recordings on other cameras.
But that’s not all. This is a pan and tilt camera, which means you get near 360-degree side-to-side rotation, plus up-and-down movement with auto-tracking, eliminating almost any potential blindspot. You can have eyes all around your property with this.
The camera supports dual-band WiFi 6, and can hold up a a 512GB microSD card for local recording right on the camera.
Reolink Altas PT Ultra
Camera Unboxing
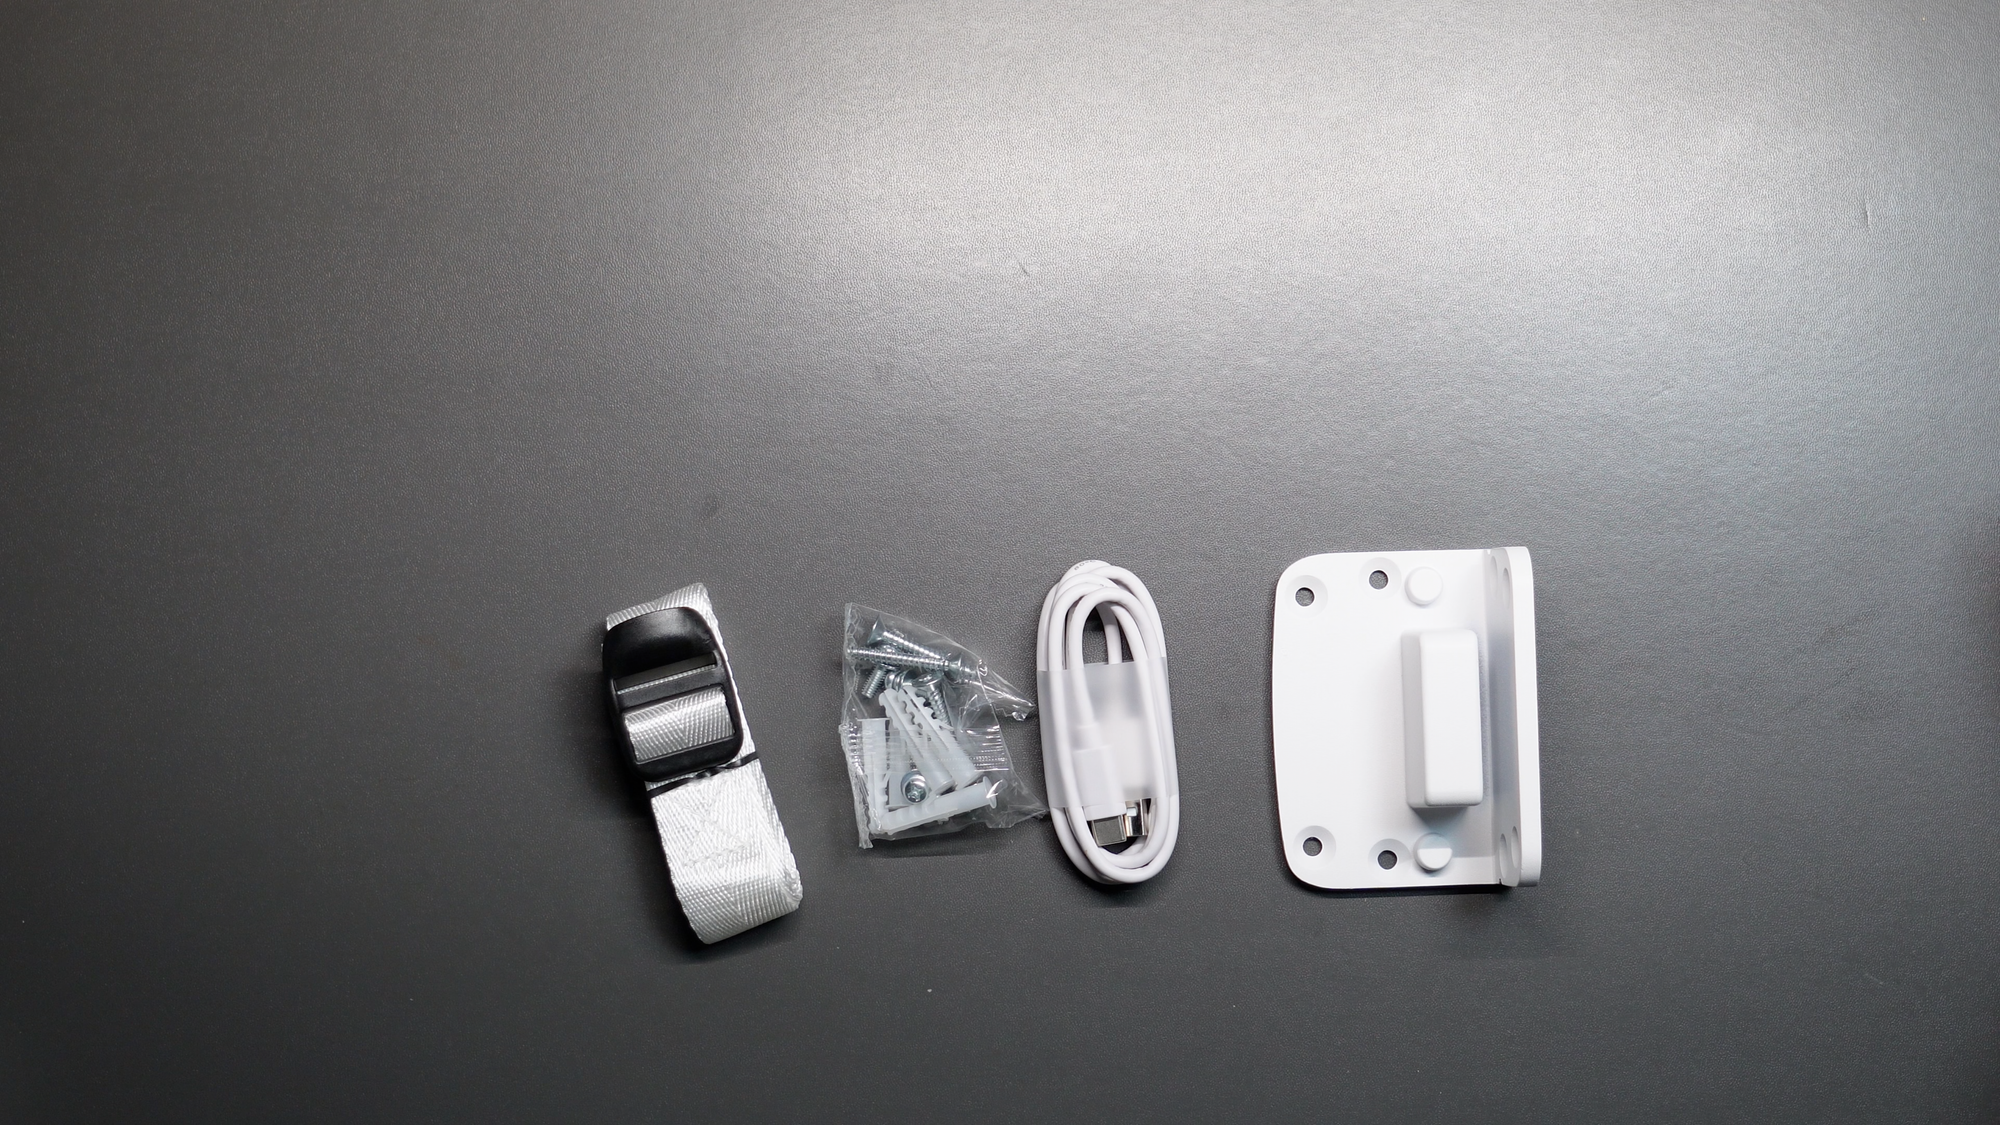
Let’s take a closer look and see what you get. Opening up the Altas PT Ultra, you get a wall mounting sticker, instruction book, quick tips, and a Reolink surveillance sticker.
You also get strap if you’d like to mount the camera around a tree, and all the hardware you need to mount it to a wall, plus a USB-A to USB-C cable for initial charging, and a metal wall mount bracket.
The camera body is mostly white plastic. There is an adjustable antenna that supports dual-band WiFi 6, a super loud speaker underneath for two-way audio and a siren. The white rubber cover reveals a USB-C port for charging the 20,000 mAh battery, or for connecting a solar panel. And the black rubber cover opens to accept a microSD card for saving footage locally on the camera. The back of the camera slides directly into the wall mount and is held securely in place using two machine screws
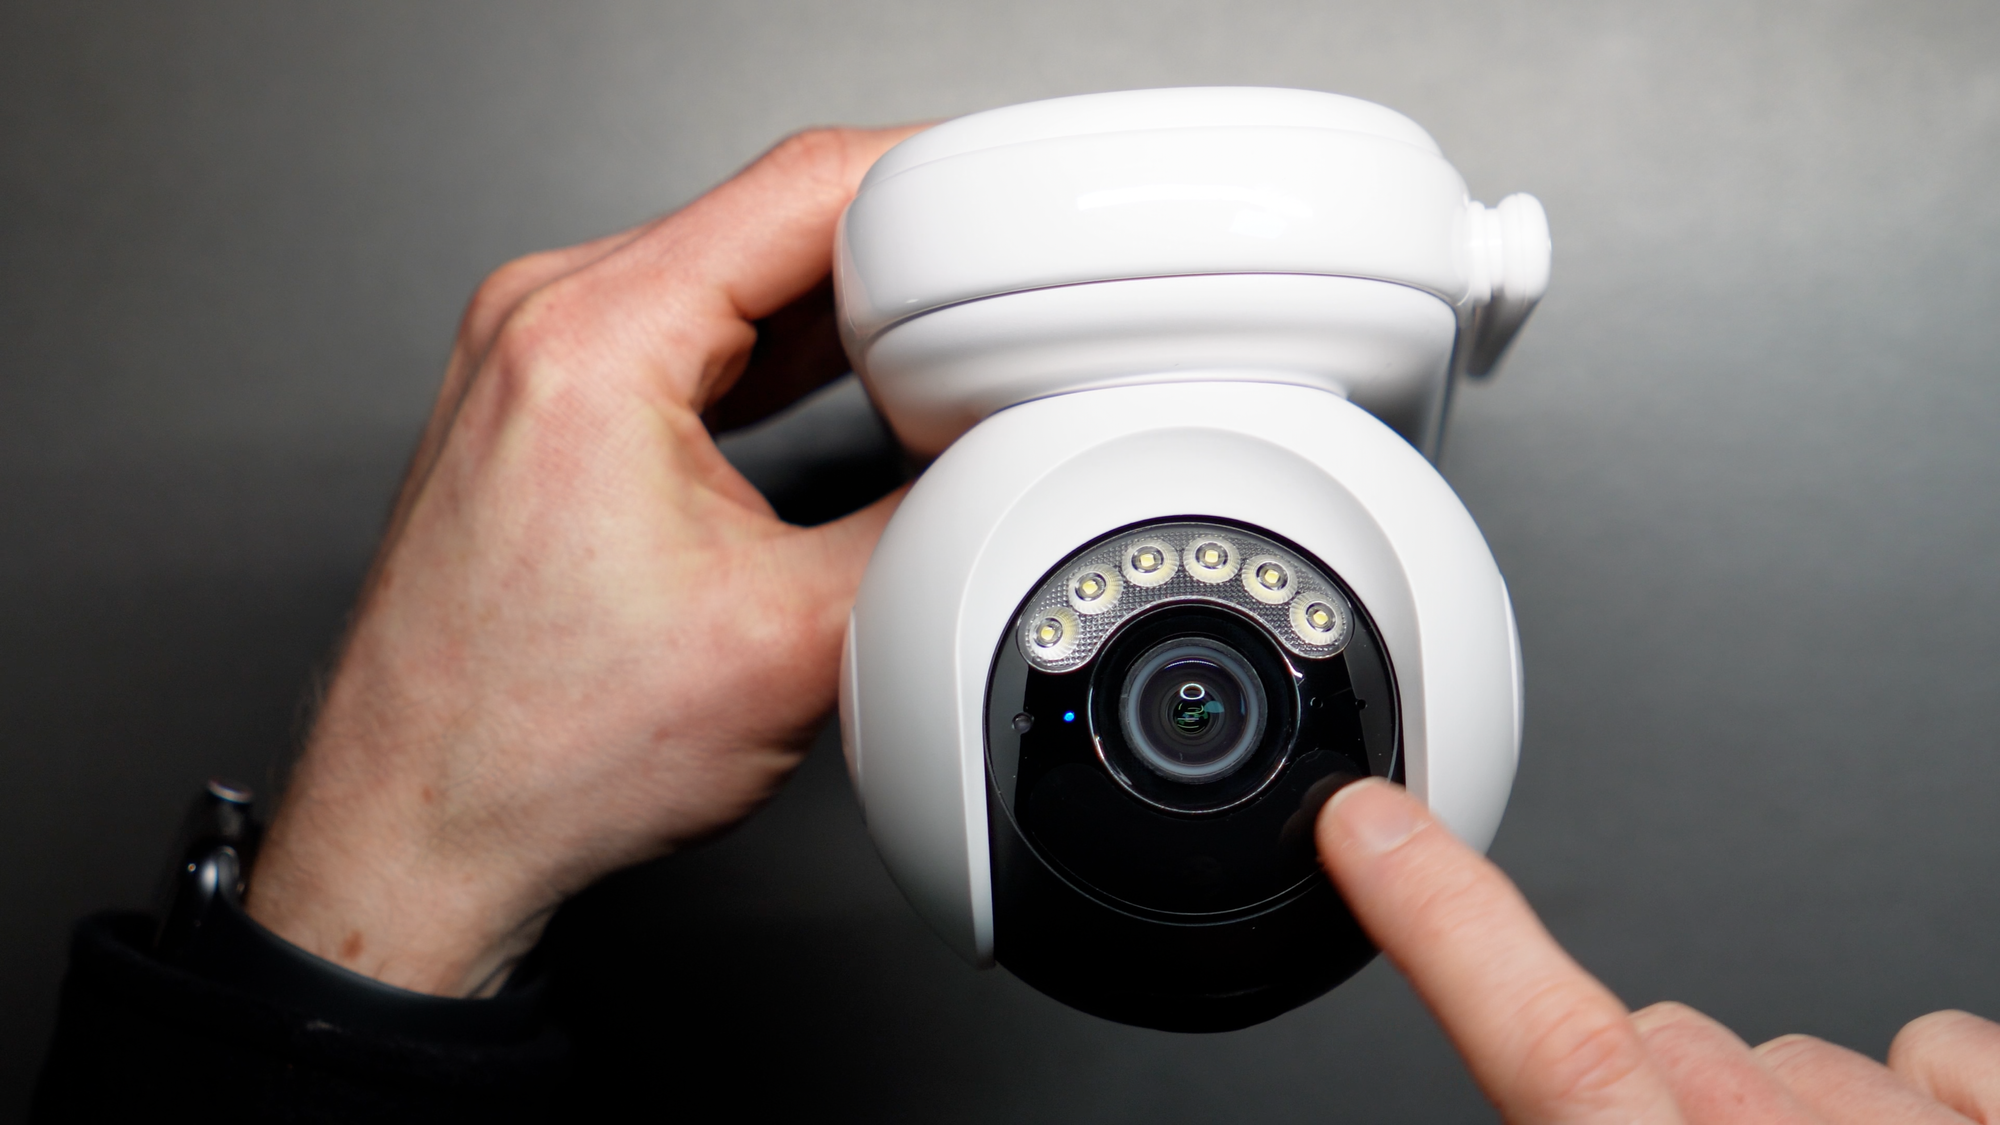
Taking a closer look at the camera itself, the lens can record in 4K ultra-high definition with ColorX for low-light. Above the lens are floodlight LEDs, and on either side there are microphones, and below is a PIR motion sensor.
Unboxing Reolink Altas PT Ultra
Solar Panel Unboxing
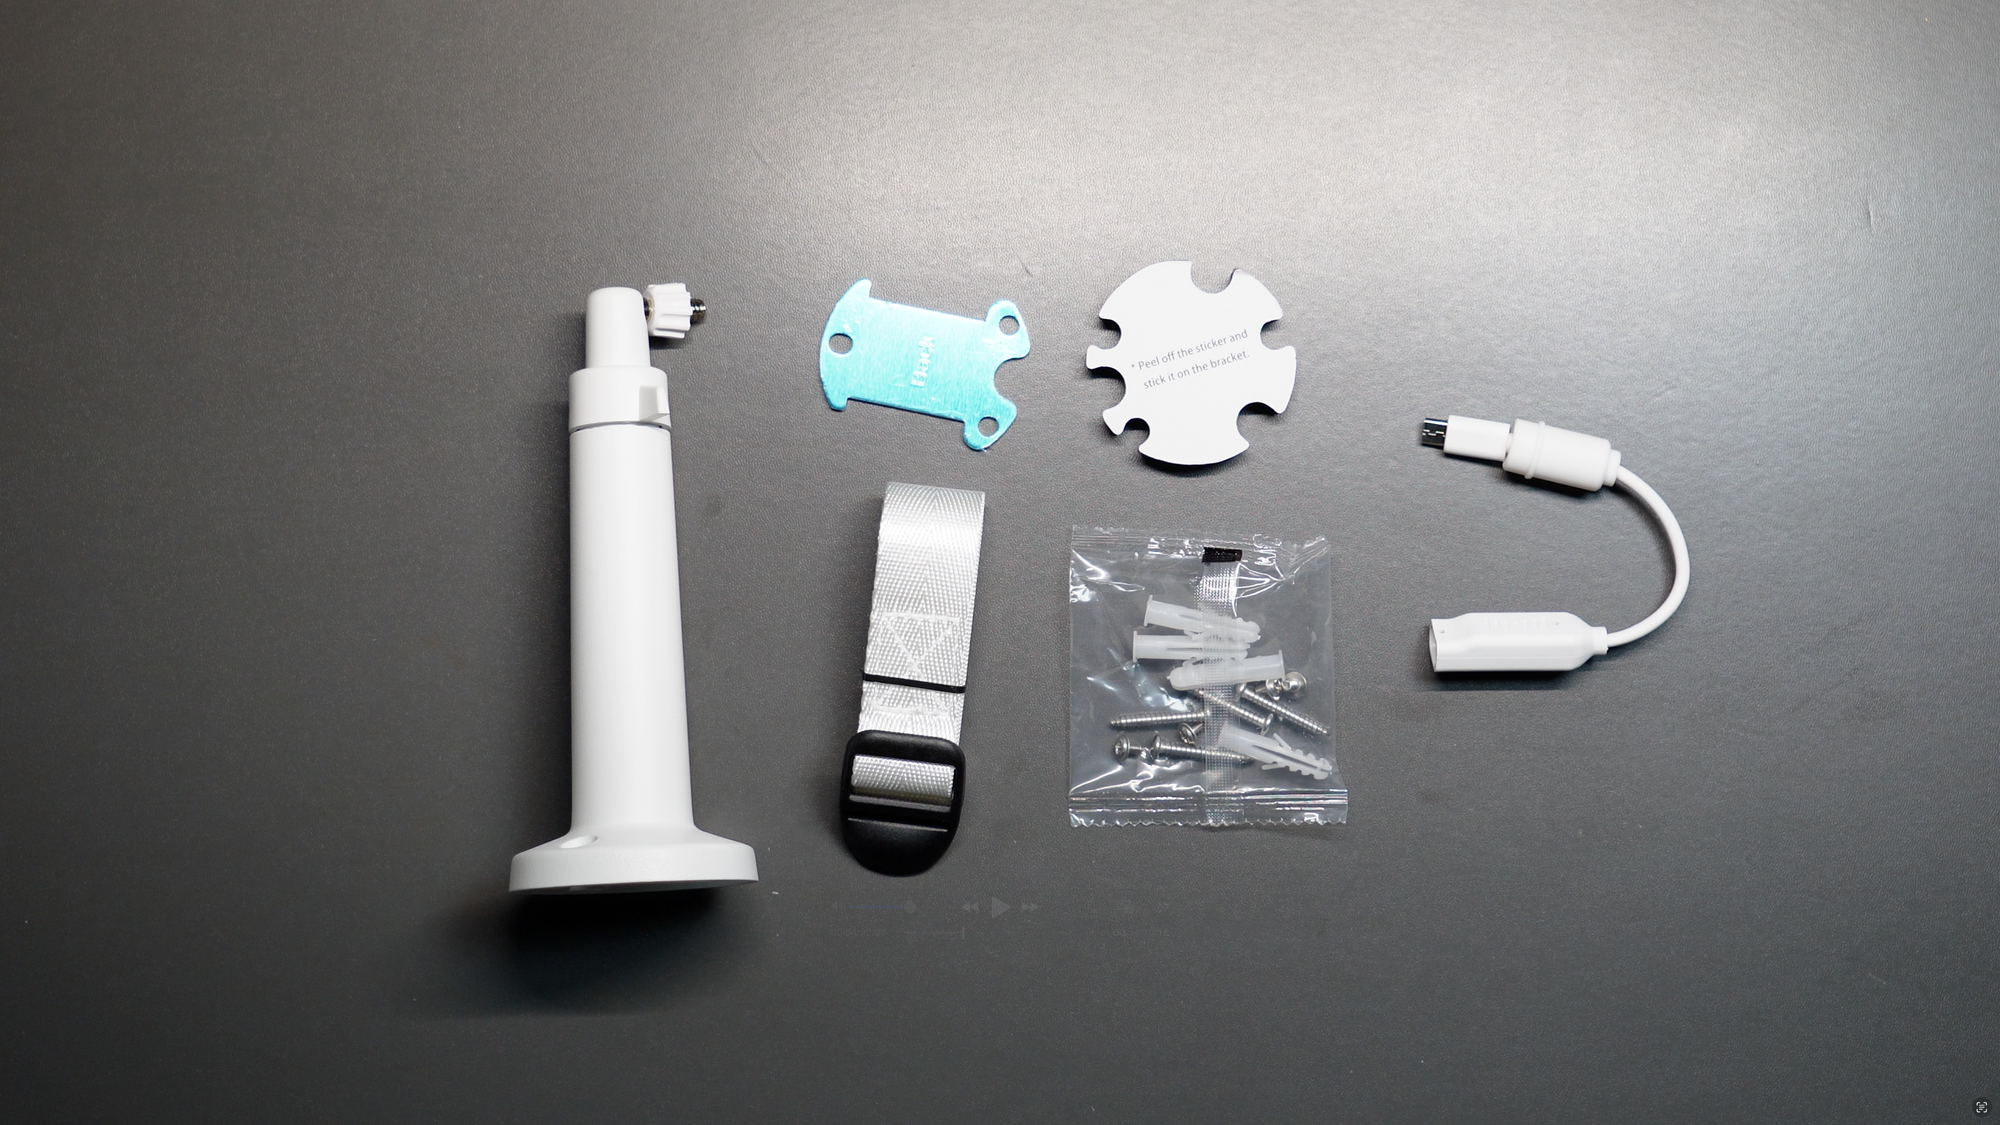
To make this device as hassle-free as possible, I highly recommend picking-up the 6W solar panel accessory, which is what will make the Altas PT Ultra run continuously depending on your settings and environment.
It connects to the camera using the included USB-C cable, and can be mounted around a tree using the provided strap and bracket, or directly to a wall using the included mounting pole and hardware.
It also came with a USB-C to micro-USB extension, which confused me at first since the Altas PT Ultra does not use micro-USB as far as I can tell. I assume that’s because this solar panel is compatible with other Reolink cameras that do utilize micro-USB.
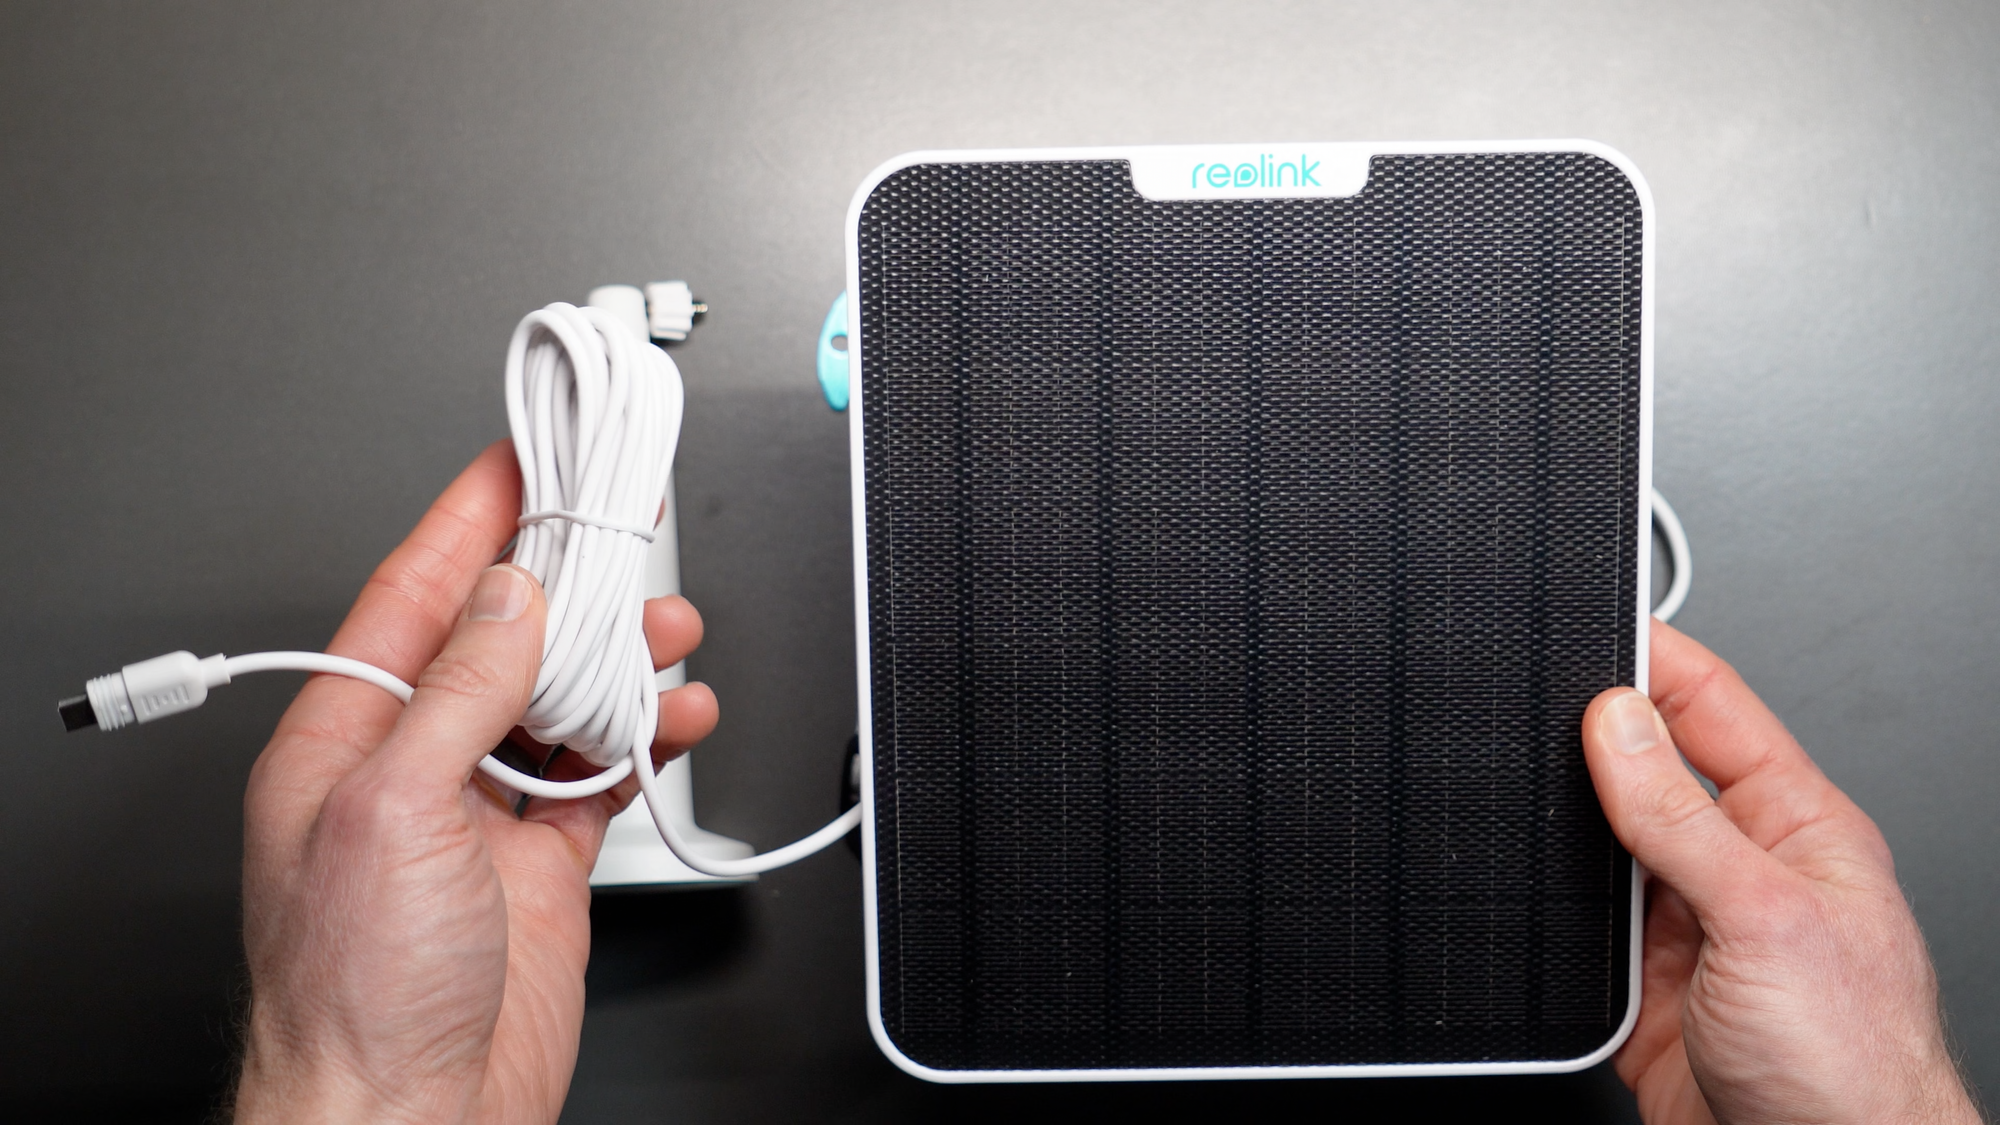
Unboxing Reolink Altas PT Ultra solar panel
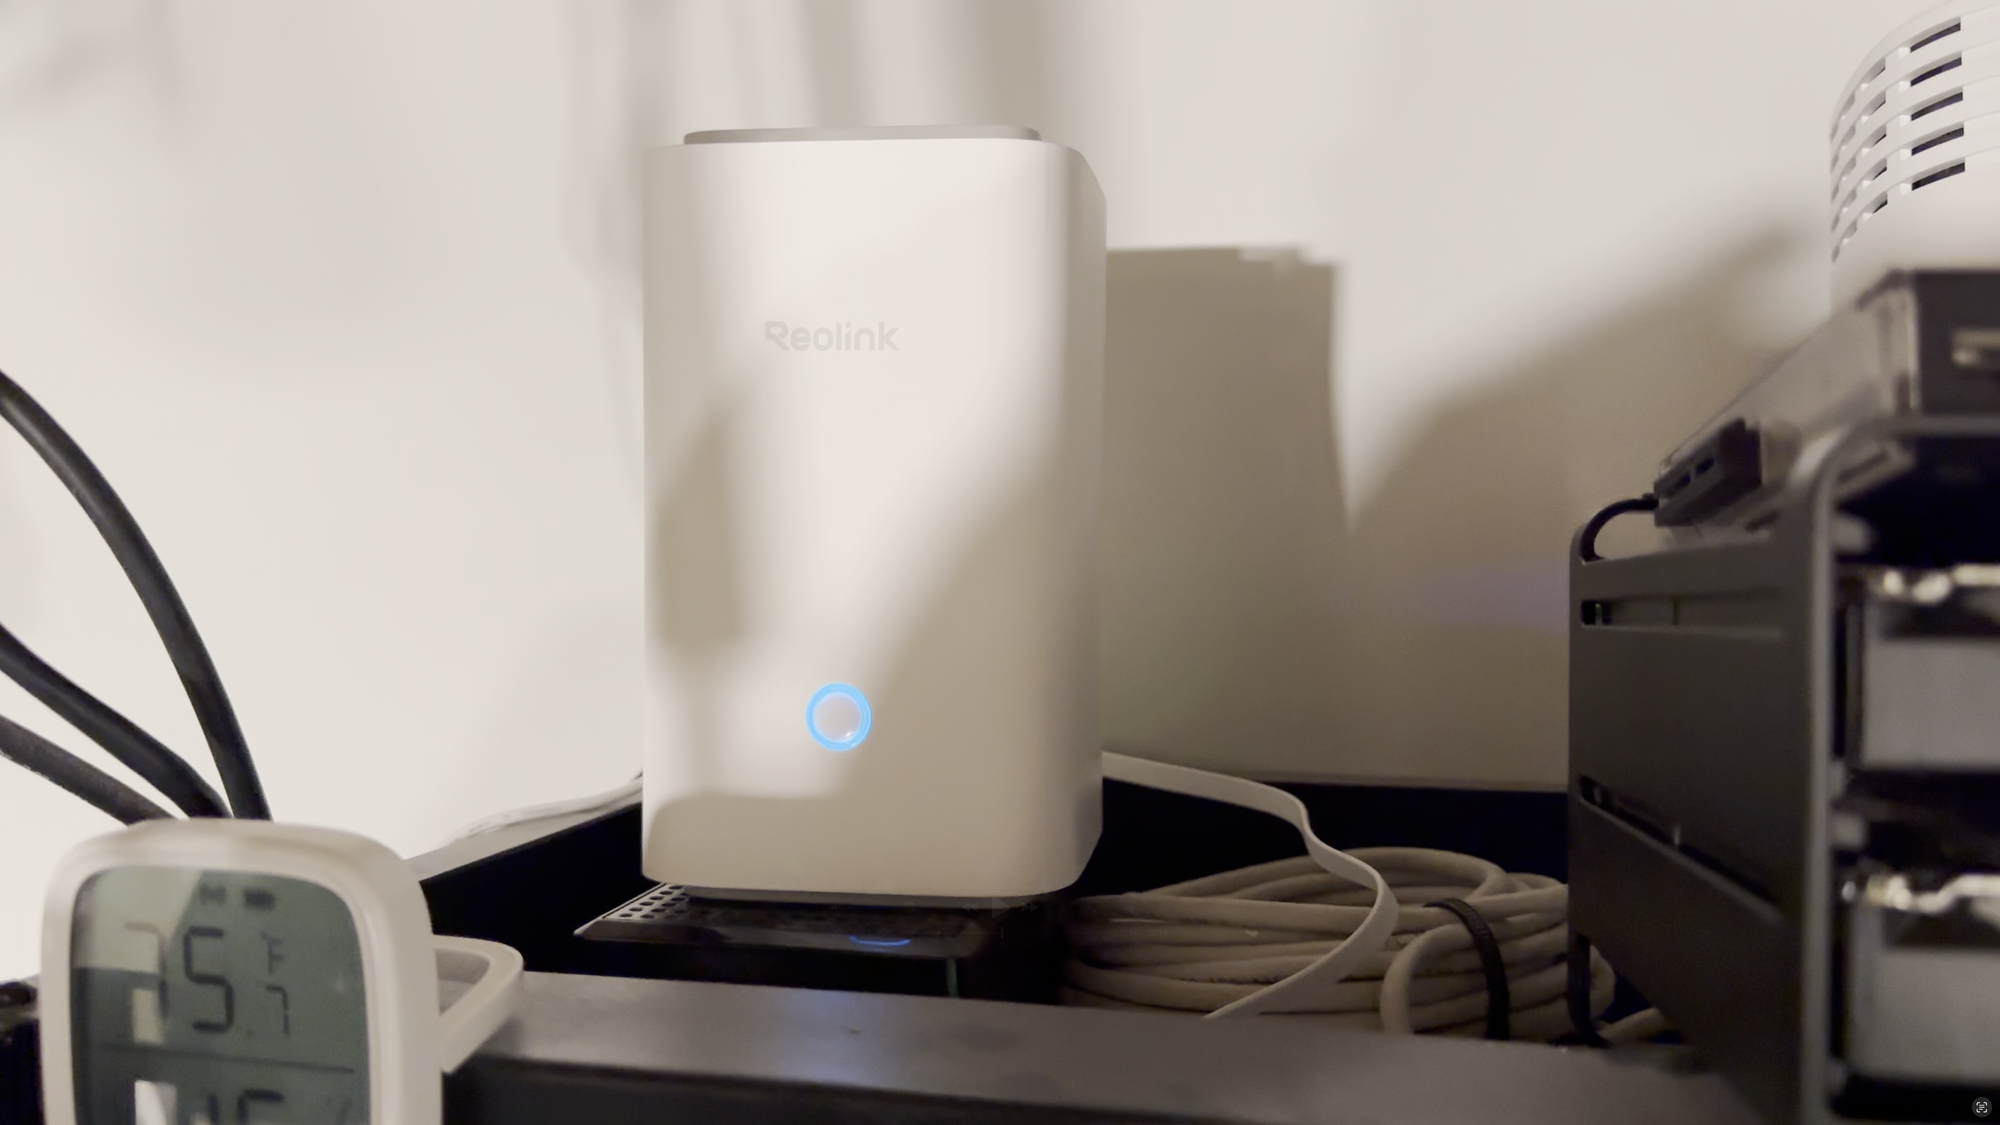
Home Hub Unboxing
You could set-up the camera as a standalone device, or you could choose to pair it with the optional Reolink Home Hub. Instead of recording security footage to each camera with separate microSD cards, you can wirelessly connect up to eight Reolink cameras to one Home Hub. This centralizes storage of your recordings, and supports up to two 512GB microSD cards. Most importantly, there are no monthly fees to use this device or to access your recordings.
The Home Hub supports offline, local recording, so no cloud access is required. Your videos recordings are encrypted to protect your data. The Home Hub creates a local LAN network using WiFi 6 for dual-band 2.4GHz and 5GHz coverage, or you can connect cameras directly to one of your home’s existing WiFi networks.
The Home Hub comes with a barrel-jack power cord, ethernet cable, and a tiny pin if you need to reset the device.
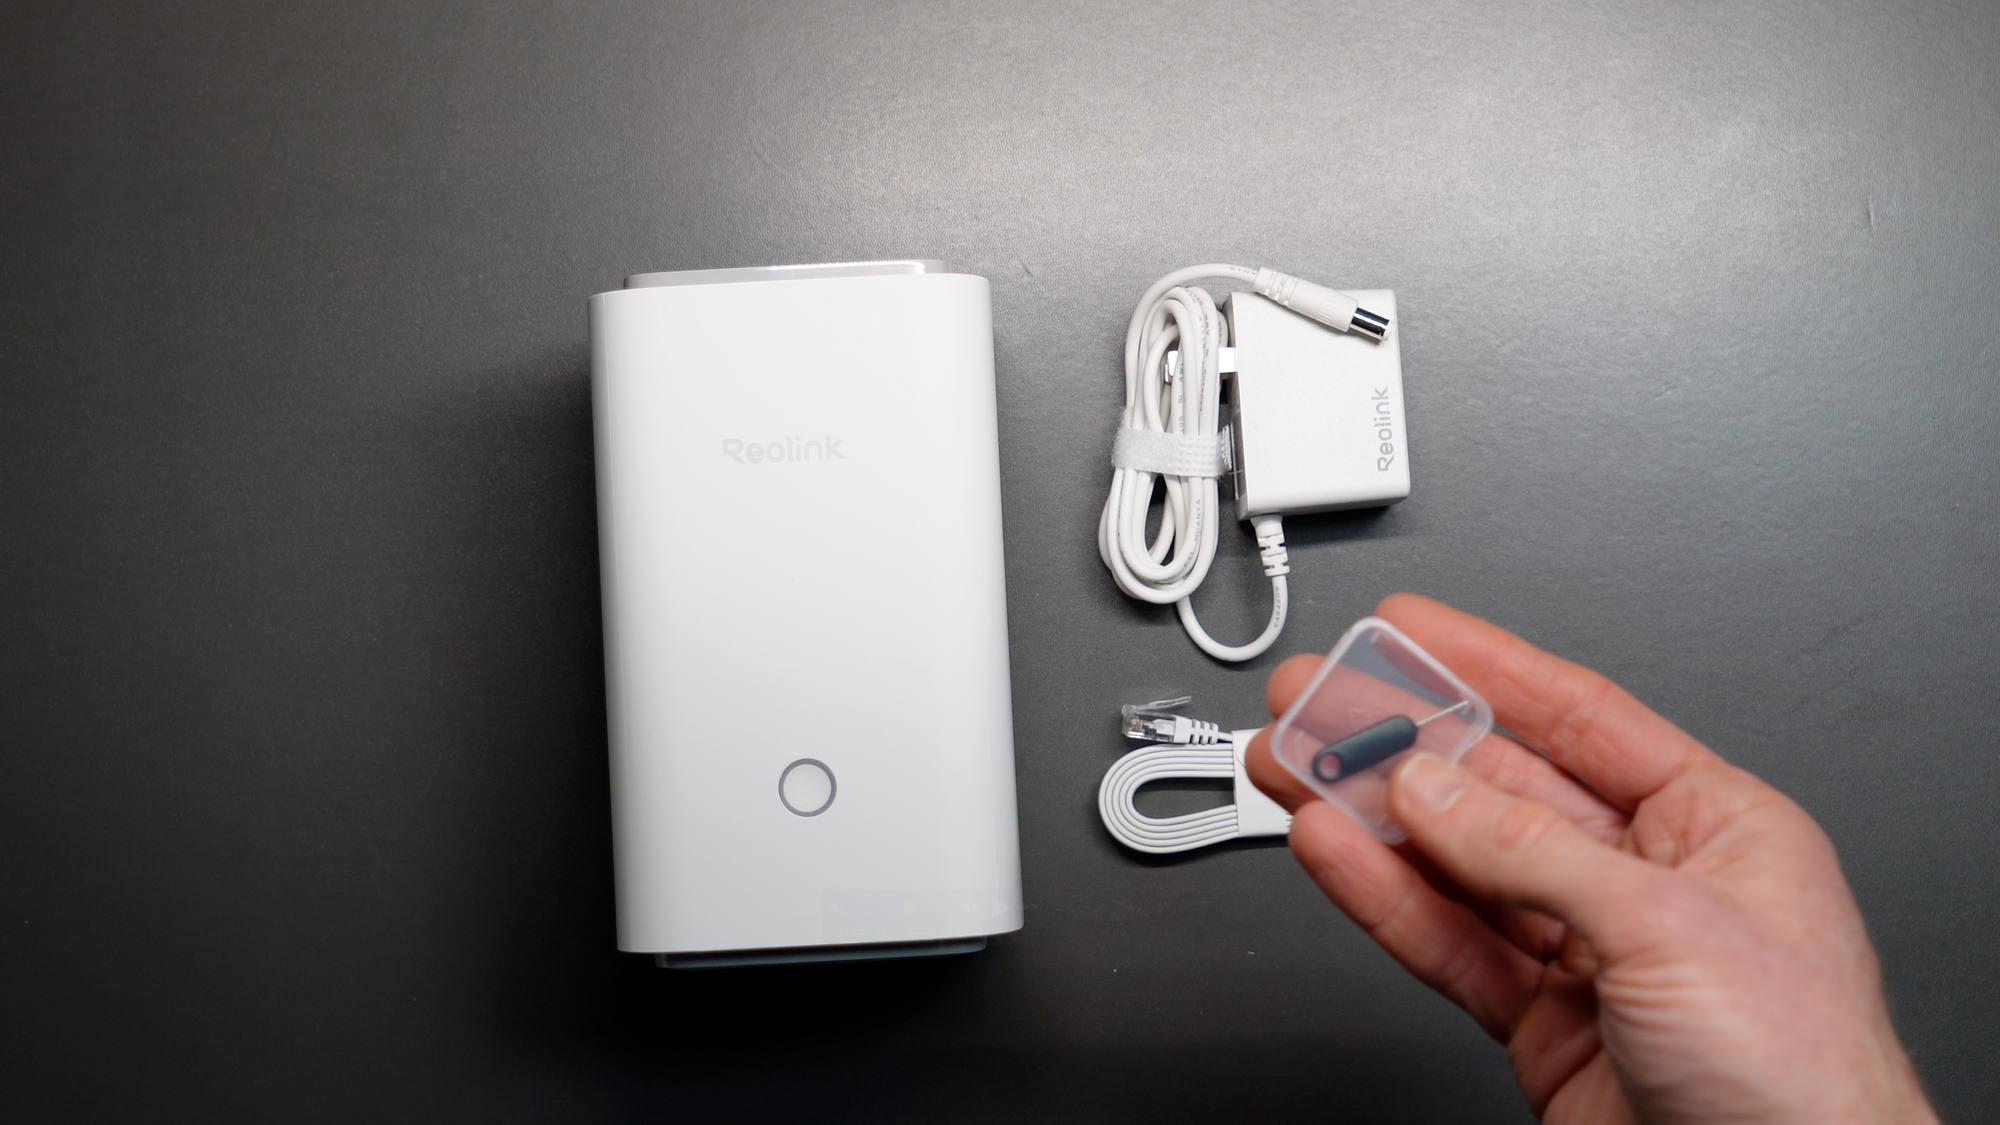
Unboxing Reolink Home Hub
Home Hub Setup
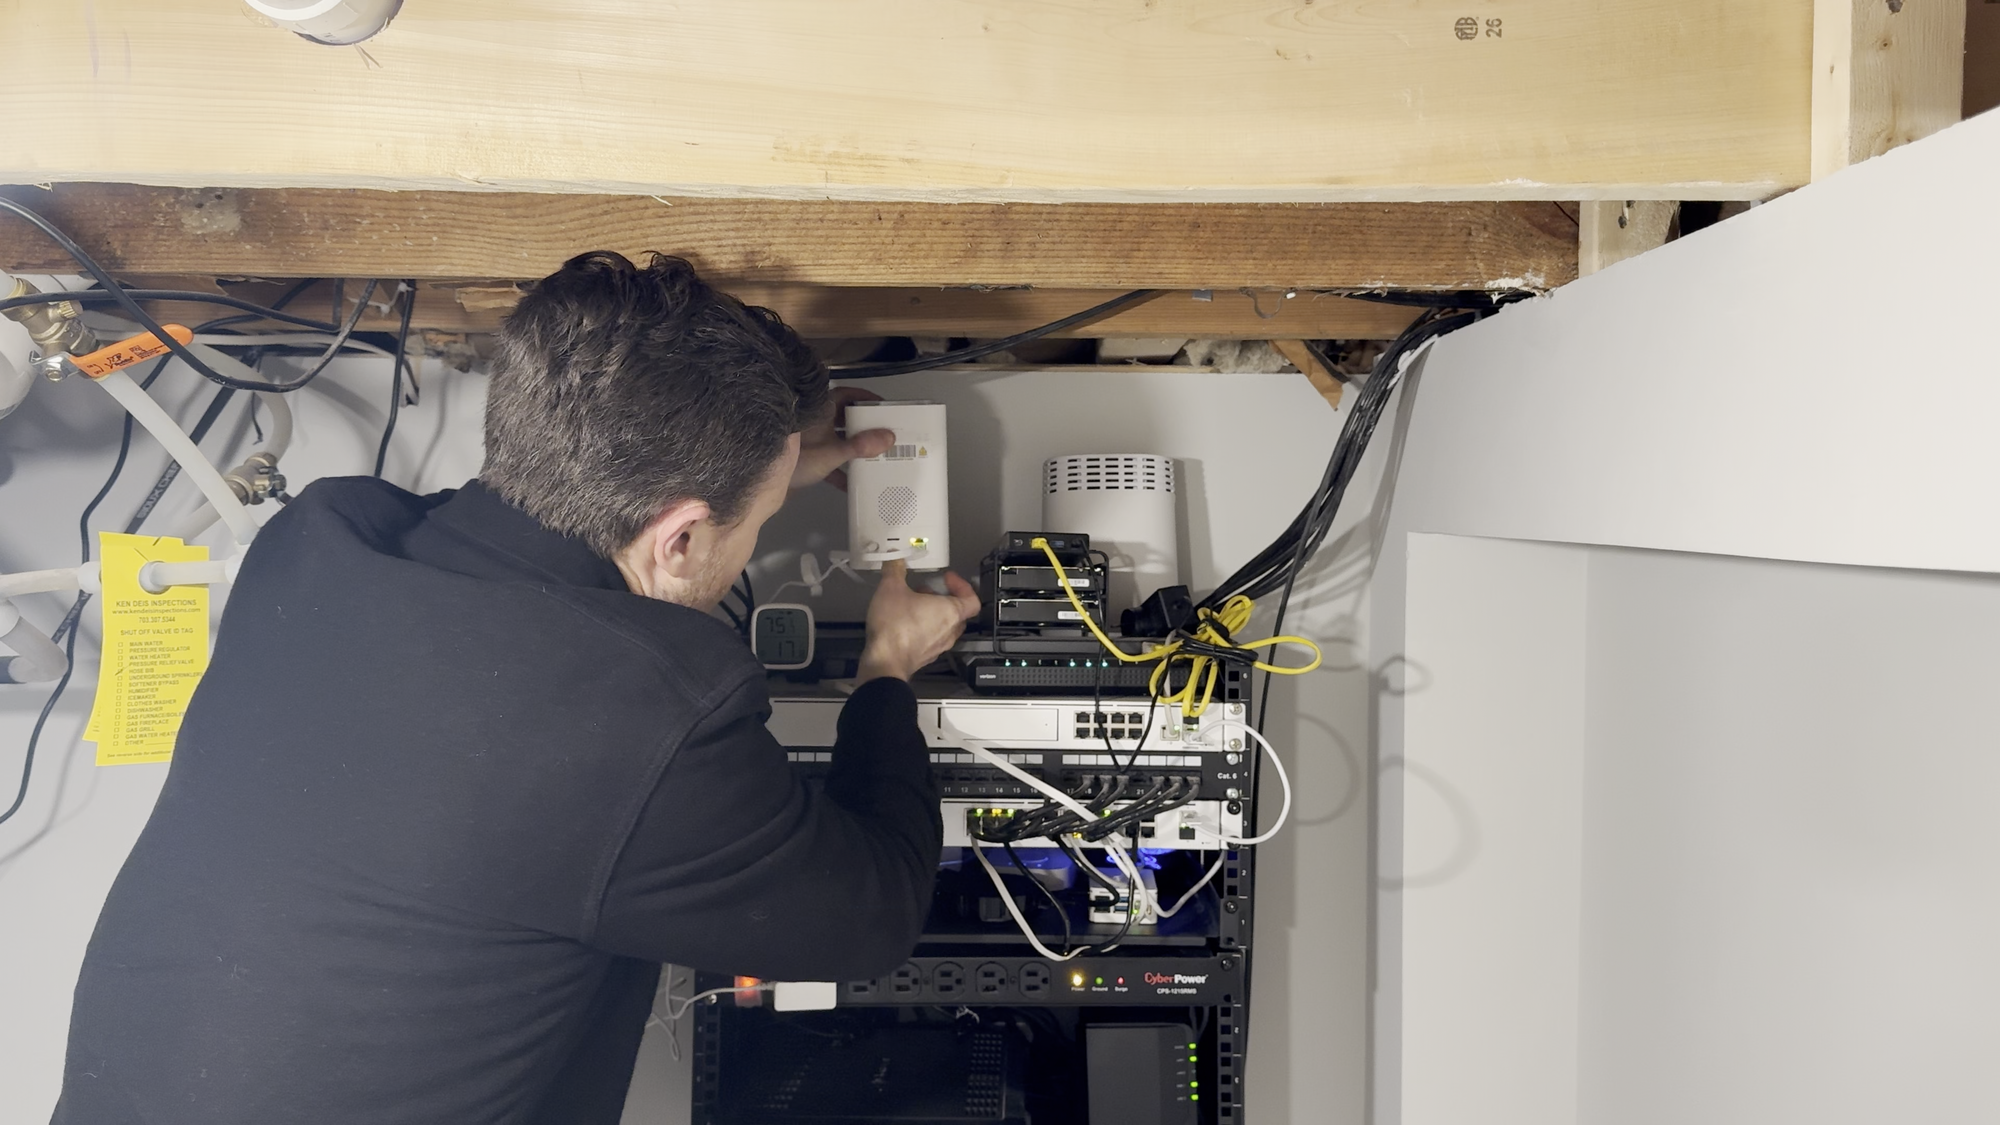
I chose to setup my Altas PT Ultra using the Home Hub. To do this, plug in the Home Hub power cable, and then plug the Home Hub into an available ethernet port on your router. Next, insert the microSD card you will use for saving local recordings. I’m using a 128GB microSD card.
At this point, the Home Hub had a flashing red light, but I needed a solid blue light for a stable connection. This required formatting the microSD card in the Home Hub using the Reolink app, which I’ll come back to.
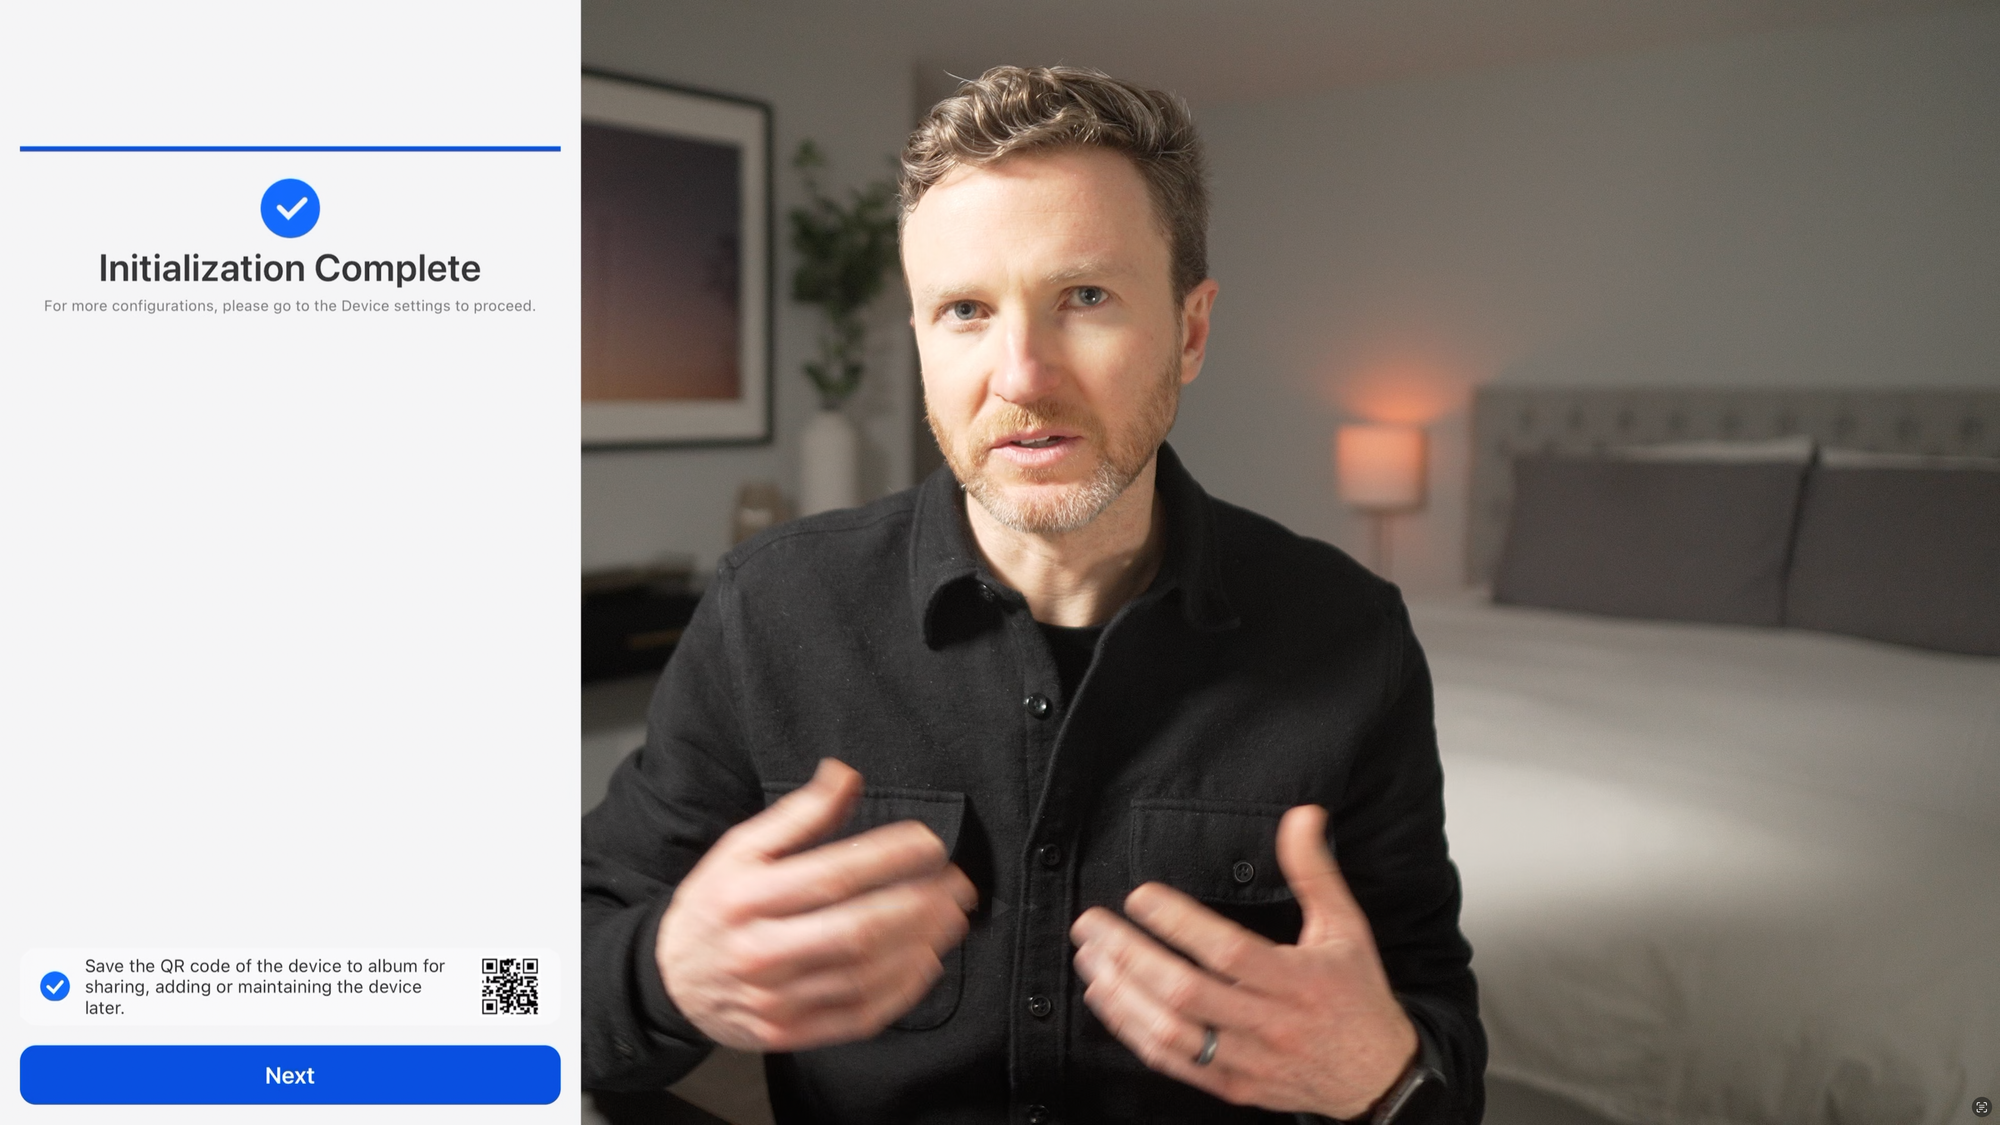
If it’s your first time using the Reolink app, it should auto-discover your Home Hub. Click to initialize the device, and then it’ll ask you to create an admin password. If it prompts you for an update, go ahead and do that before proceeding. This may take several minutes. Once complete, you can give the Home Hub a name, and initialization will be complete.
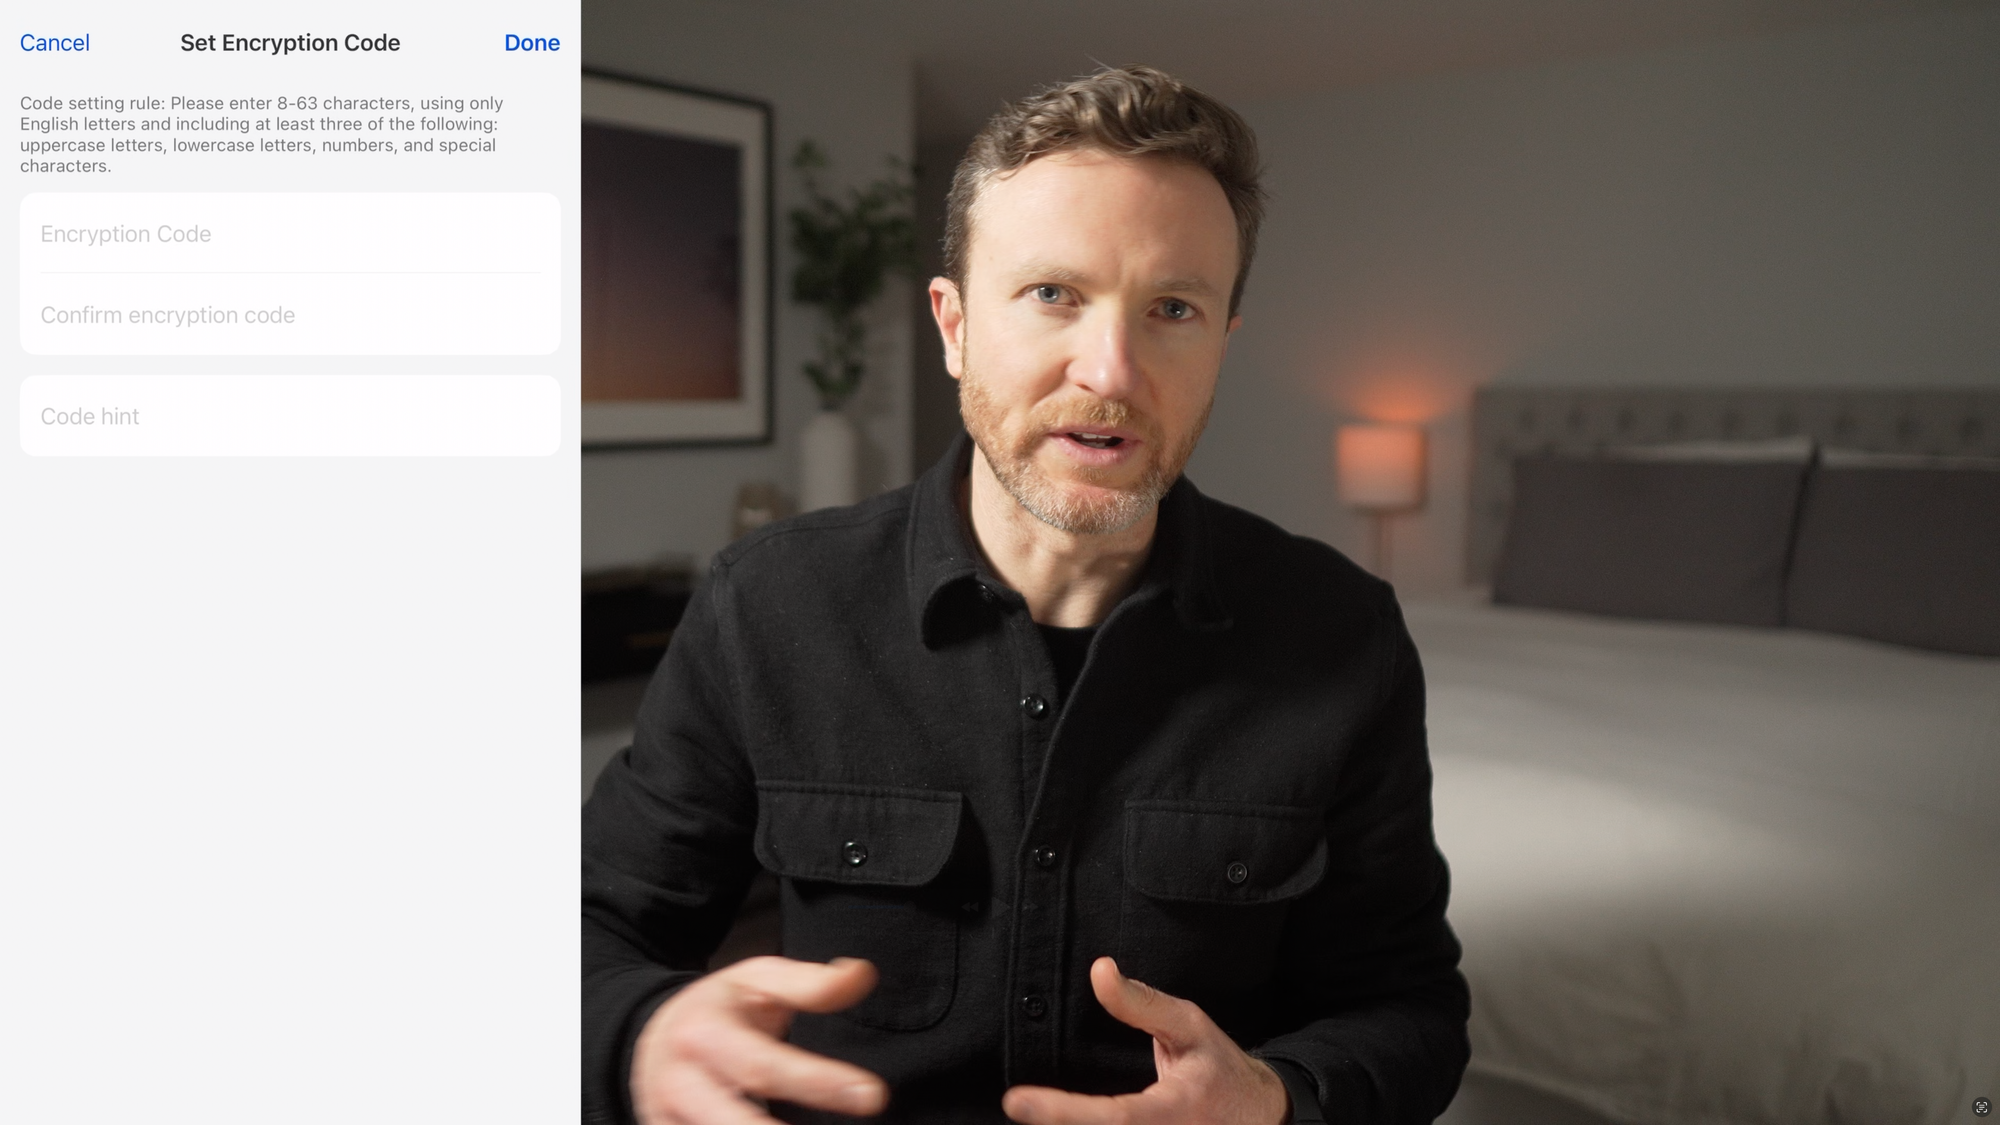
You will then have the option to set an encryption code to protect your video recording data, which is a good idea. From the Home Hub in the Reolink app, you can adjust alarm and alert settings, among others.
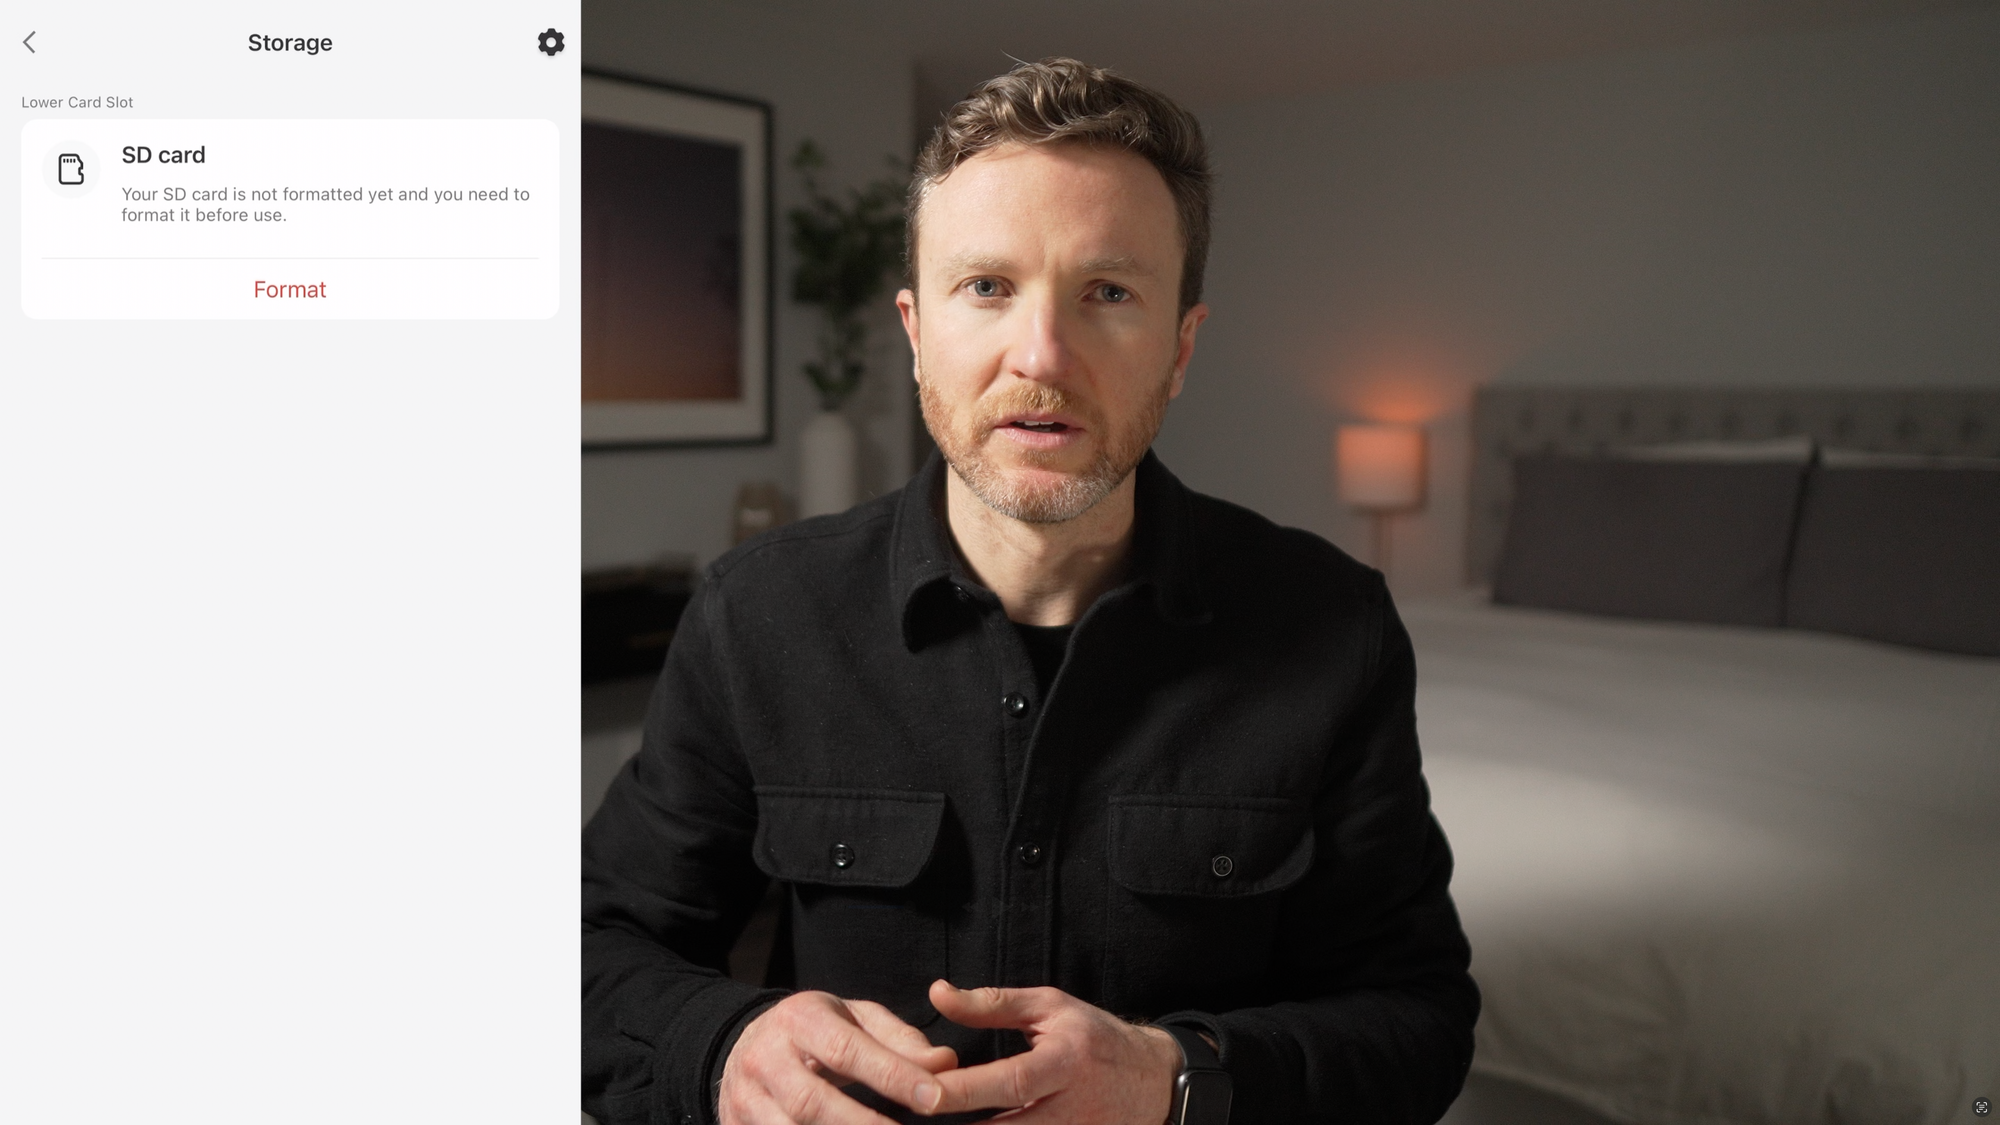
But remember I needed to get a solid blue light on the Home Hub itself, and to do this you’ll need to format the microSD card. This will erase anything already saved to the card. If it’s a new card, this shouldn’t be an issue.
From the Home Hub in the Reolink app, click Settings > Storage > Format under SD Card > Confirm. Once complete, it should show the available space on the card, you’ll have the option to control how older recordings should be handled, and the light on Home Hub should be blue if everything is working as expected.

Setting up the Reolink Home Hub
Camera Setup
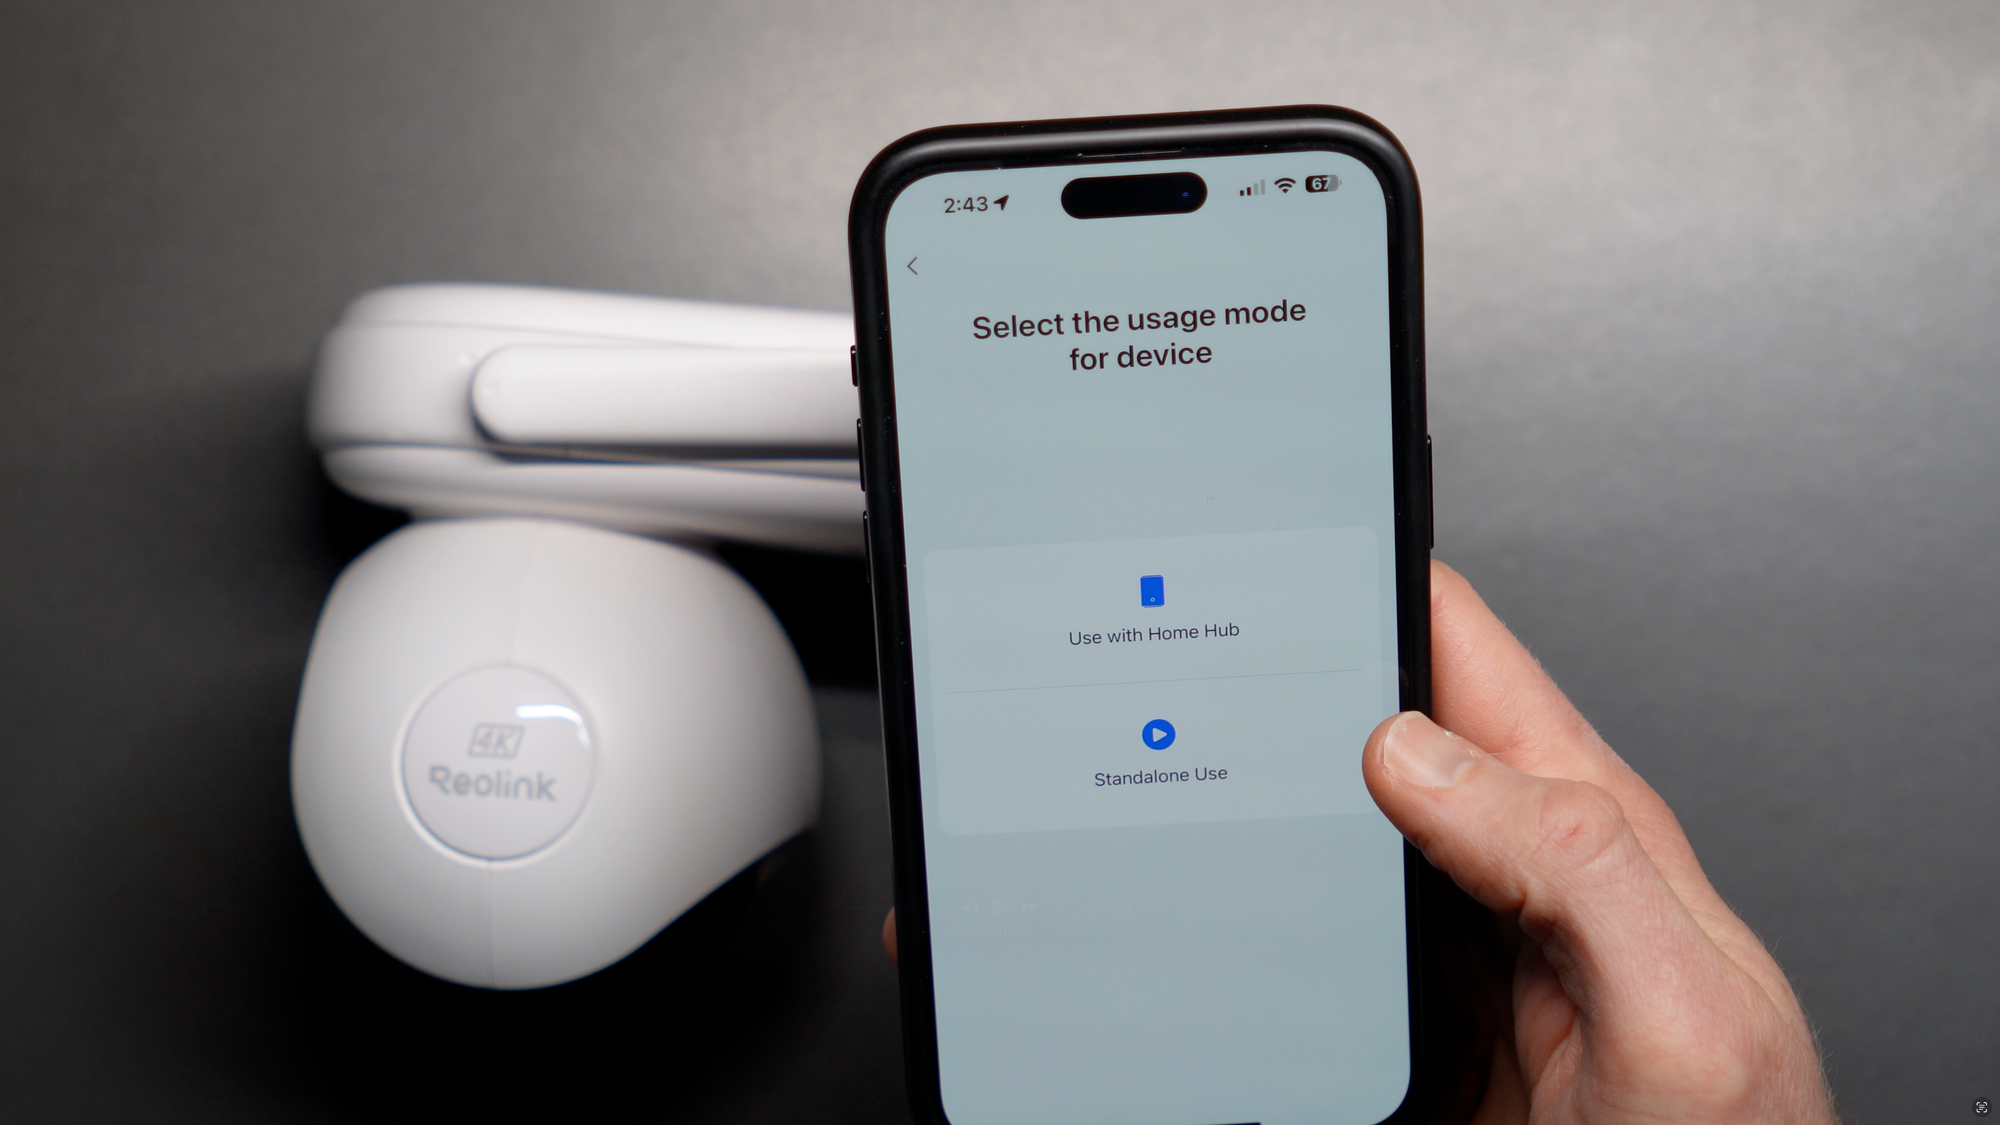
Now you can setup the Altas PT Ultra camera with the Home Hub. From the Reolink app, click the plus icon in the upper right, and then scan the QR code printed on the back of the camera mount.
You can choose to use as a standalone device, but I chose to use it with the Home Hub since that’s where I wanted the camera recordings to be saved and encrypted.
For simplicity, I chose to set up the camera on the same LAN, meaning my phone and the camera would be connected to the same Default or Main LAN on my home network.
I then powered on the camera by pressing the power button under the white rubber cover with the USB-C port. I heard a voice prompt when it turned on, and proceeded to the next step without resetting the device. It then gave me the option to connect to either the 5GHz or 2.4GHz network created by the Home Hub. While I first connected to the Reolink 2.4GHz network, I found the connection slow at times, and ended up switching to my home’s 5GHz WiFi network. You can experiment to see what works best for you. After naming the device, it was ready to use, and I was then able to see the live stream from from the camera on the Reolink app.


Setting up the Reolink Altas PT Ultra
Installation
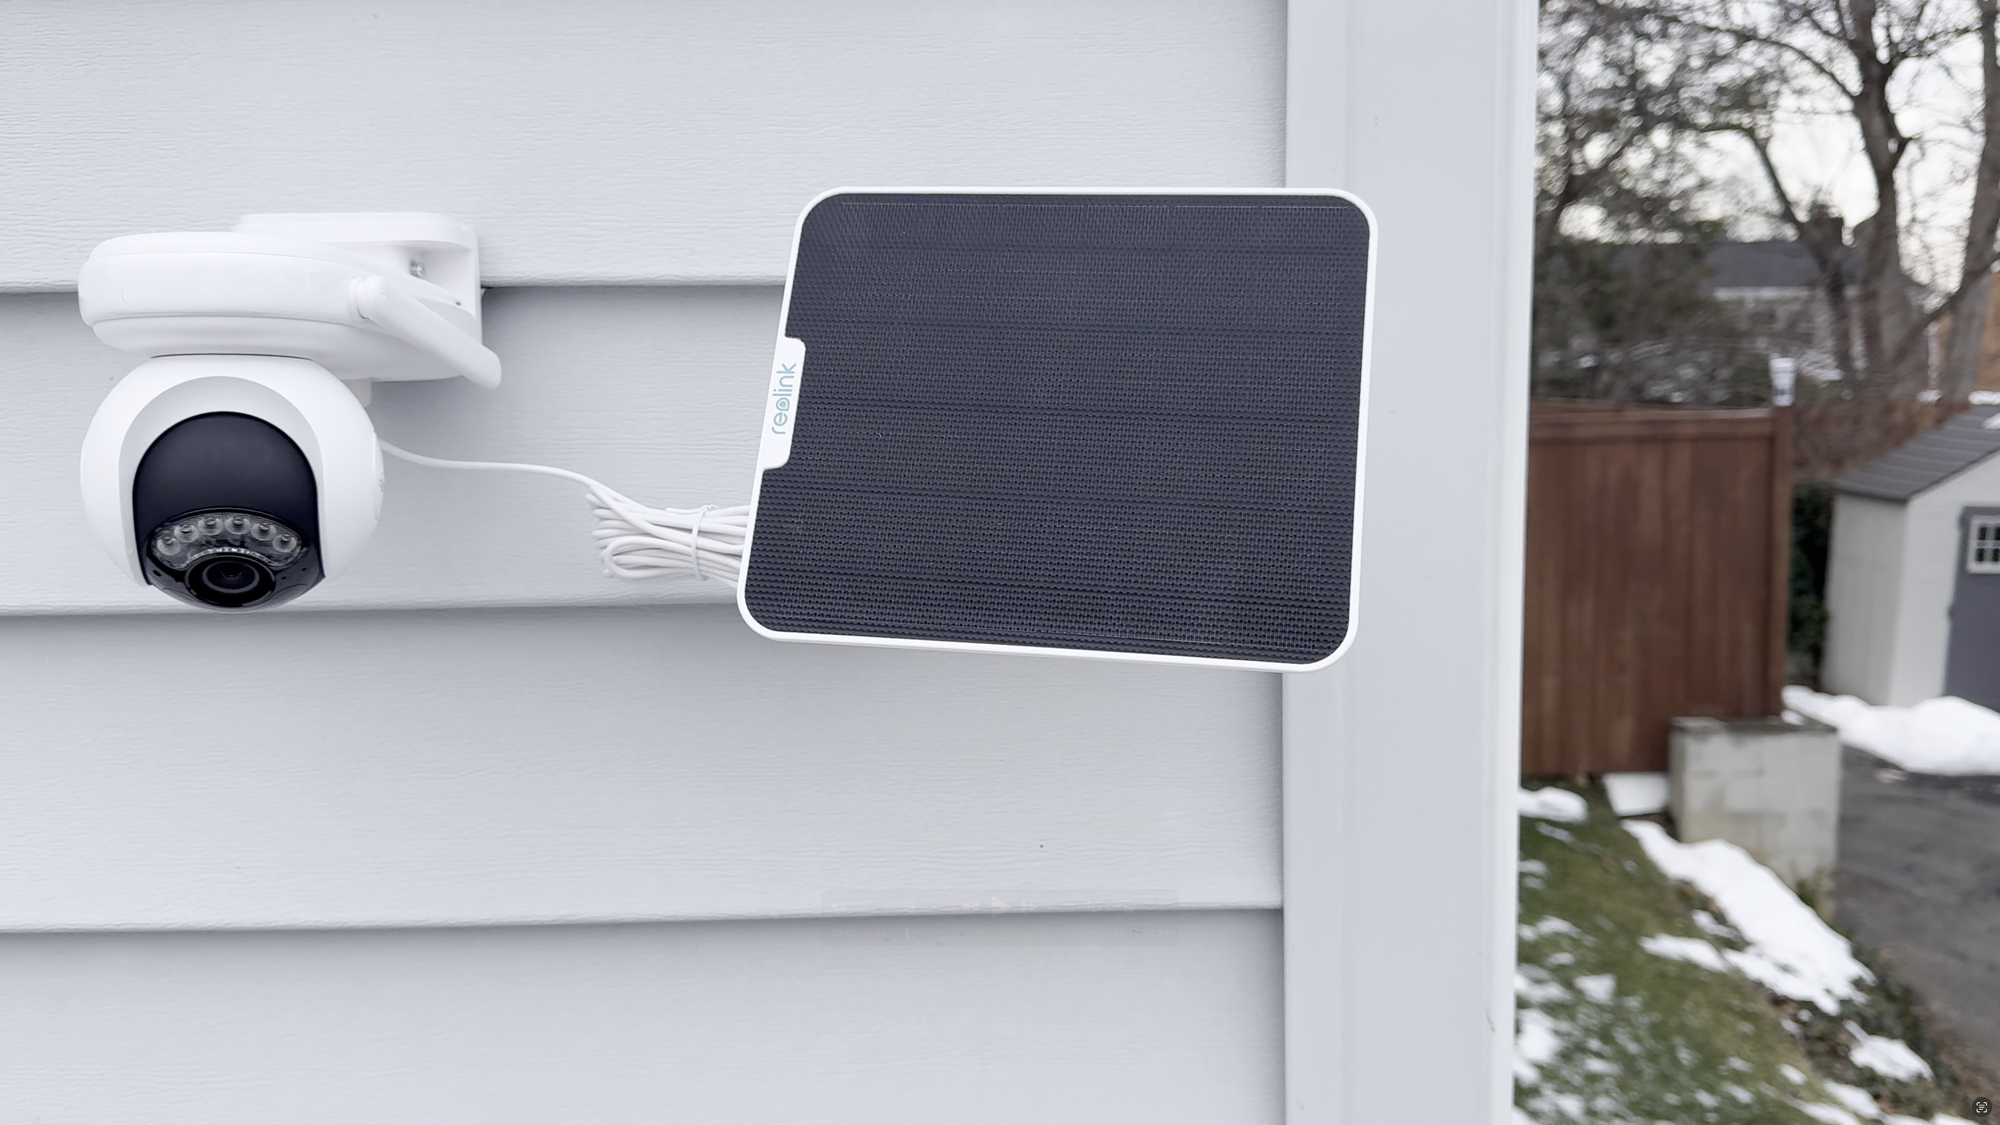
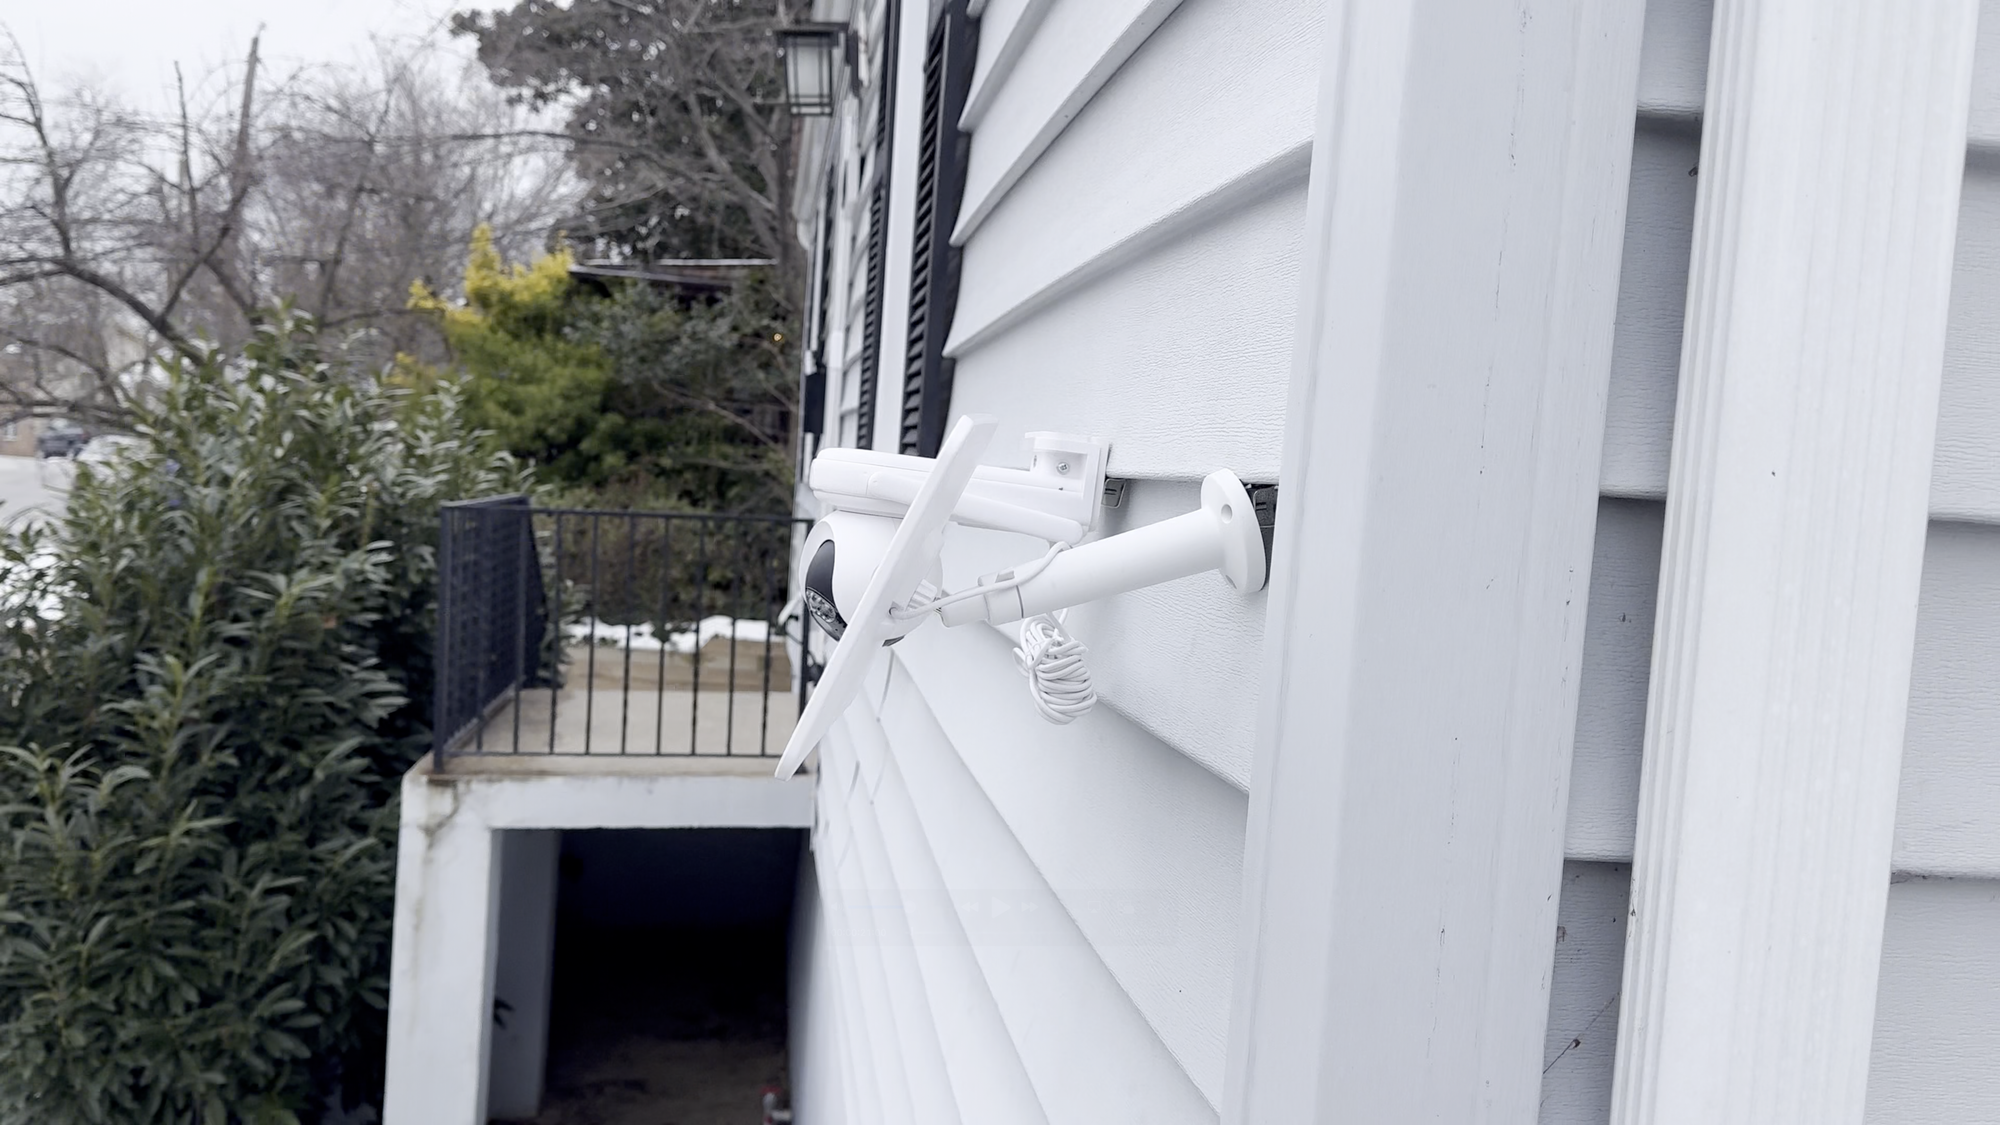
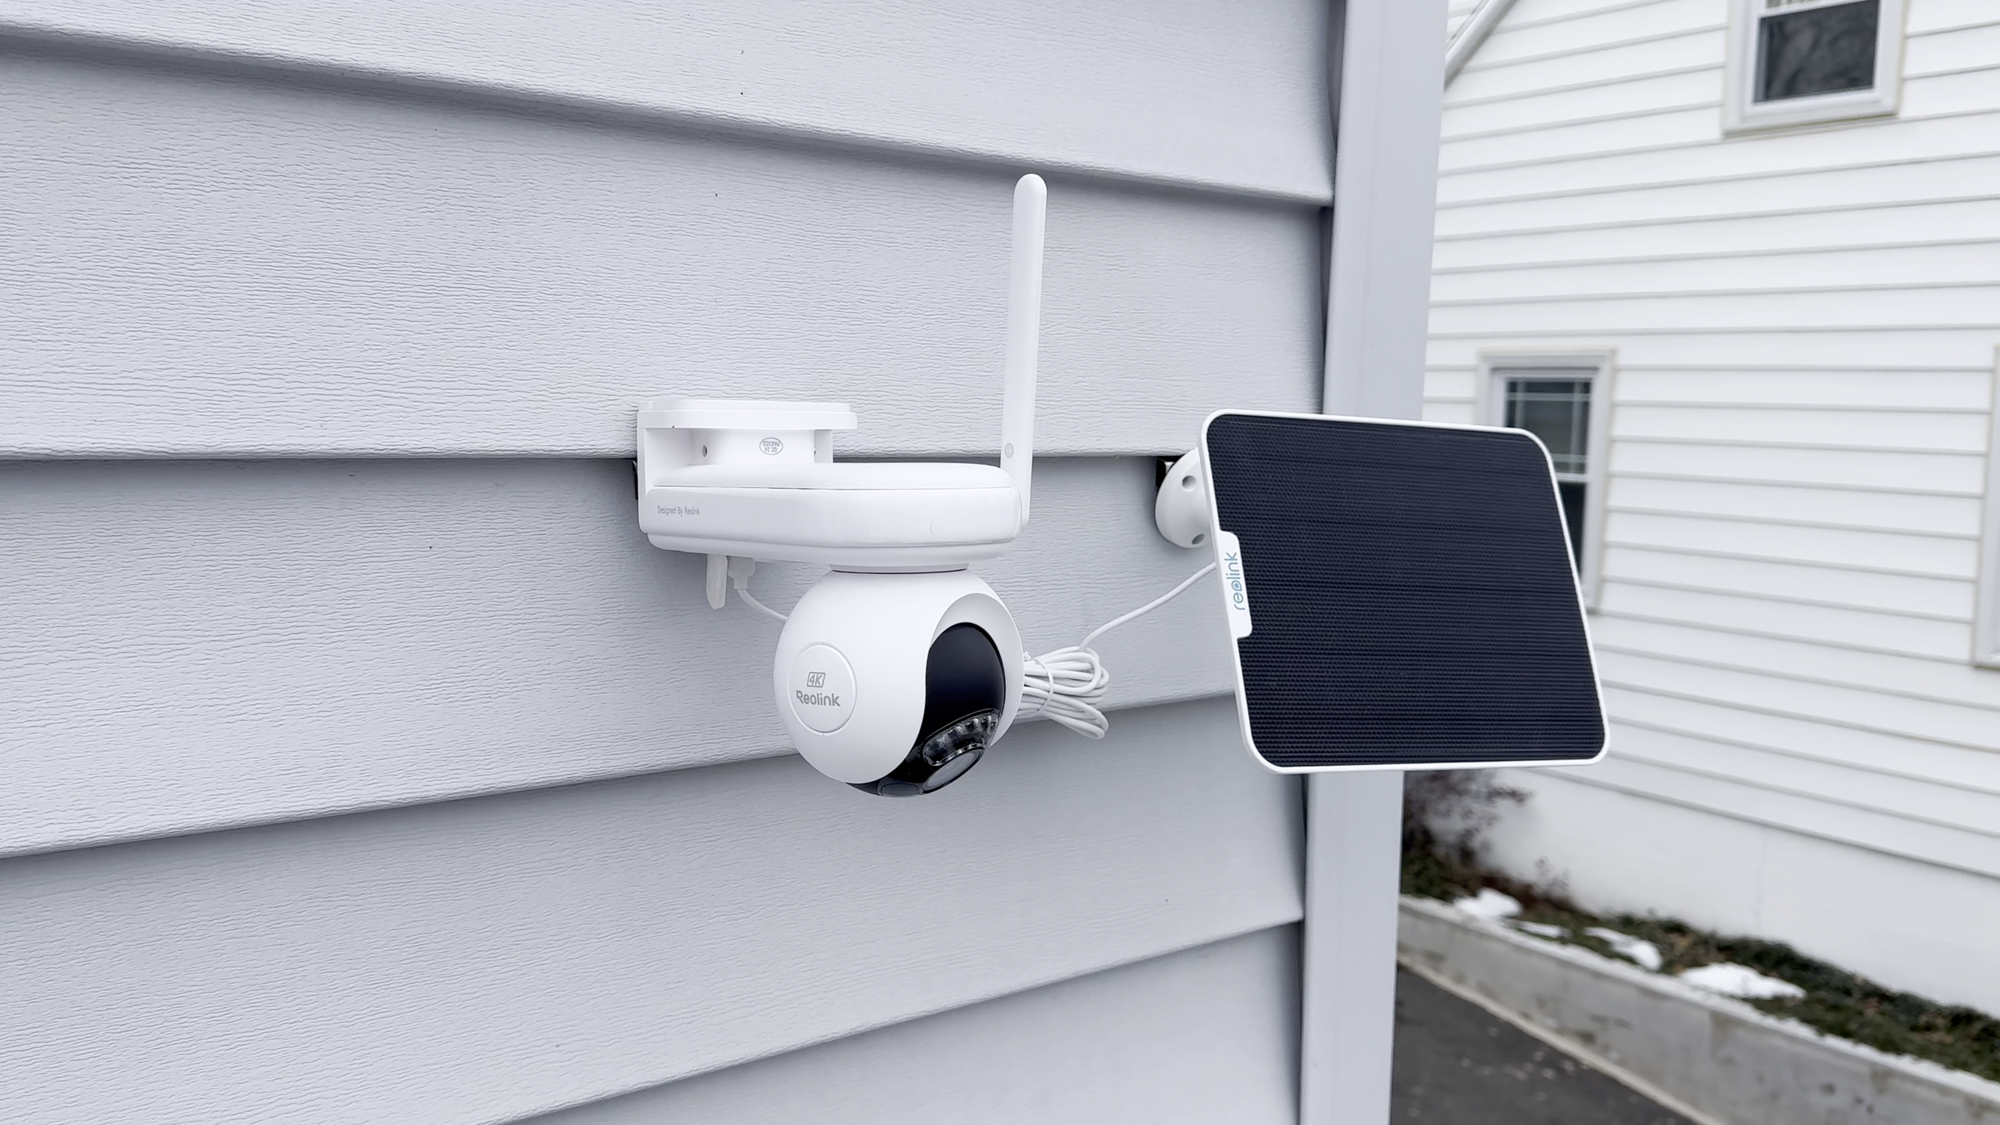
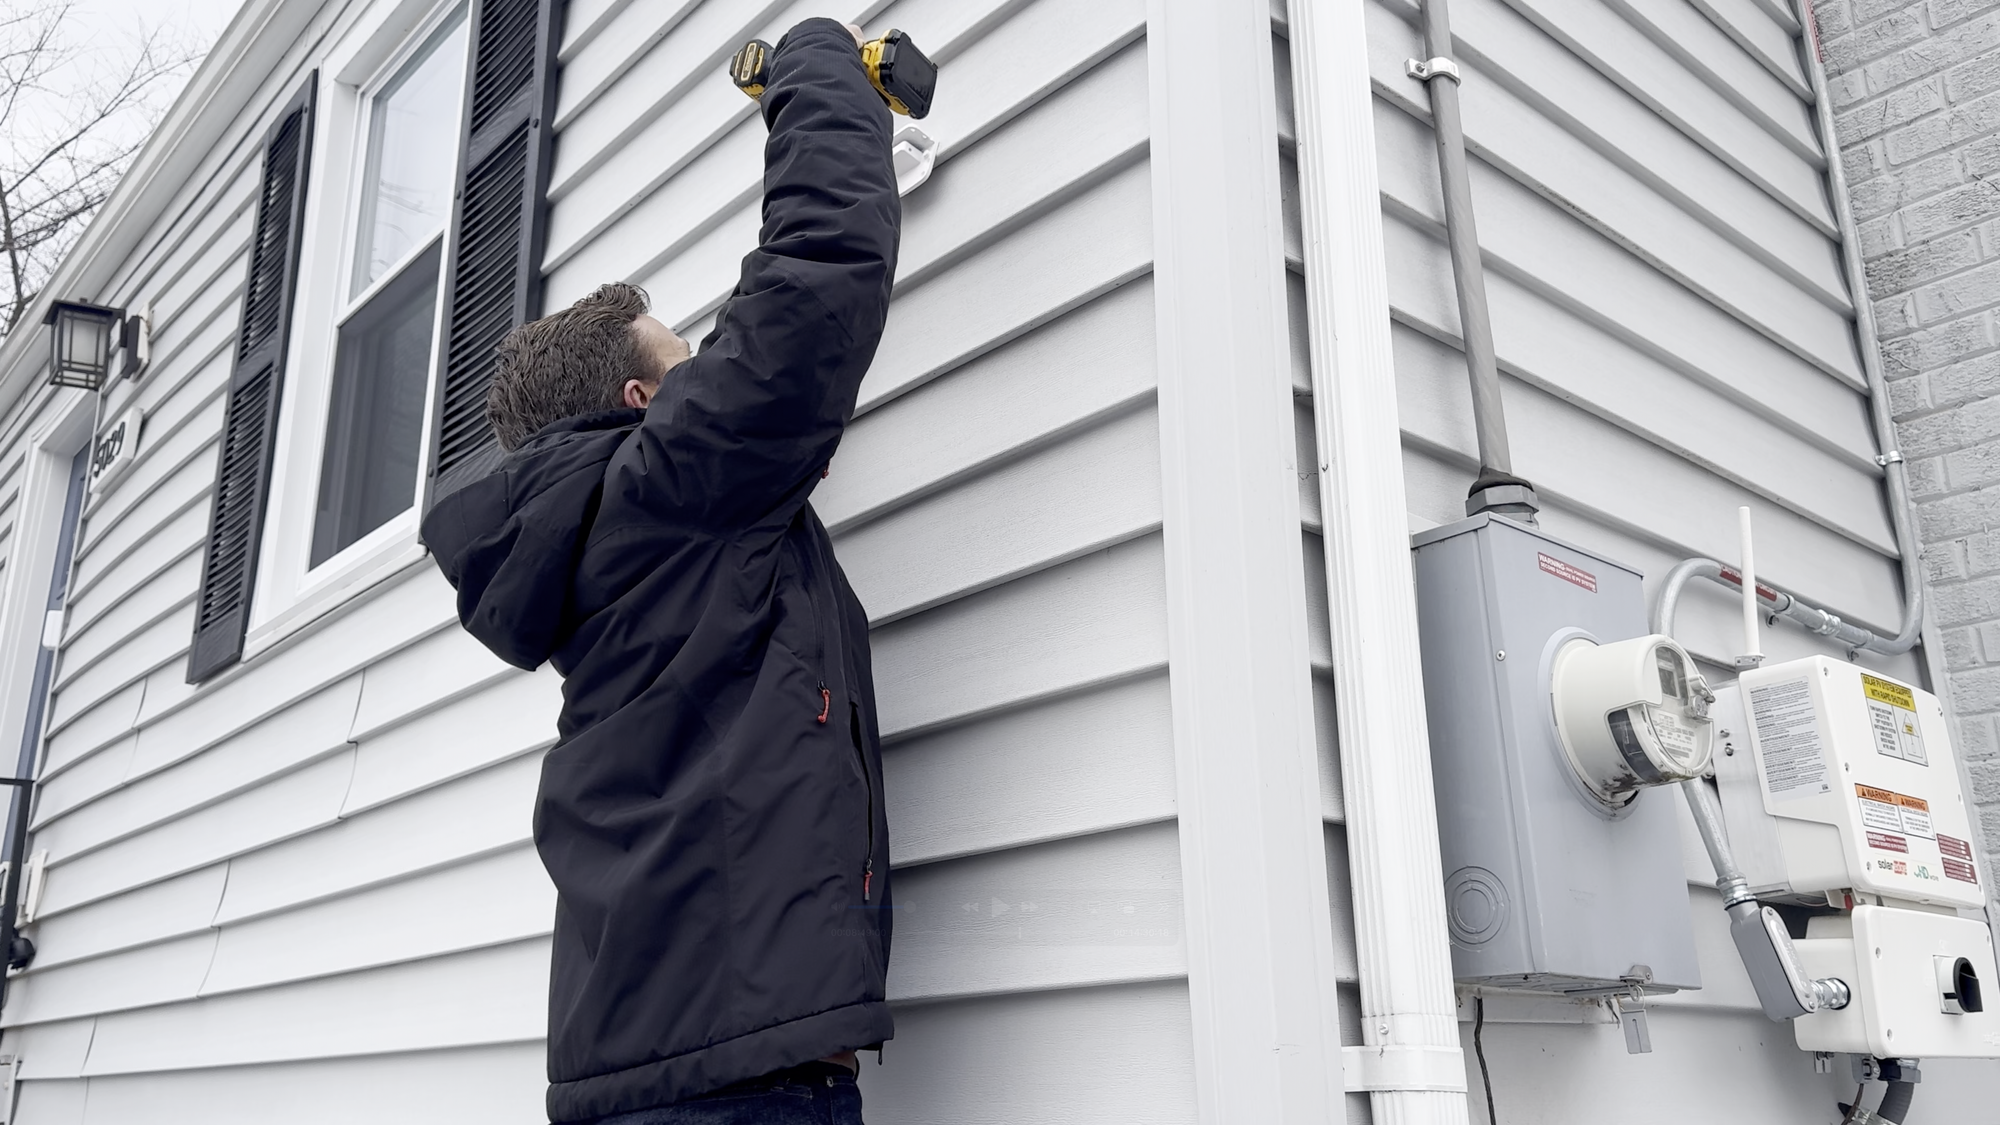
With the Home Hub and camera connected to my WiFi network, it was time to install the camera outside. I specifically chose an east-facing corner of my property that would benefit from plenty of morning sunshine to charge the camera via the solar panel.
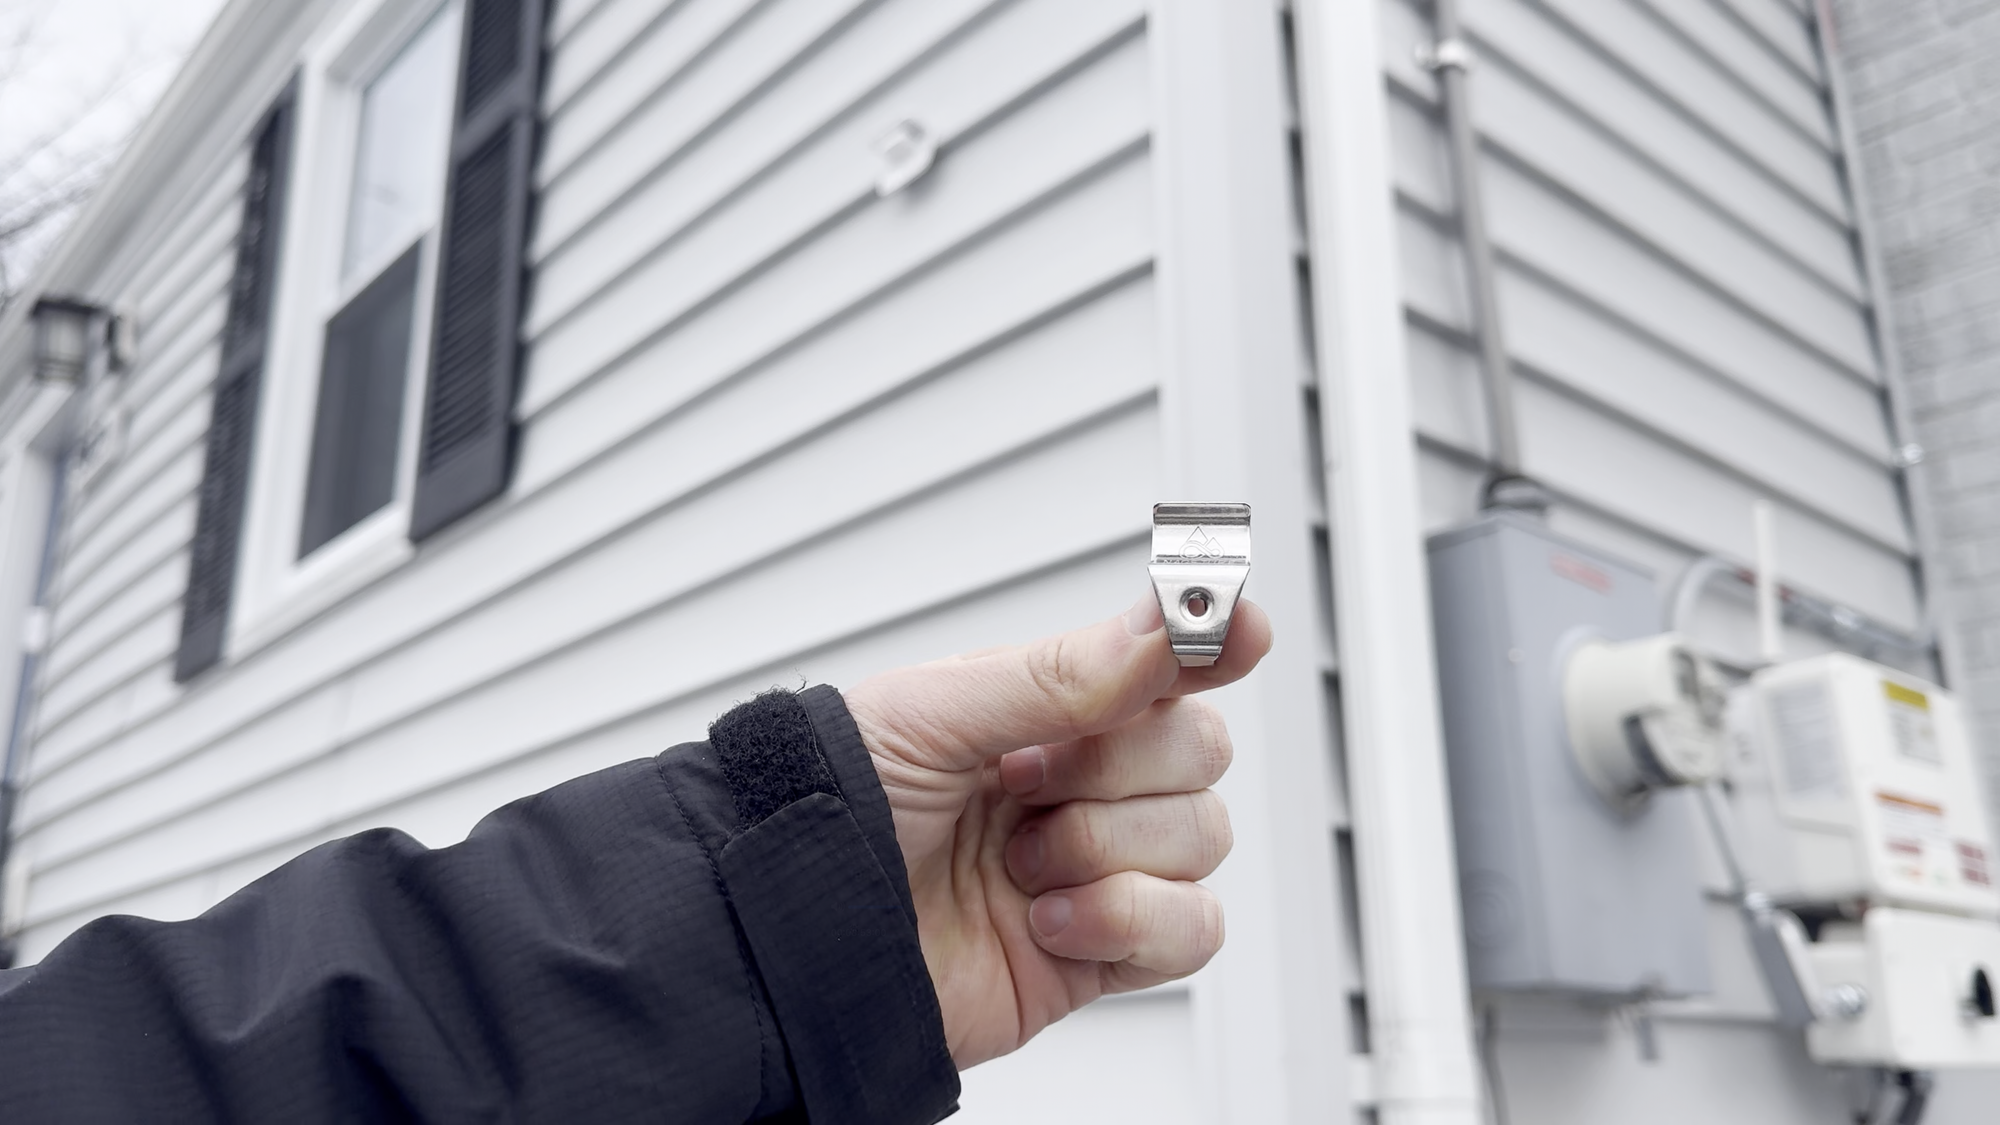
I was attaching the camera to vinyl siding, so I used these special hooks that allow me to do so without damaging the siding. I’m a big fan of these hooks. I just slide one hook between two of the siding panels, and then screwed in the camera bracket to the hook. I repeated this once more with a second vinyl siding hook. Now, the mount itself was installed.
Next, I slid the camera into the mount, and screwed it into place using the provided security screws. This was a little tricky because my ladder was short and the screw openings were recessed into the mount.
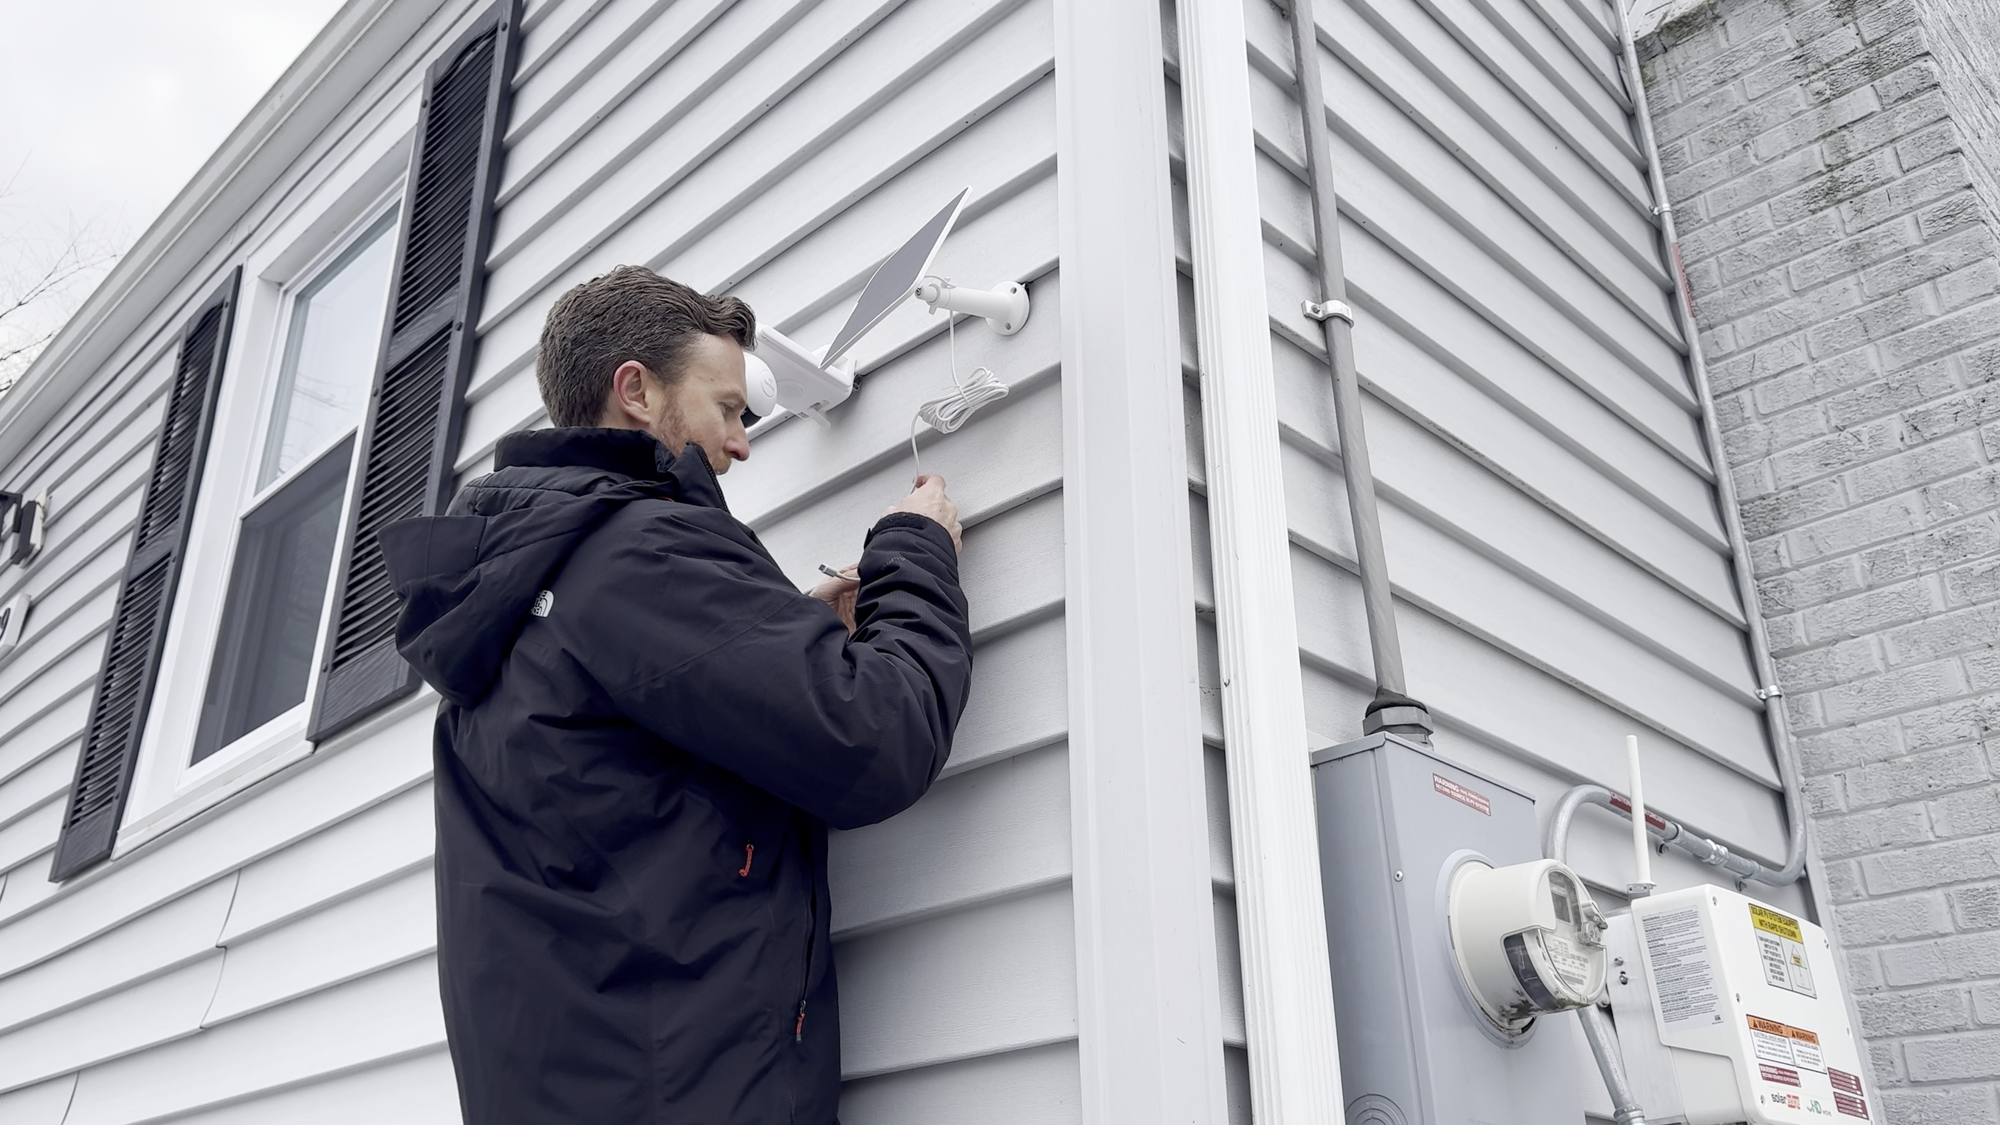
With the camera in place, I did the same steps once again for the solar panel mounting bracket, and then screwed the solar panel into place on the mount. I assumed I had to use the USB-C to micro-USB adapter that came with the solar panel, but couldn’t get it to plug into the camera, only to remember that it was a USB-C port. So, I removed the adapter, and it connected easily.
Now, the camera, solar panel, and Home Hub were all fully setup and installed.
Installing the Reolink Altas PT Ultra and solar panel
Home Assistant Integration
Reolink devices are auto-discovered by Home Assistant, even without any prior Reolink devices installed. From the Devices & services page, I clicked Add > entered the password I created earlier for the Home Hub admin account > Submit > assigned the camera and Home Hub to rooms > Finish.
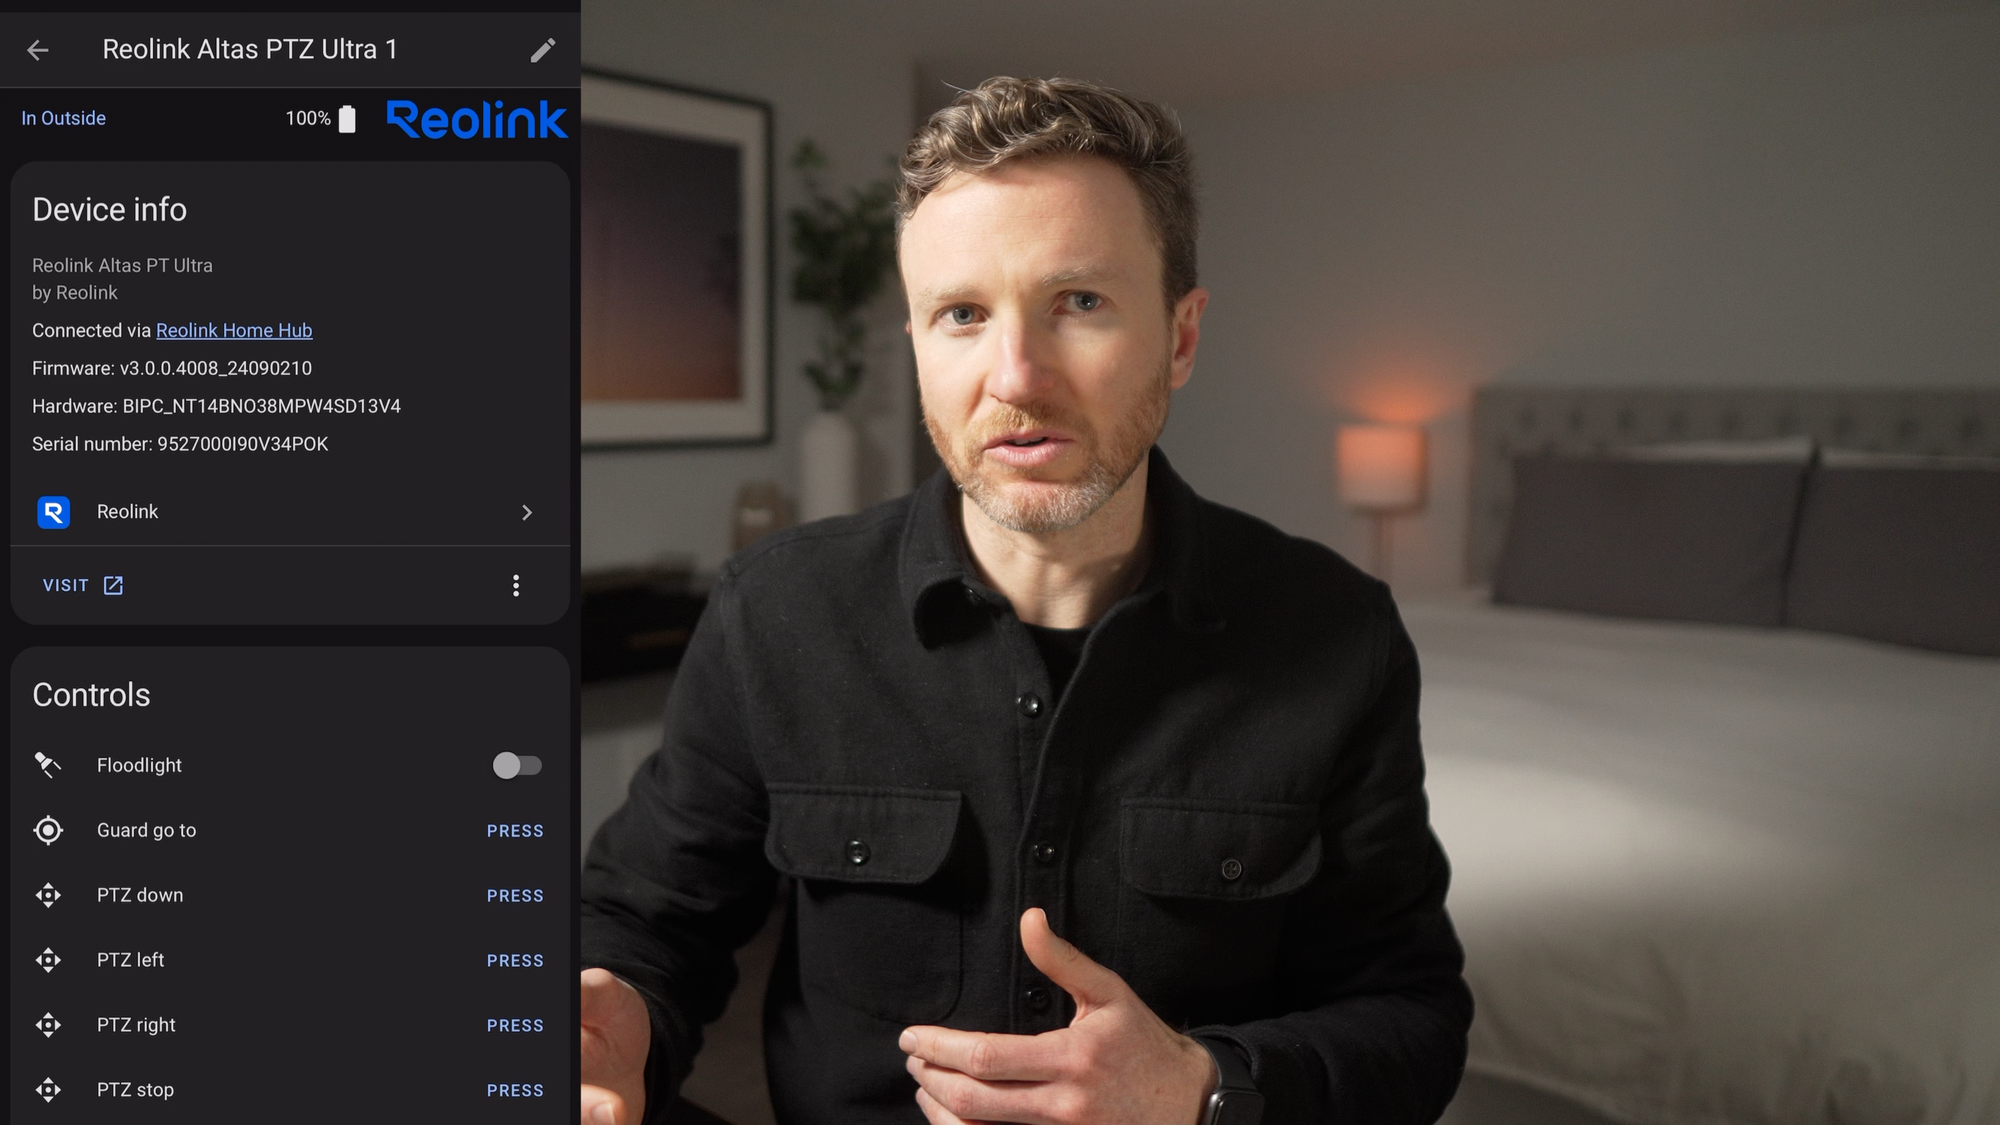
Tons of entities and controls are exposed to Home Assistant, giving you a lot of control over the device in your home automations, which I just love.
You can toggle the floodlight, control the pan and tilt, load up a live view instantly, and get sensors for animal, motion, person, and vehicle detection. You can also adjust some of the detection sensitivities, enable auto-tracking, control the alarm and siren, see the current battery life, and much more.
You could easily create home automations to notify you if an animal, person, or vehicle is detected, or for any motion detection event. Or, load up the live feed on a wall mounted tablet dashboard if you’d like.

Adding the Reolink Altas PT Ultra to Home Assistant
Testing
To assess the image quality and motion detection sensitivity, I held up a sign with my name on it and stood at a distance of 5, 10, 20, and 30 feet from the camera. I performed this same test during the daytime on a cloudy day, and at nighttime.
During the daytime, the sign was easily readable at 5 and 10 feet, but not so much at 20 or 30 feet. For the nighttime test, I did it both with and without the floodlight on. With the floodlight off at night, my name was mildly readable at 5 feet, and too difficult to read thereafter. I don’t know to what extent the illumination on the ground snow cover and front porch light, which was to the camera’s right, affected the results. With the flood light on at night, the sign was readable at 5 and 10 feet, but not after that.
I also tested out the audio quality of the camera’s built-in speaker, and found it very loud and easy to hear across those same distances.
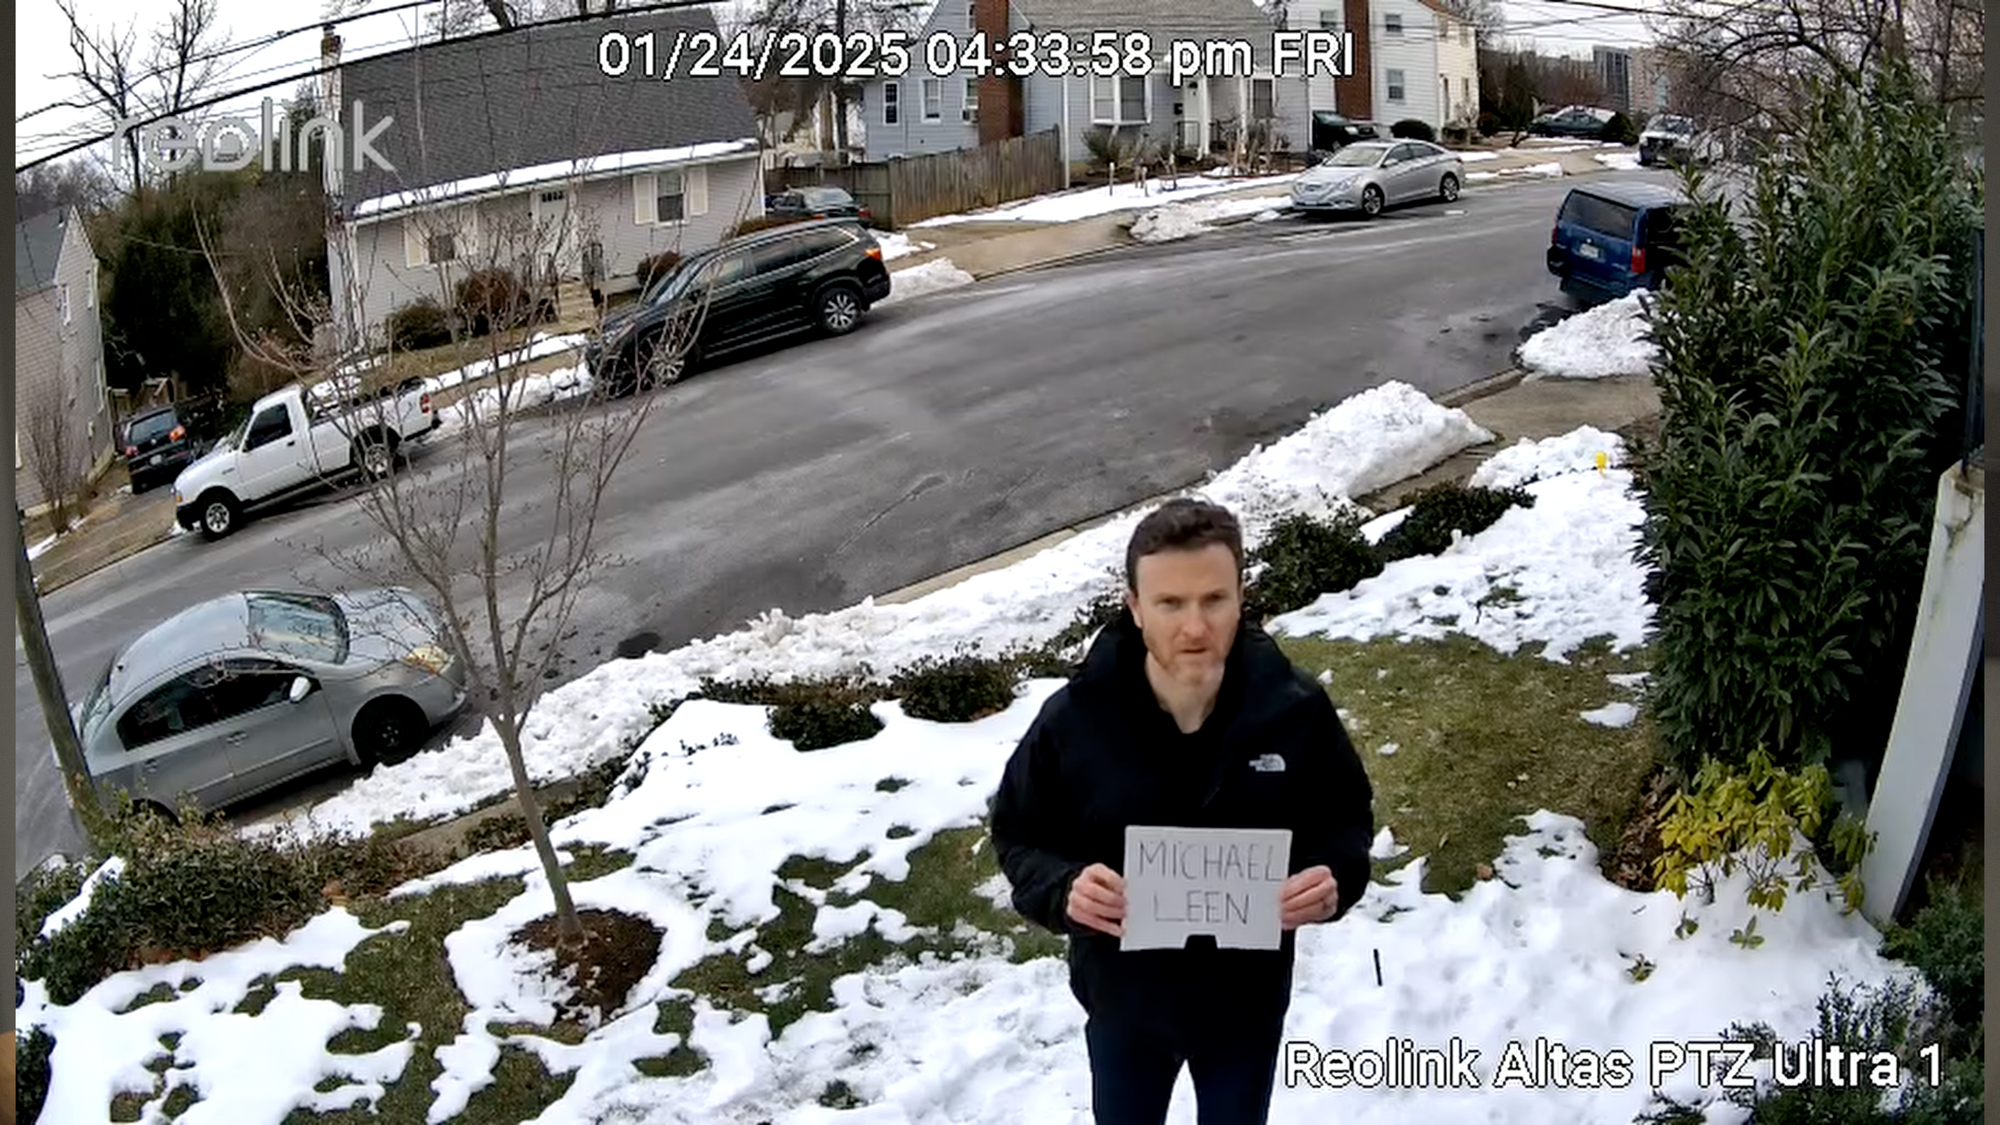
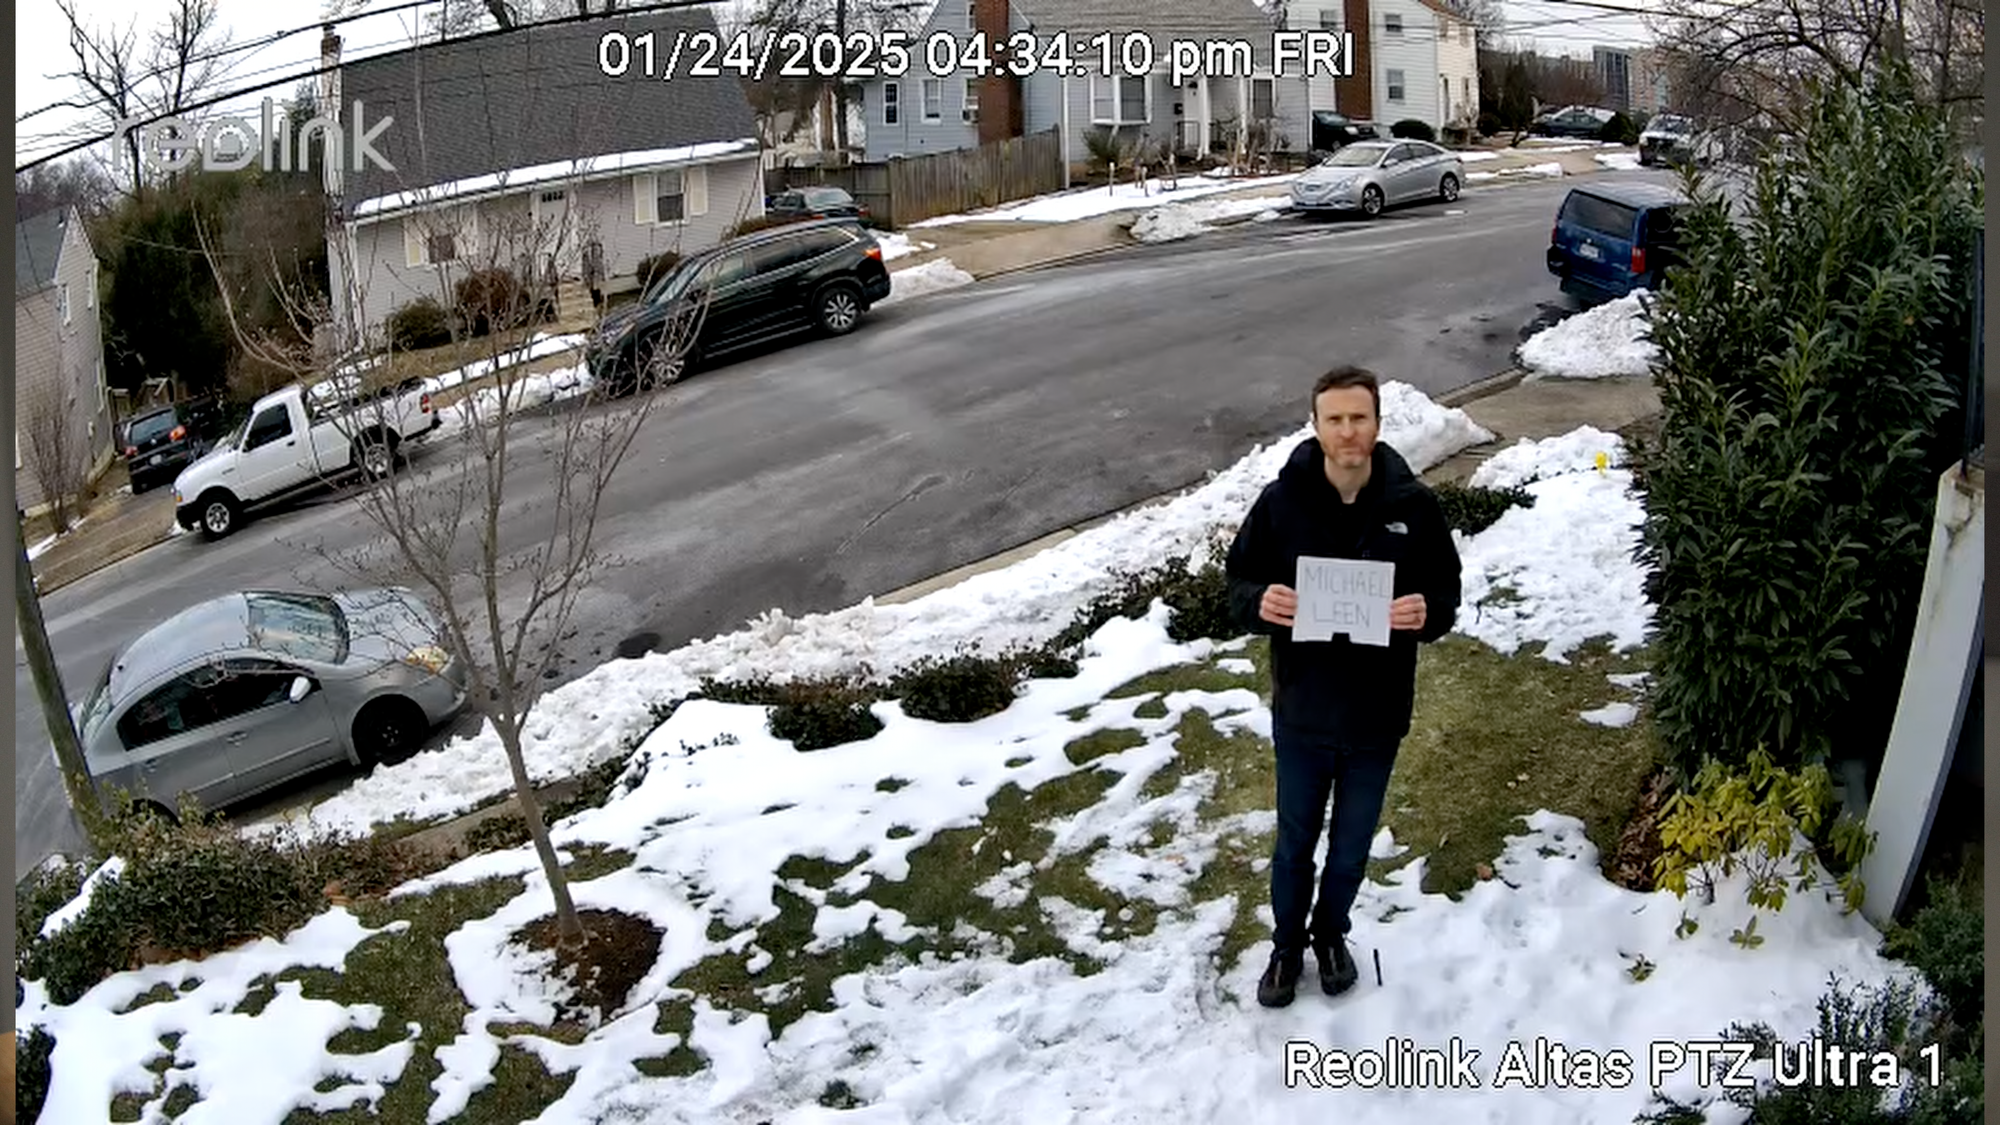
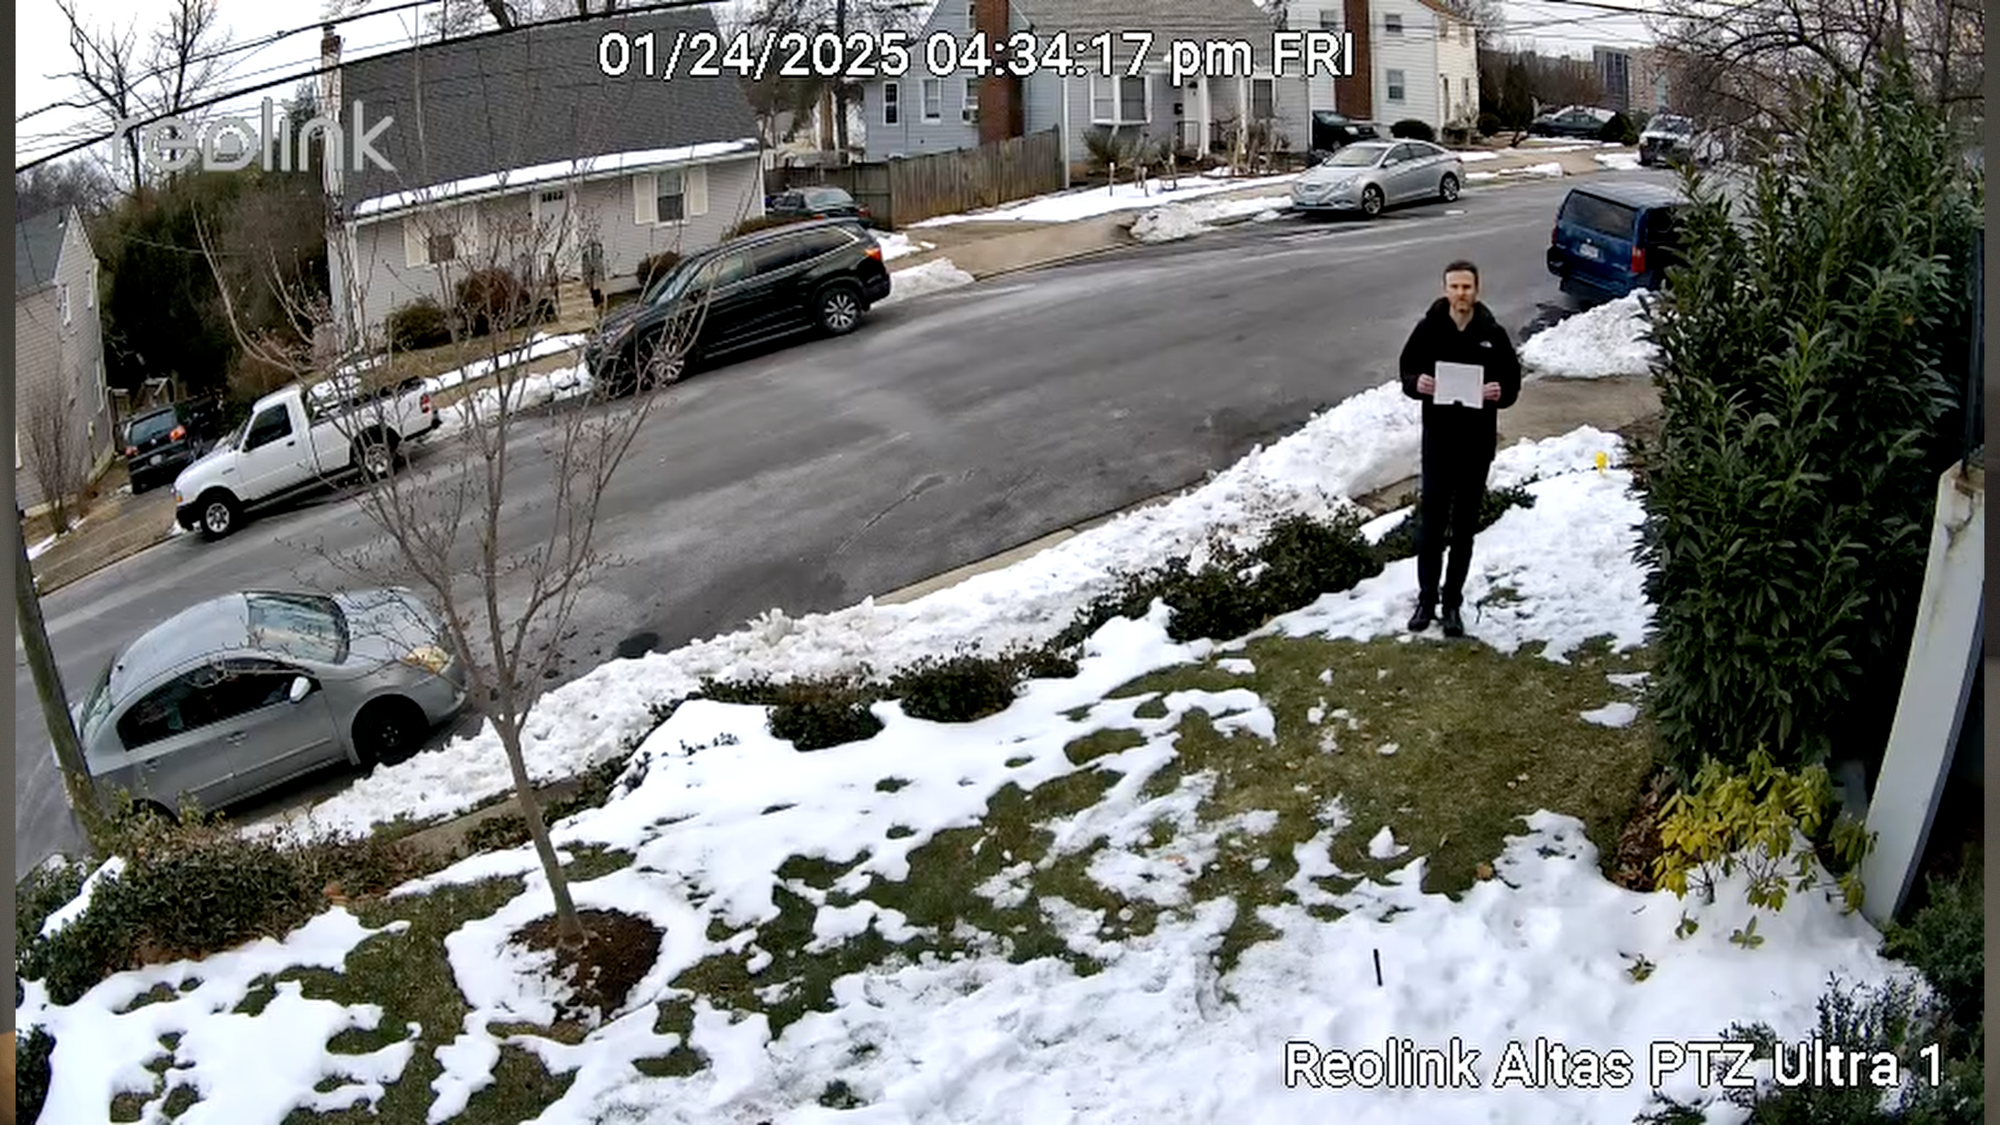
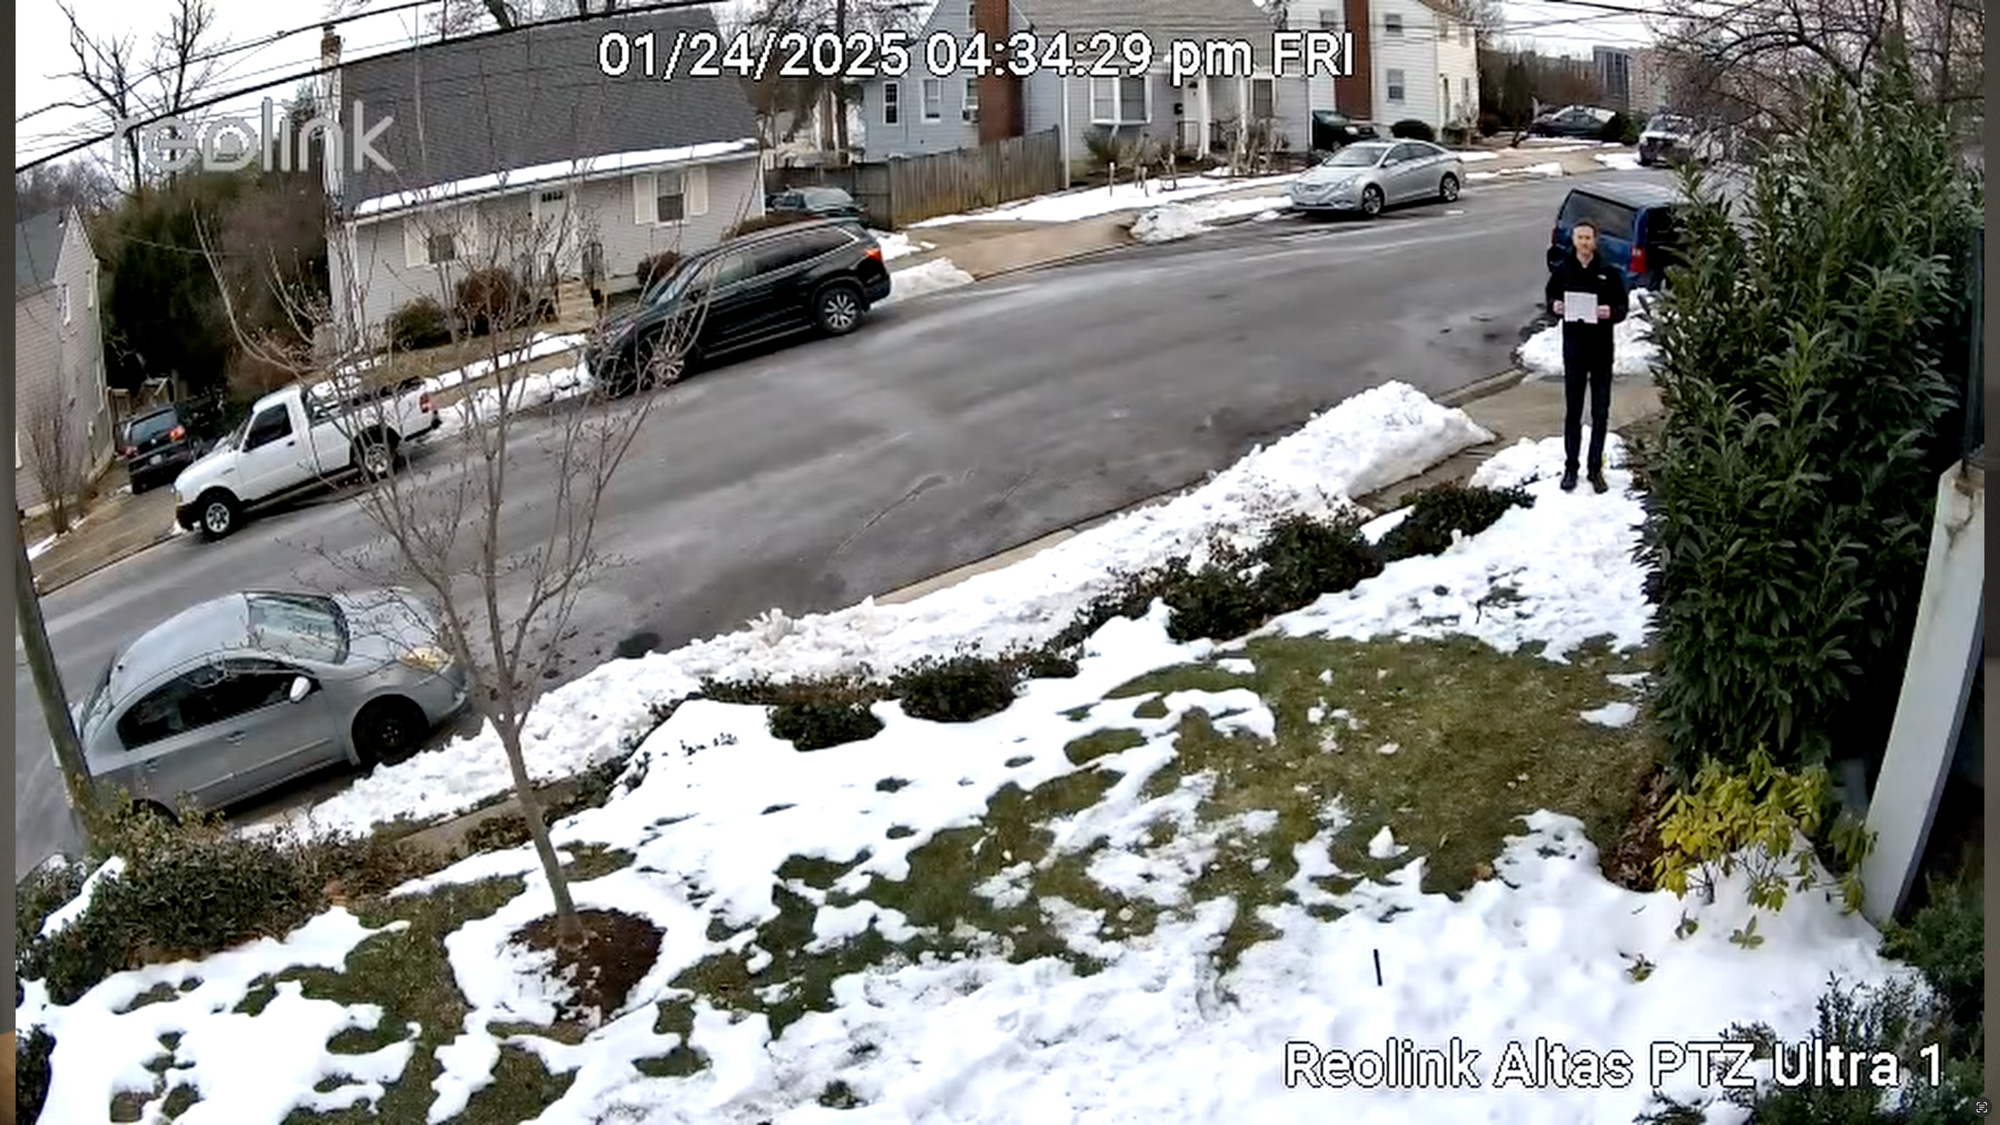
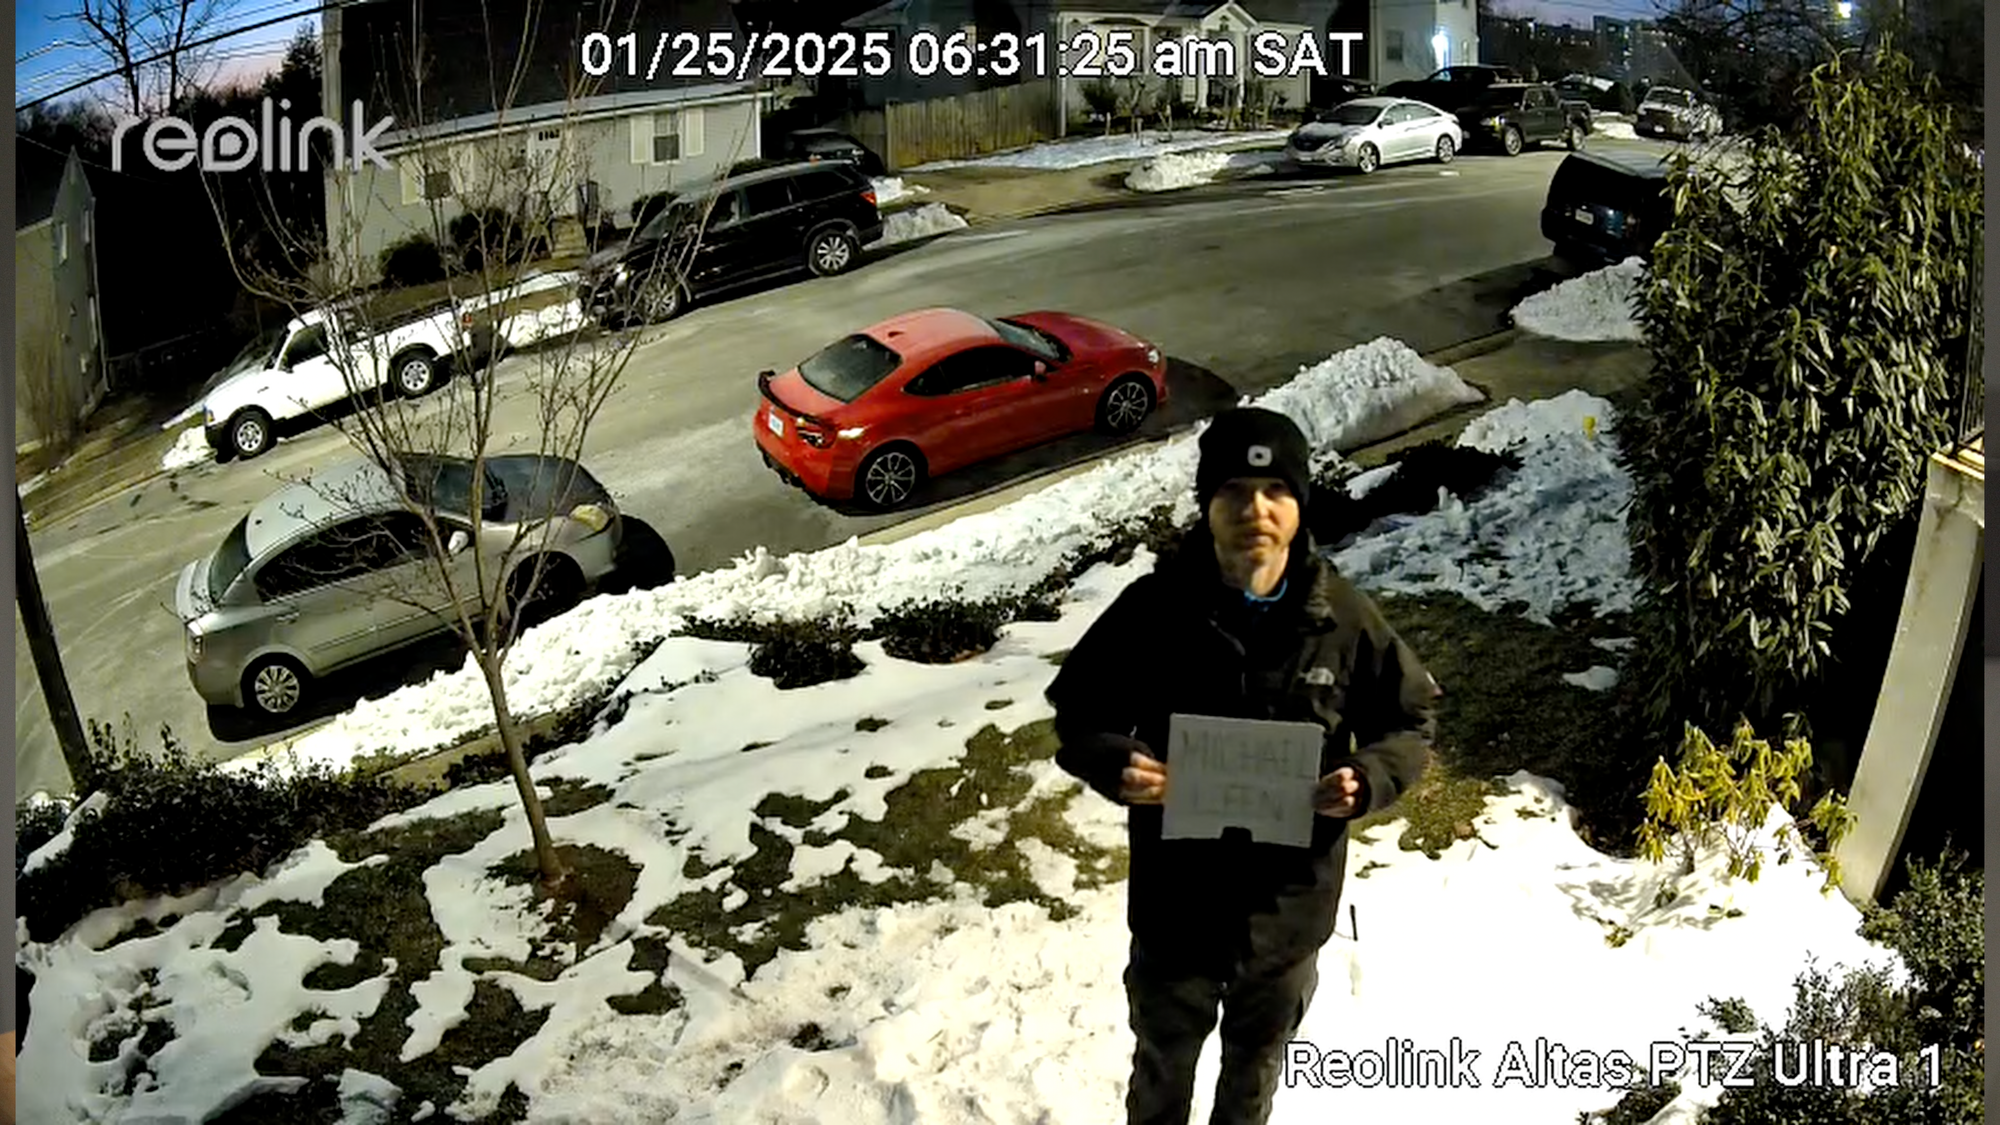
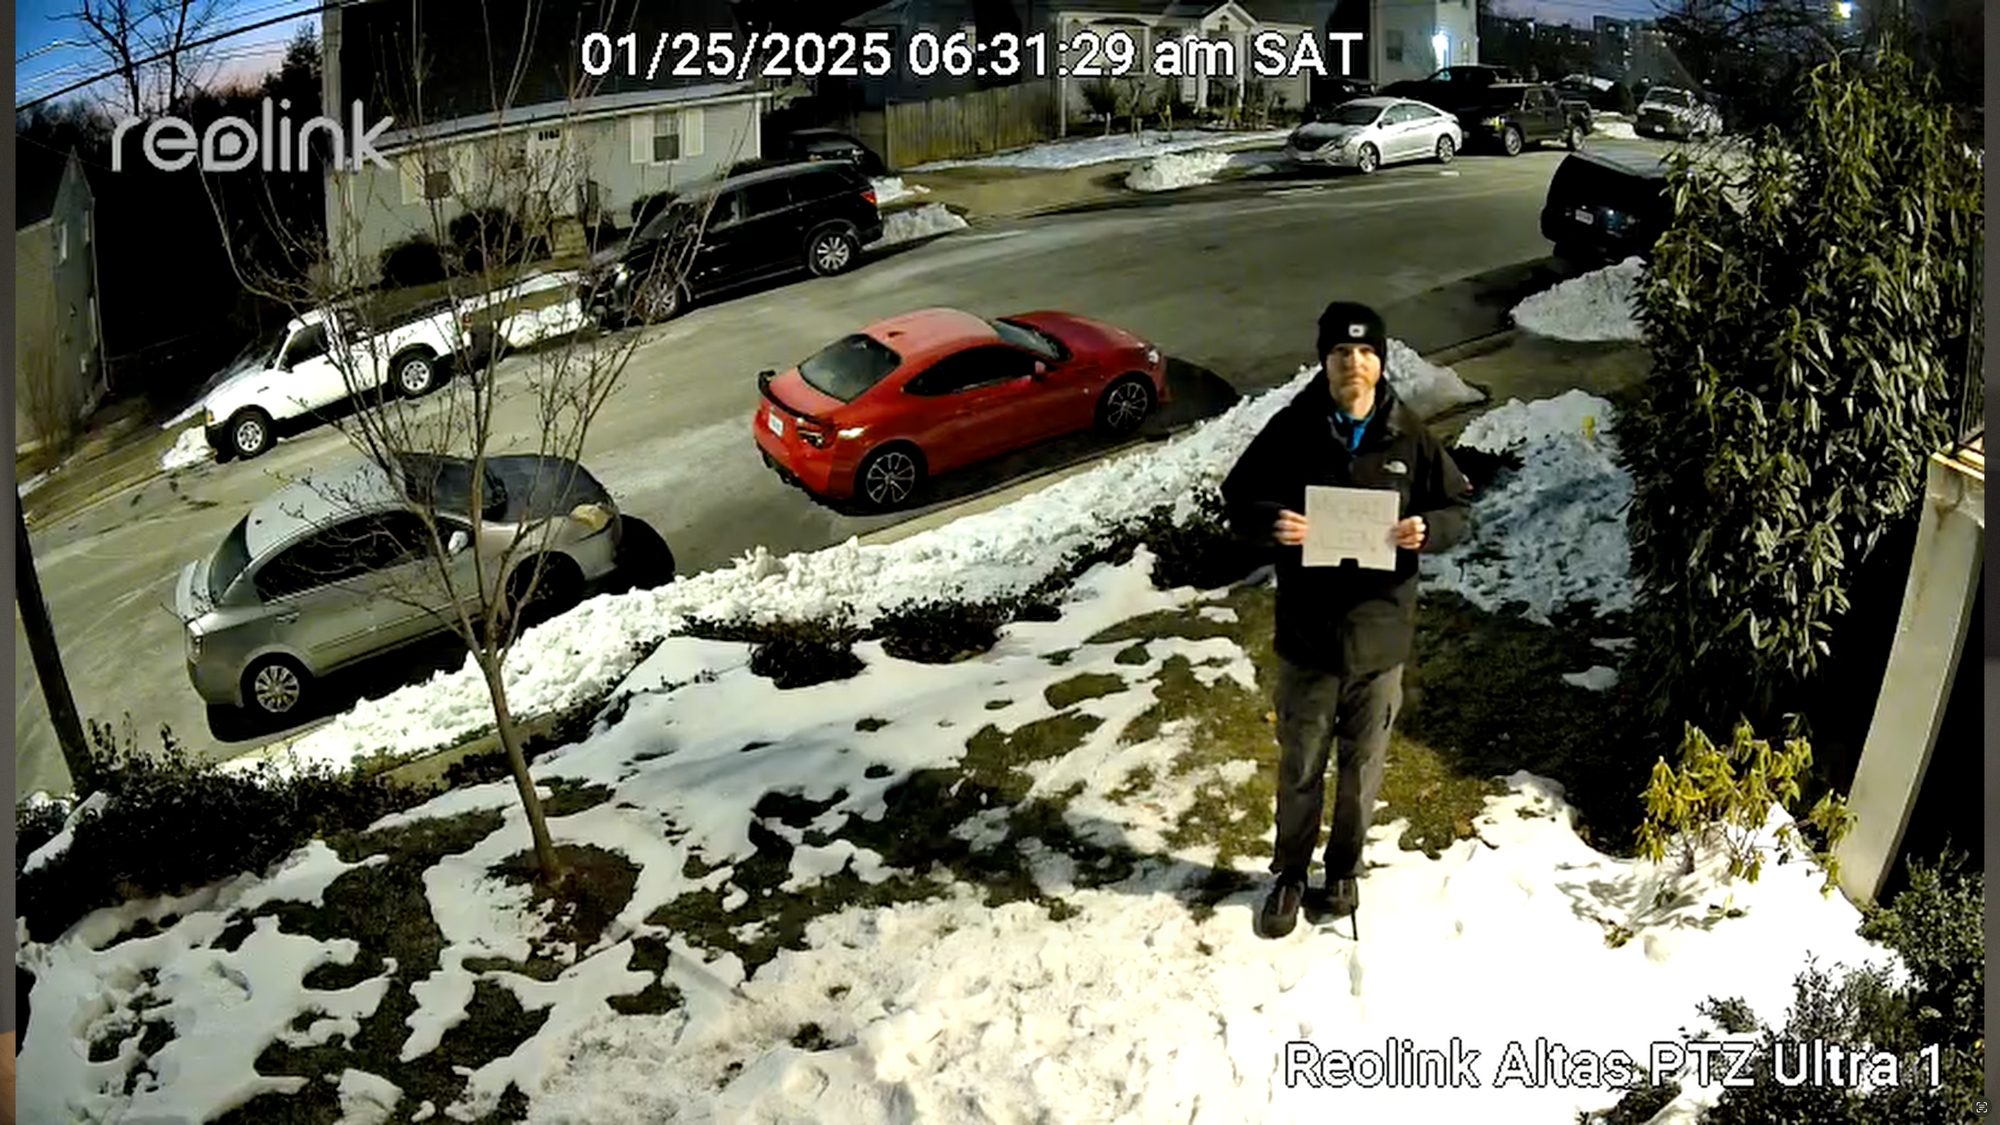
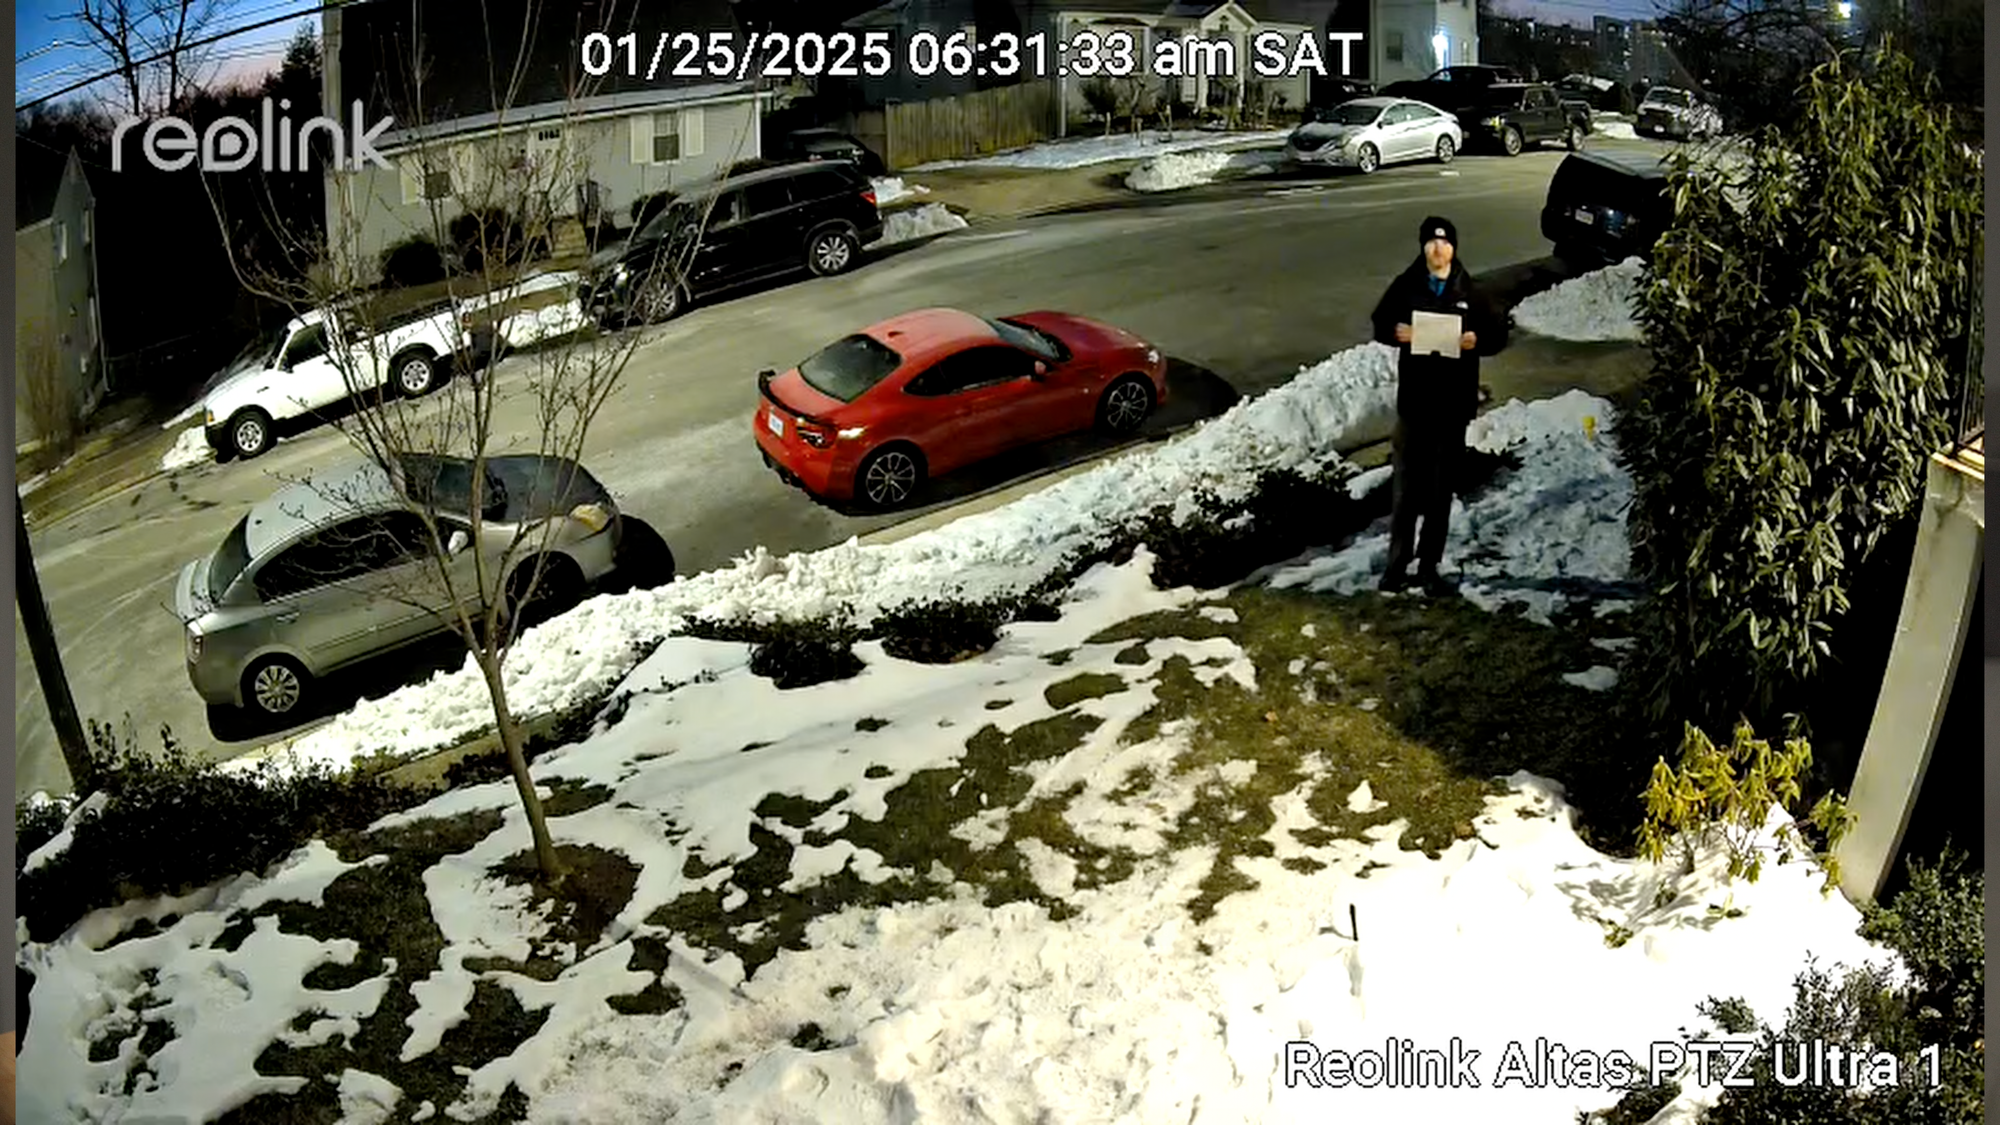
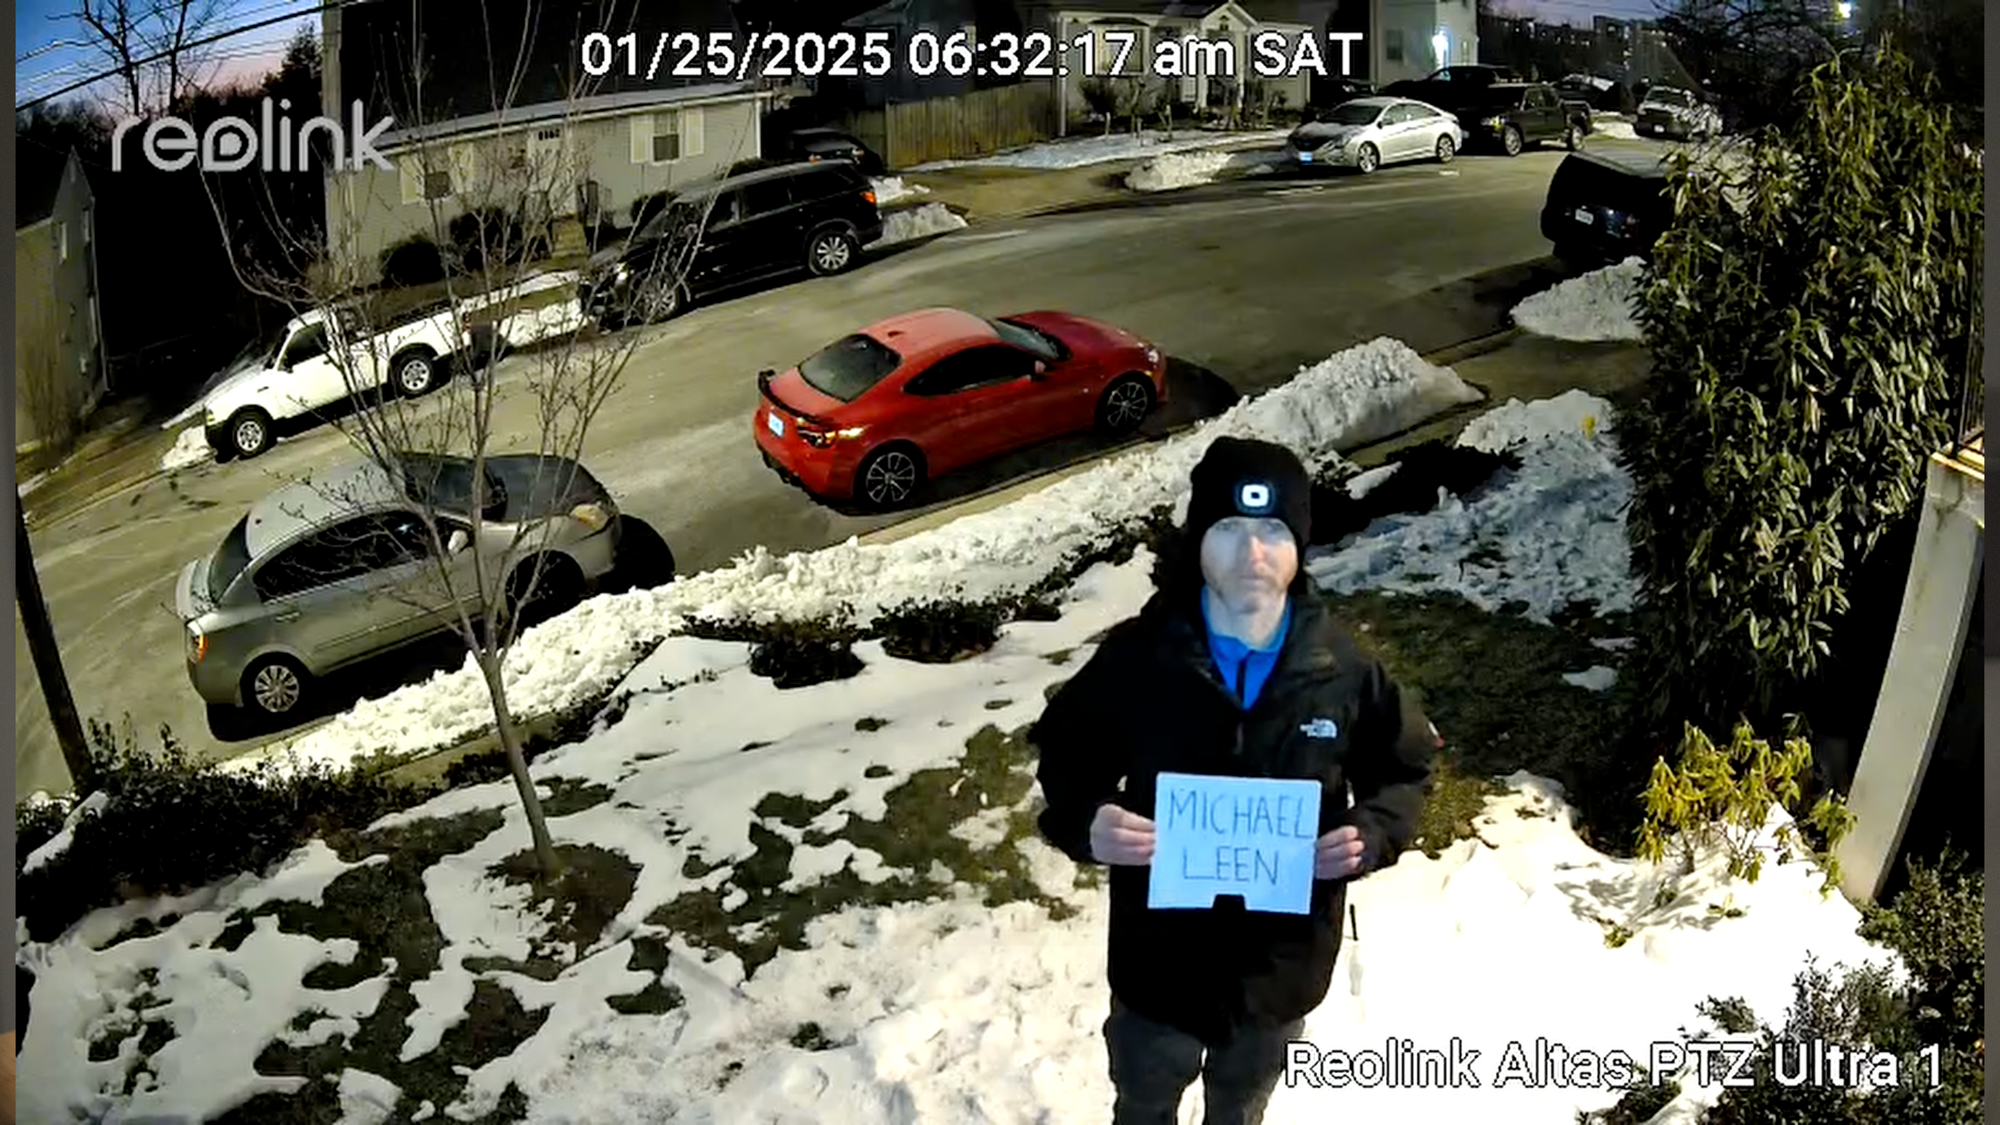
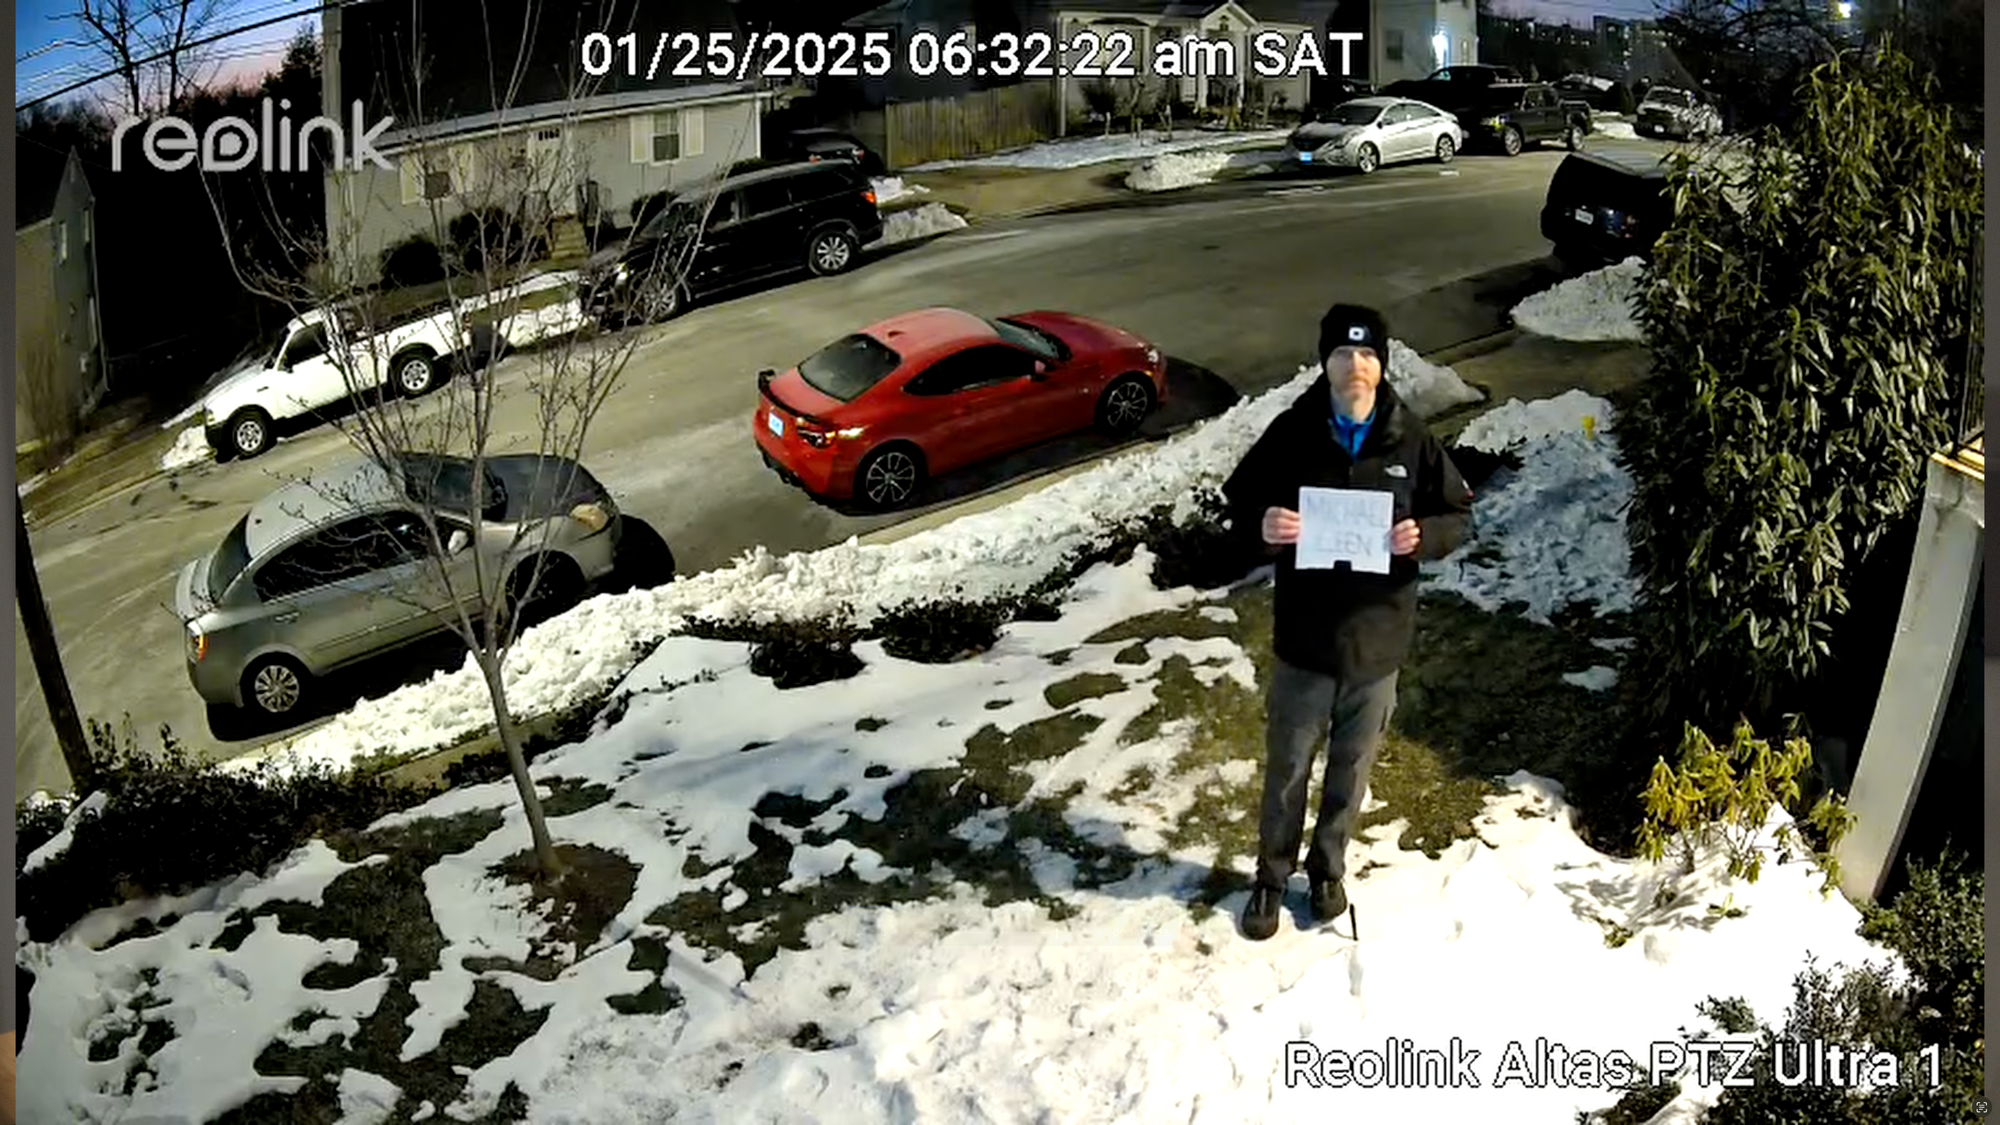
Testing the Reolink Altas PT Ultra at distances of 5', 10', 20', 30' during the day and at night with the floodlight off and on
What to Improve
Let’s talk about what could be improve. During setup, Reolink could have made it clearer that the Home Hub SD card needed formatting. I knew the red light on the Home Hub wasn’t right, and just had to figure out myself why. This seems like something that should be part of the device setup.
I also wish the camera’s pan and tilt had a faster response. There were many times were I pressed to move it, but I didn’t see that change reflected on the live stream, so I clicked again to move it, only to realize it had a delayed response to the initial press.
And while this is minor, I wish the security screw points for connecting the camera to the mount were not recessed so far in.
To maximize chances of not needing to charge batteries, I’d be interested if Reolink offered a larger solar panel, or the option to connect two solar panels at once.
What I Like
With that said, my battery continues to be at 100% for motion event recording thanks to the solar panel. Of course, this may not be the case if it was in a high traffic location, or set to continuous recording.
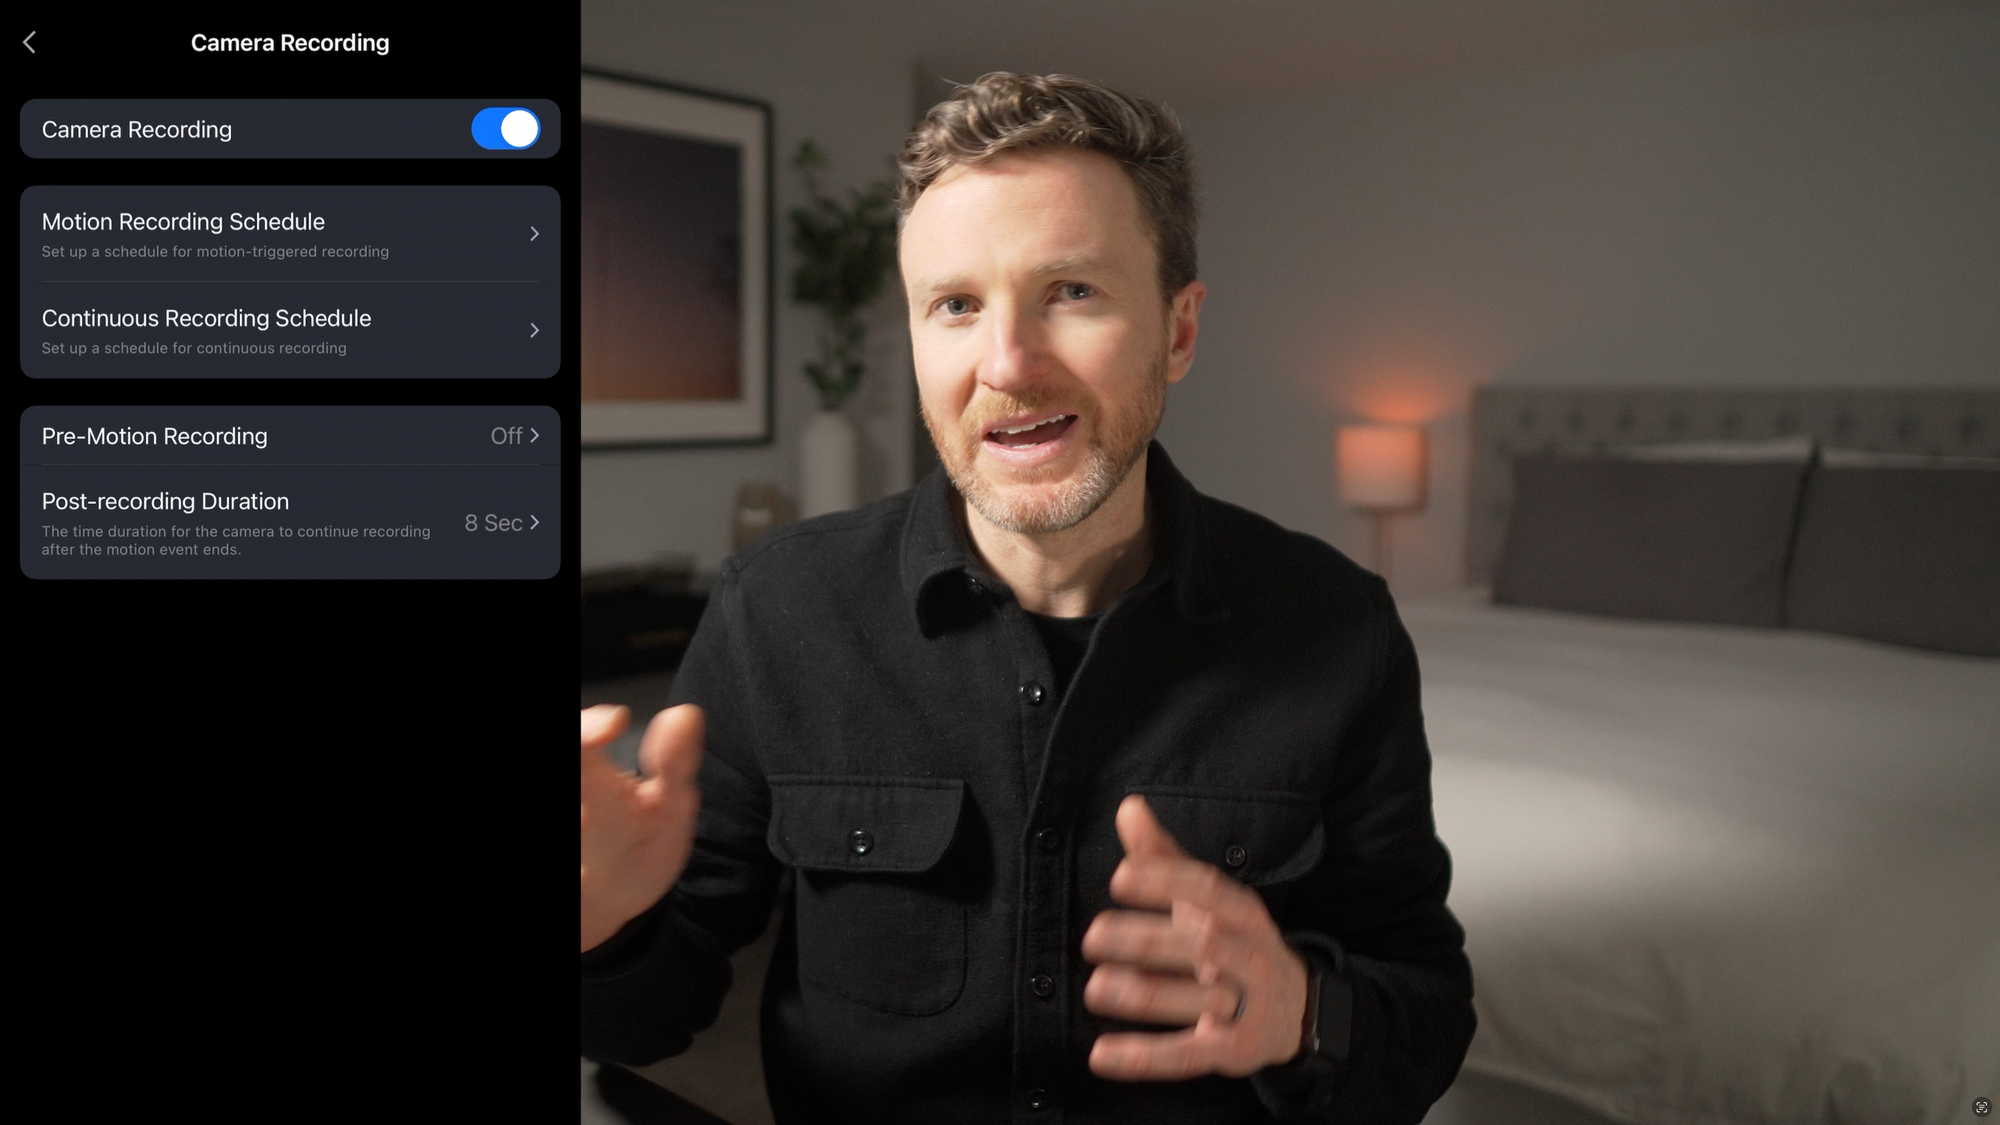
I appreciate that you can enable a pre-motion recording in addition to setting the post-recording duration, and set schedules for both motion and continuous recording. If you want continuous recording, you may want to set a schedule for certain times of day. That way, when paired with a solar panel, you hopefully should not have to worry about charging the battery. There is also a feature that allows you to set-up a time lapse, which is pretty cool.
When connected to my home’s WiFi network, it is generally instantaneous to bring up the camera’s live stream, either from the Reolink app on my phone, or through Home Assistant.
Most of all, I enjoy the convenience of a wire-free setup powered by the sun with no subscriptions required.

Reolink Altas PT Ultra has a lot to like
Final Thoughts
The Reolink Altas PT Ultra is trying to find the best of both worlds between a wired PoE camera and a traditional battery-powered wireless camera. It’s sort of a hybrid, and for the most part, I’d say it succeeds.
It’s not going to give the same responsiveness or complete hassle-free use if a PoE camera, but it’s also not subject to the limitations of motion event only recordings of a typical battery-powered camera. If running wires isn’t an option for you, this is certainly a battery-powered camera worth considering.
Watch on YouTube
Featured Tech
Reolink PT Altas Ultra
Reolink: https://go.michaelsleen.com/reolink-altas-pt-ultra
Amazon: https://amzn.to/3CqKXvw
Reolink Home Hub
Reolink: https://go.michaelsleen.com/reolink-home-hub
Amazon: https://amzn.to/3PTIlcM
Reolink Solar Panel
Reolink: https://go.michaelsleen.com/reolink-accessories
Amazon: https://amzn.to/3WCf8Hb
Vinyl Siding Hooks: https://amzn.to/4hxEL3F