Make your existing garage door SMART with ratgdo
How to make virtually any garage door opener smart using a device called ratgdo, including a step-by-step guide through the setup.
Introduction
In 2023, Chamberlain, owner of the MyQ line of smart garage door controllers, shut off "unauthorized access" to its APIs, breaking the smart home integration for thousands of customers.
If you are in this situation and wondering what to do, I'll give you my recommendation, including a step-by-step guide so you can take back control of your garage door and make it smart.
Main Points
If you’ve got a garage door opener from Chamberlain Group, including MyQ, Liftmaster, or Craftsman with a yellow “learn” button, you can get an off-the-shelf solution, such as iSmartgate, Meross, and Tailwind iQ3 Pro . Or, you can go the DIY approach as I did, and install ratgdo, which stands for Rage Against the Garage Door Opener.
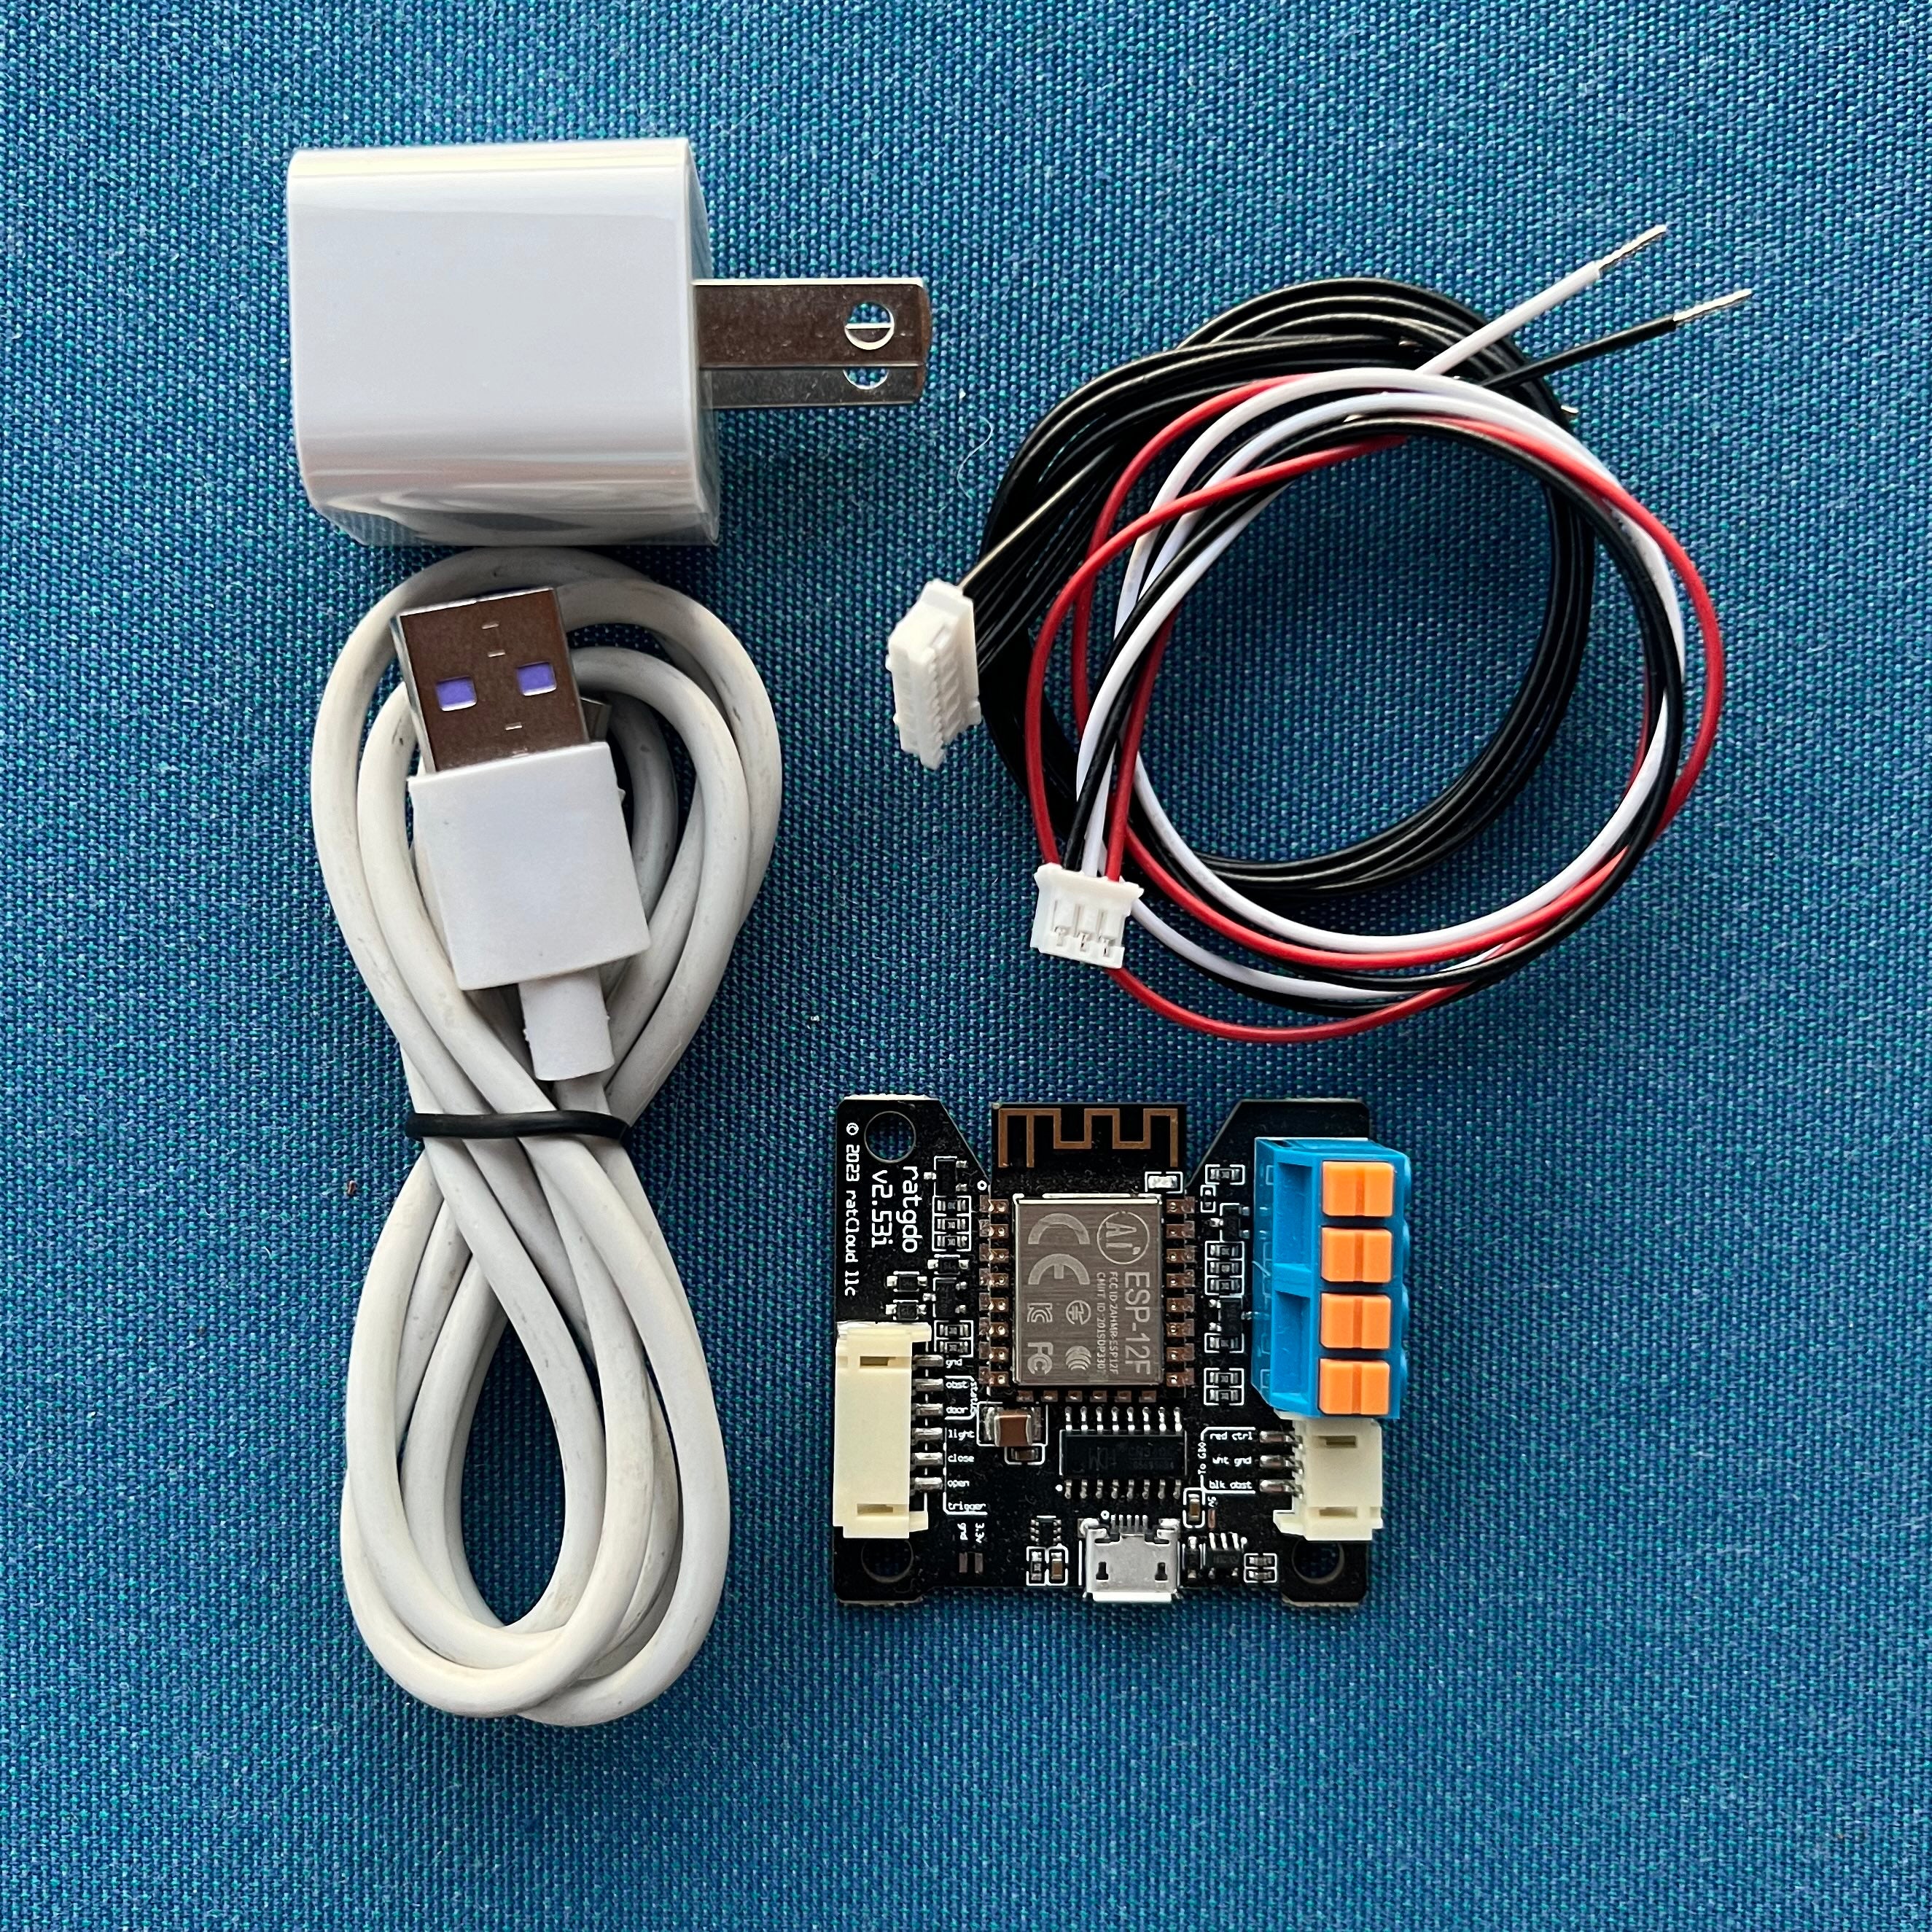
Ratgdo is a small, WiFi control board that attaches to your existing garage door opener with three wires. It works over your local network using MQTT or ESPHome, and integrates seamlessly with Home Assistant, the home automation platform that I use. From there, I am also able to integrate it into Apple HomeKit. Now, I can control the garage door and its built-in light with a status of the door and obstruction sensors.

Here are five steps to set up your ratgdo so you can get up-and-running fast:
- Confirm your garage door is compatible. Ratgdo works with almost any residential Chamberlain or Liftmaster garage door opener, including those with yellow, purple, red, and orange “learn” buttons. Just know that the features may vary depending on your model. See this link for a feature comparison.
- Order ratgdo. At the time this was published, you can buy ratgdo directly from the developer, Paul, for $30, or $44 gets you the control board plus all the installation supplies you need. See this link to order.
- Install the firmware. Connect ratgdo to a computer using a USB cable, open a Google Chrome browser, and launch the Web Tools flasher. See this link for the flasher. Once it launches, you’ll choose the firmware version. I’m going to focus on connecting via MQTT over WiFi in this tutorial. If you experience reliability issues, I recommend using ESPHome instead.
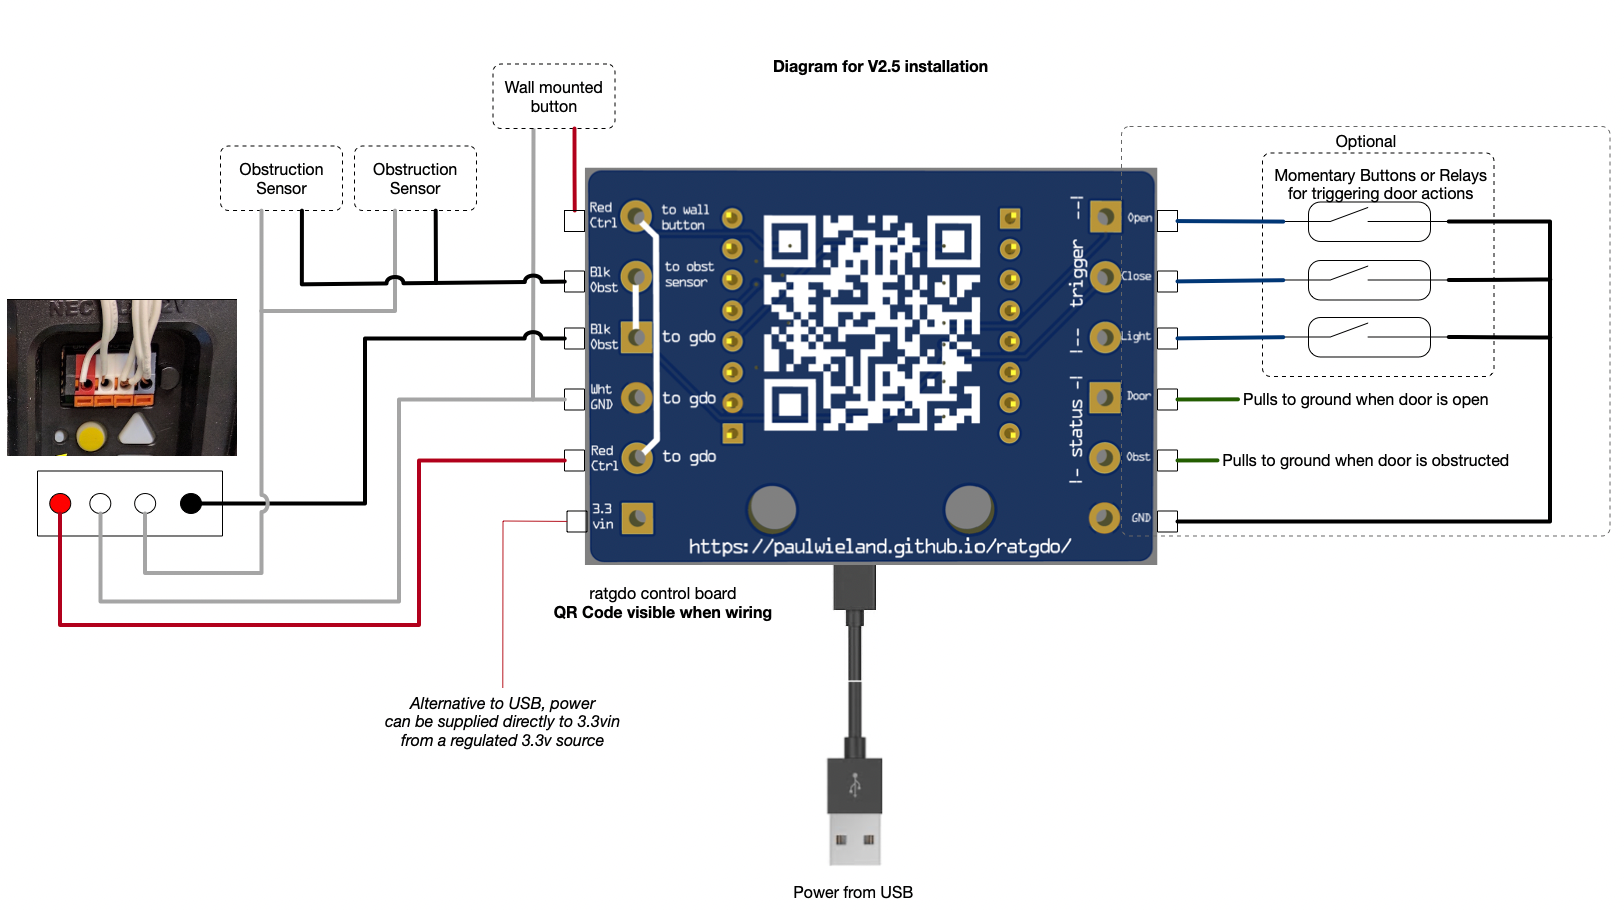
- Connect ratgdo to your garage door opener. Once the firmware is installed, you’re ready to wire up ratgdo and connect it to your garage door opener. If you’re not used to wiring, don’t worry, it’s simpler than it looks. Now, there are at least two ways to do the wiring, what I’ll call the Pigtail-only method and the Passthrough method. I’ve done both, and both methods work. For now, I’ll walk through the Passthrough method using the supplies from the installation kit.
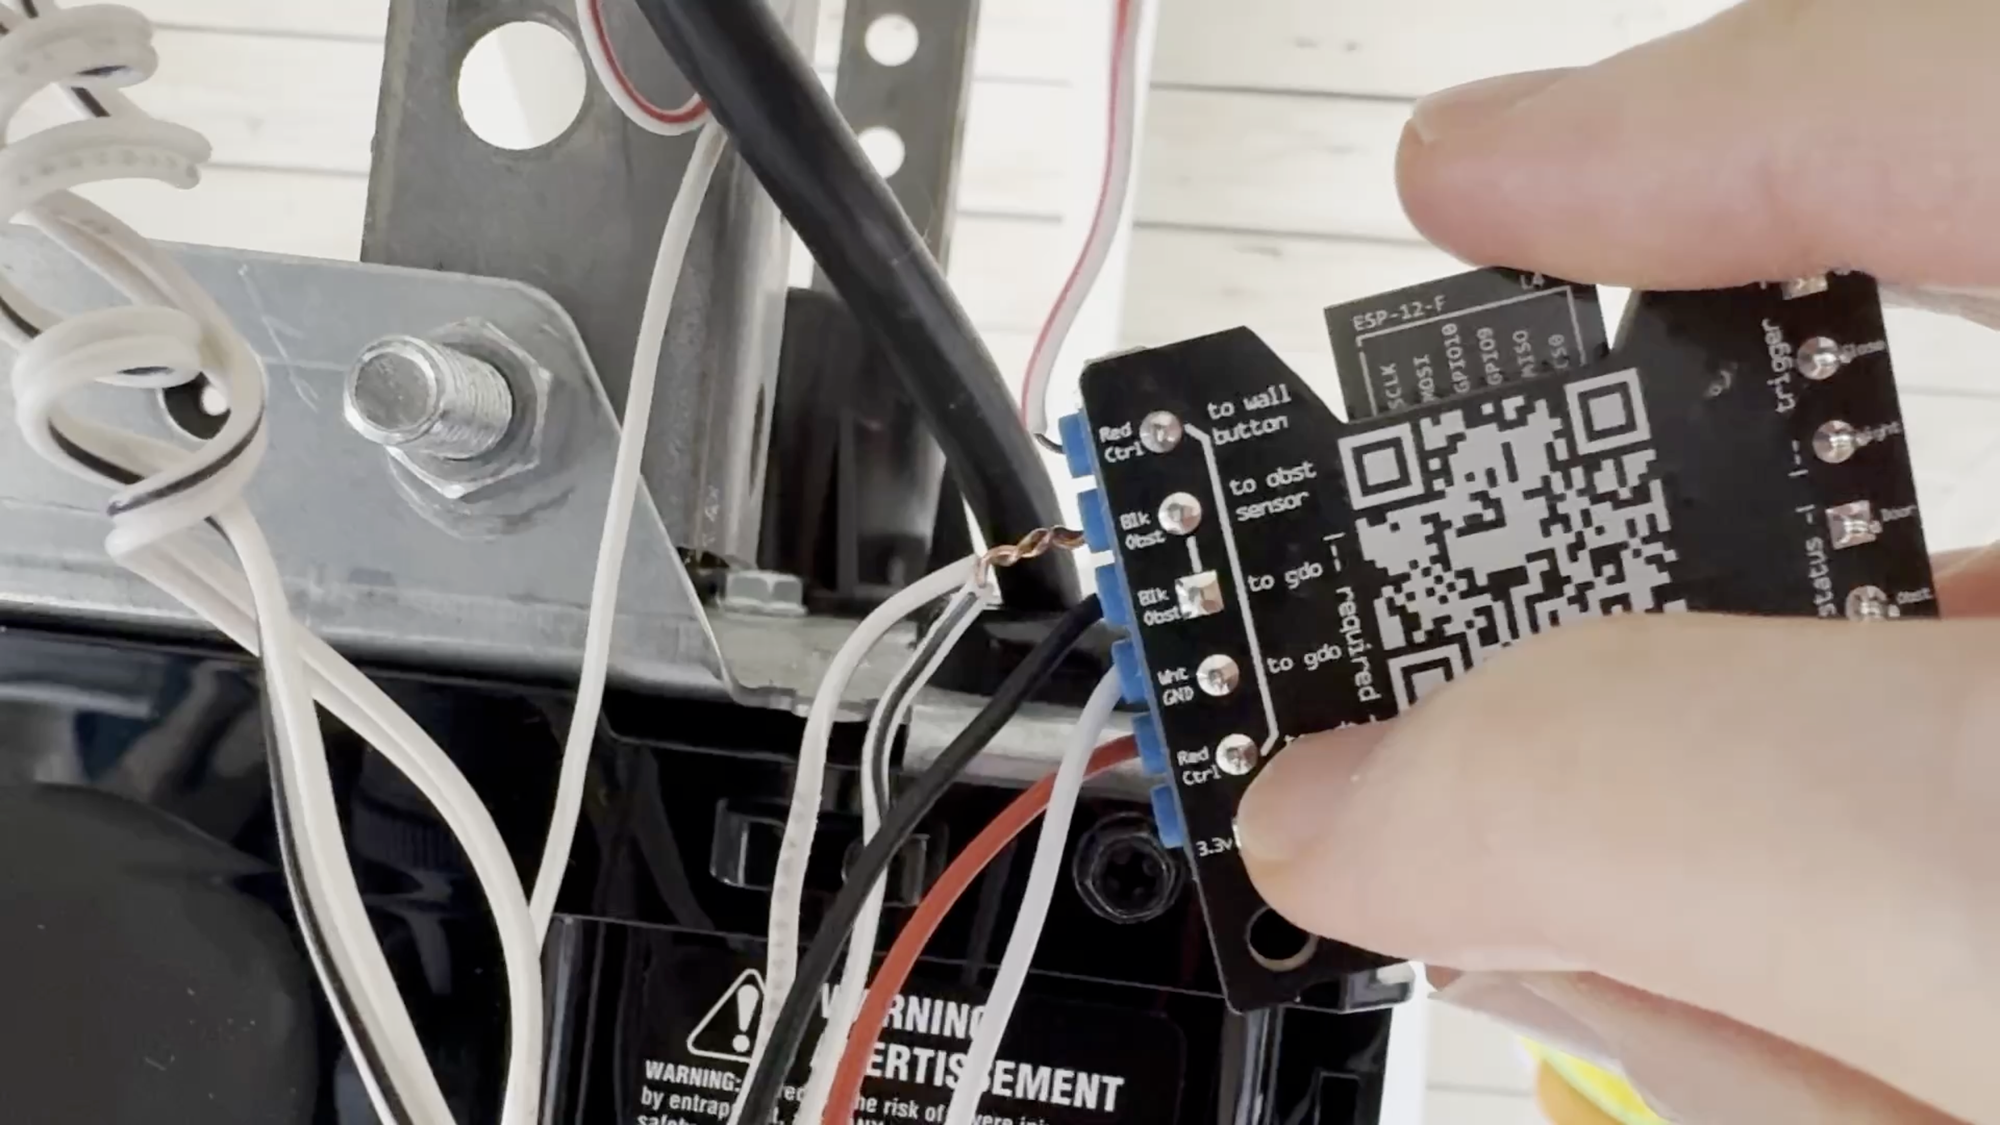
- To begin, you’ll need to strip the rubber coating to expose some of the wire on the red, white, and black wires. This is easiest with a wire stripper tool, but I don’t own one. Instead, I used a Swiss Army-style knife to cut around the wire insulation, and then slide off the end to expose the wire, which I found to be quick and easy.
- Now, you’re ready to wire. It may sound like a lot, but I found it very doable, and I am not an electrician. Remember to unplug the garage door opener to de-energize it before inserting or removing any wires. To begin, push down the orange button and insert the red wire into the Red Ctrl opening (5th from the top) on the ratgdo board. Release the orange button, and give the wire a tug to ensure it’s secure. Then, insert the white wire into the Wht GND opening (4th from the top), and the black wire into the Blk Obst opening (3rd from the top). Next, remove the red wire from your garage door opener (located on the far left on my model) by pushing the orange button, and insert it into the Red Ctrl (at the very top) of the ratgdo board. This red wire controls the garage wall button, and creates a “passthrough” to the red wire you inserted earlier, evidenced by the diagram on the control board. Now, you can take the red wire (5th from the top) on the ratgdo board, and insert that into the slot on the garage door opener where you just removed the other red wire. Next, remove the white wire from your garage door opener (2nd from the left on my model), and pigtail it together with the white wire coming from the ratgdo board, and then insert this pigtail wire back into the same position on the garage door opener. This is the only pigtail needed in what I’m calling the Passthrough method. Next, remove the black wire from your garage door opener (located on the far right on my model), and insert it into the Blk Obst opening (this time 2nd from the top). This black wire controls the obstruction sensors, and creates a “passthrough” to the black wire you inserted earlier, evidenced by the diagram on the control board. In my case, I was removing two black wires pigtailed together, one for each obstruction sensor I believe. Now, you can take the black wire (3rd from the top) on the Ratgdo board, and insert that into the slot on the garage door opener where you just removed the other black wire.
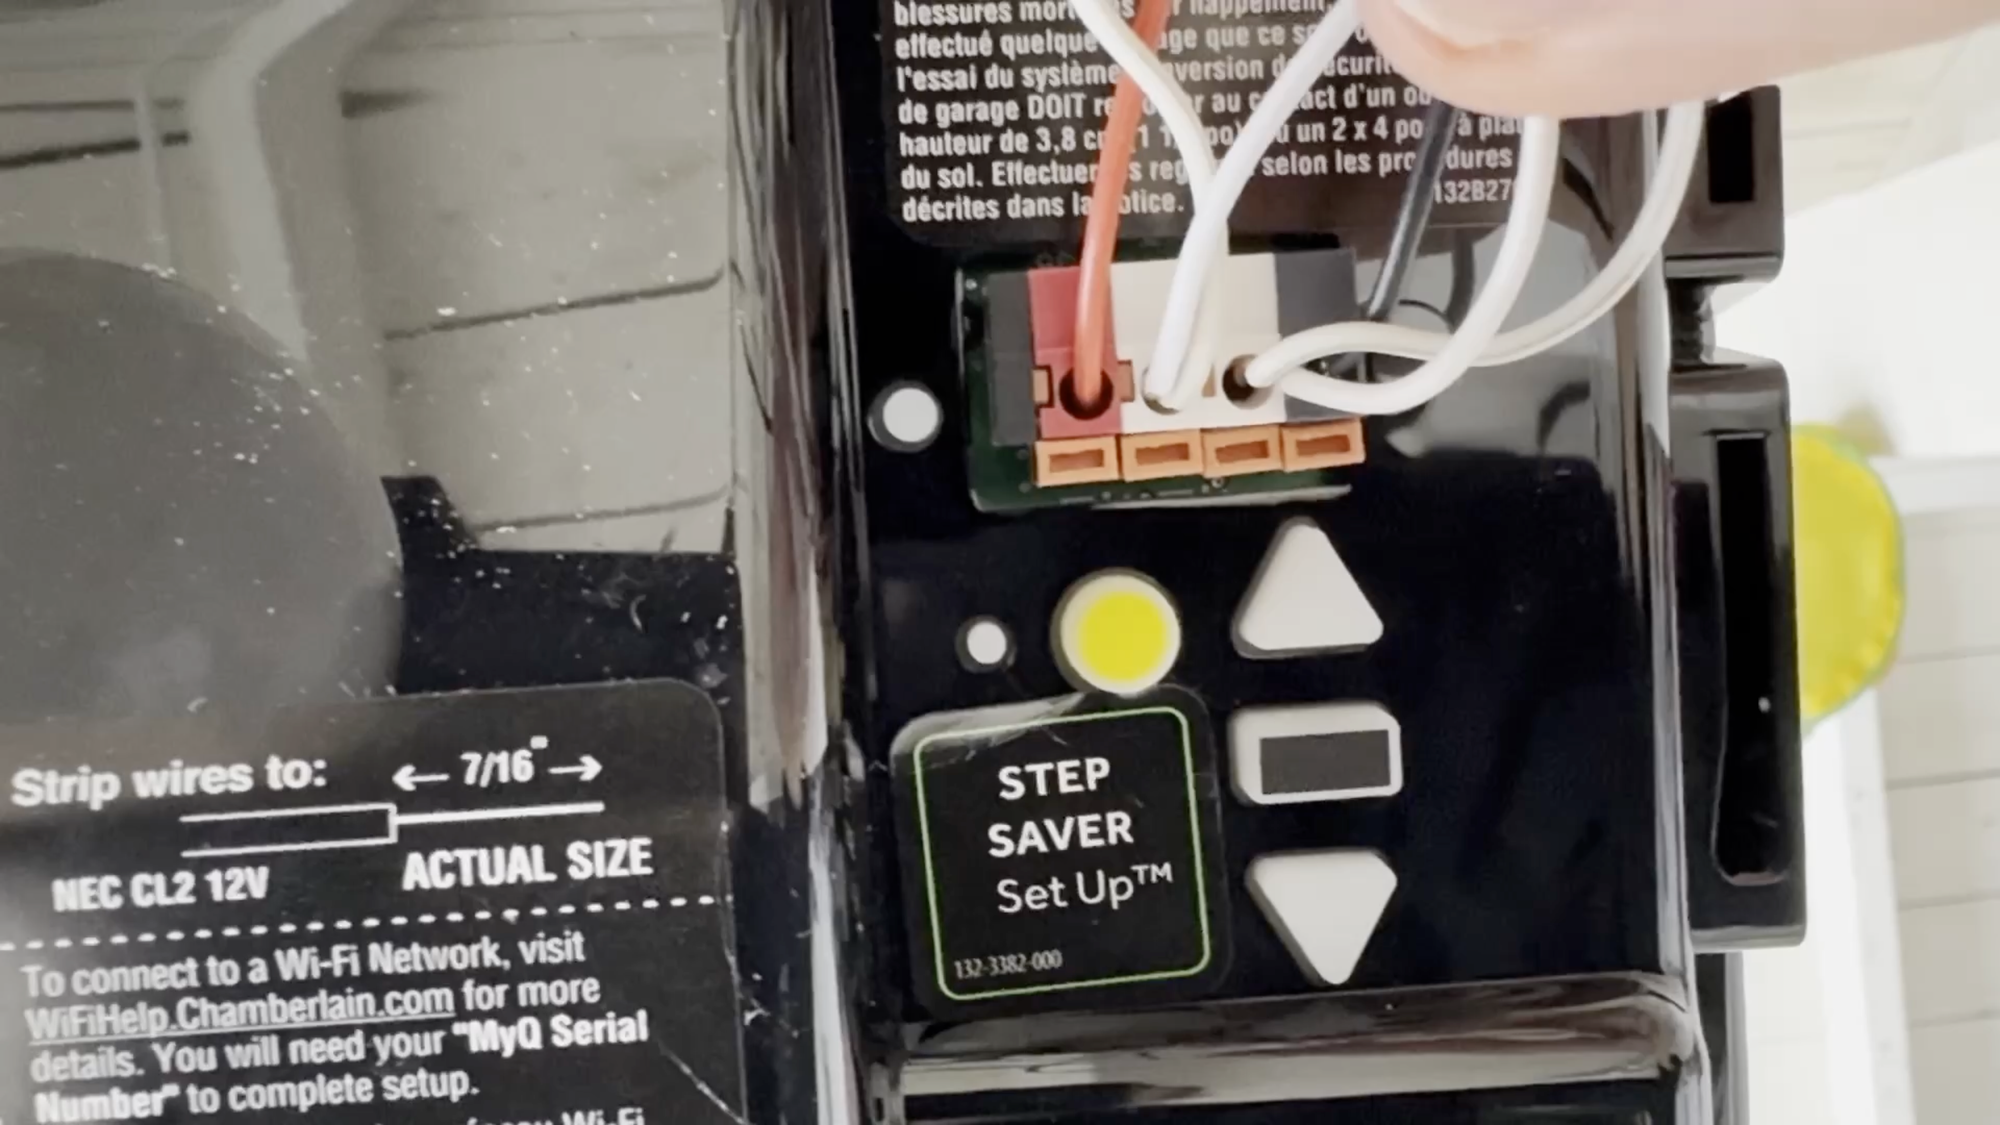
- Now, the wiring is done, and it’s time to test out your work. Connect ratgdo to power using a USB cable and power brick. Then, plug the garage door opener back into power. Try opening and closing the garage door using the wall control, wireless keypad, or wireless remotes (whatever you have) to ensure it’s working.
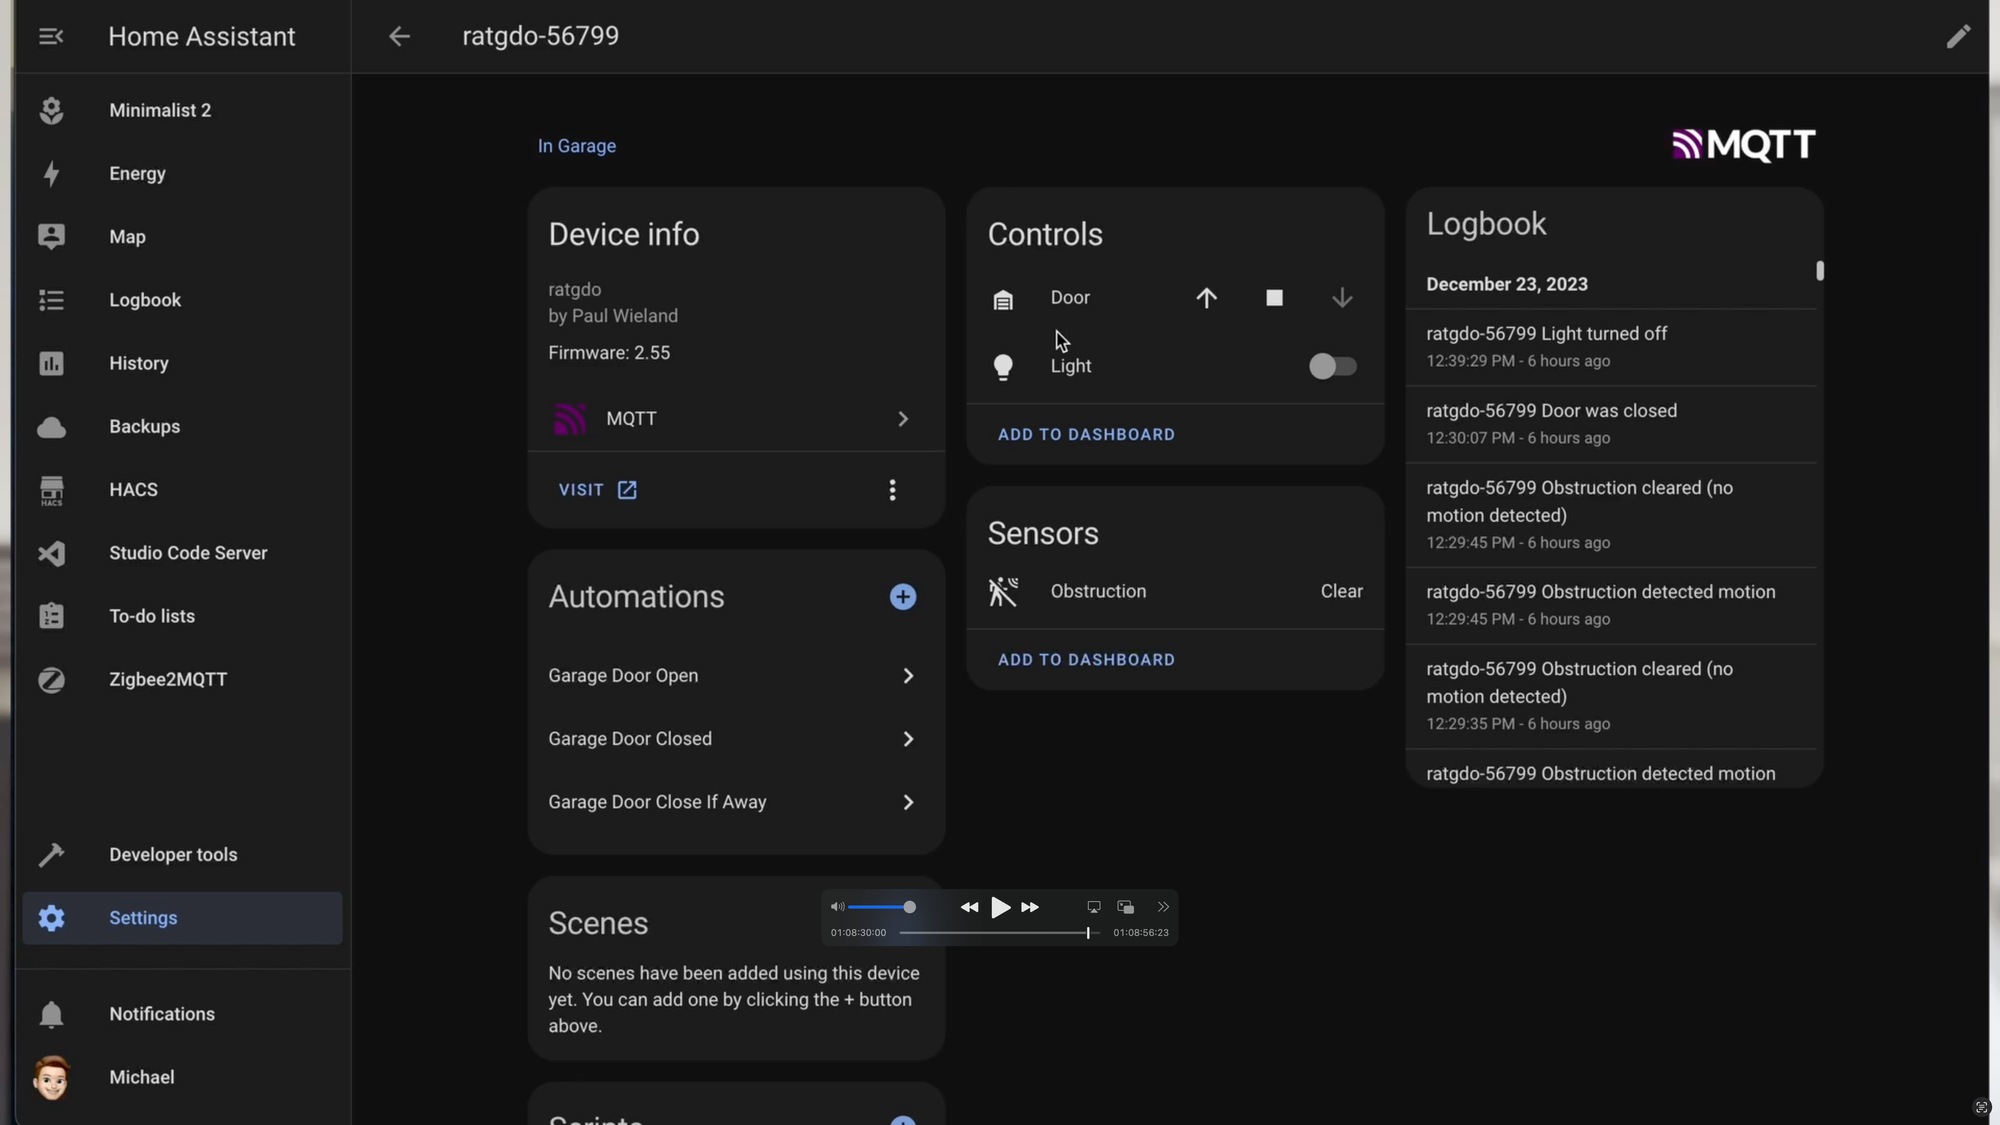
- Connect to Home Assistant via MQTT. Once the wiring is done and you’ve confirmed the garage door opens and closes using existing control buttons, it’s time to integrate ratgdo into Home Assistant for smart control and home automation. Open Home Assistant and head over to your list of MQTT devices. You should find that ratgdo is already connected and ready to rock. You can click on the device to see a status of the garage door, open and close it, control the built-in light, and even see if the garage door motions sensors are obstructed.
Final Thoughts
My experience with Chamberlain was a reminder that when you have a cloud-connected device, even one that you paid for, you don’t really own it. Features that persuaded you to buy the device in the first place can be taken away, which is lousy. Thankfully, in the case of MyQ, there are alternatives that allow you take back control of your garage door tech and make virtually any garage door smart on your terms.
In my experience with ratgdo, it brought back the features Chamberlain tried to take away, and even added additional ones, such as the ability to remotely toggle the garage door opener light on and off and see if an obstruction sensor is clear or not in real-time.
Watch on YouTube
Featured Tech
 ratcloud llc