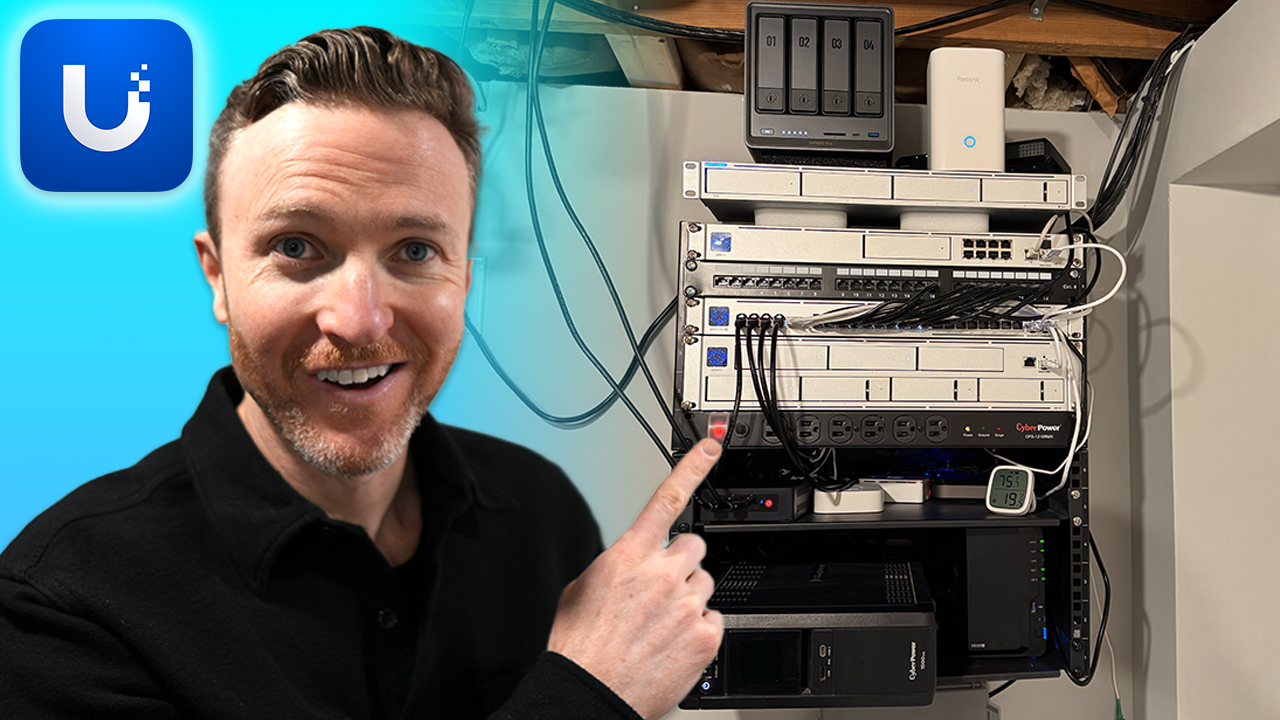
Ubiquiti UniFi Home Network and Rack Setup 2025
My updated home network and rack setup for 2025, including all the Ubiquiti UniFi hardware and beyond that I’m using, and how I keep it secure.
Introduction
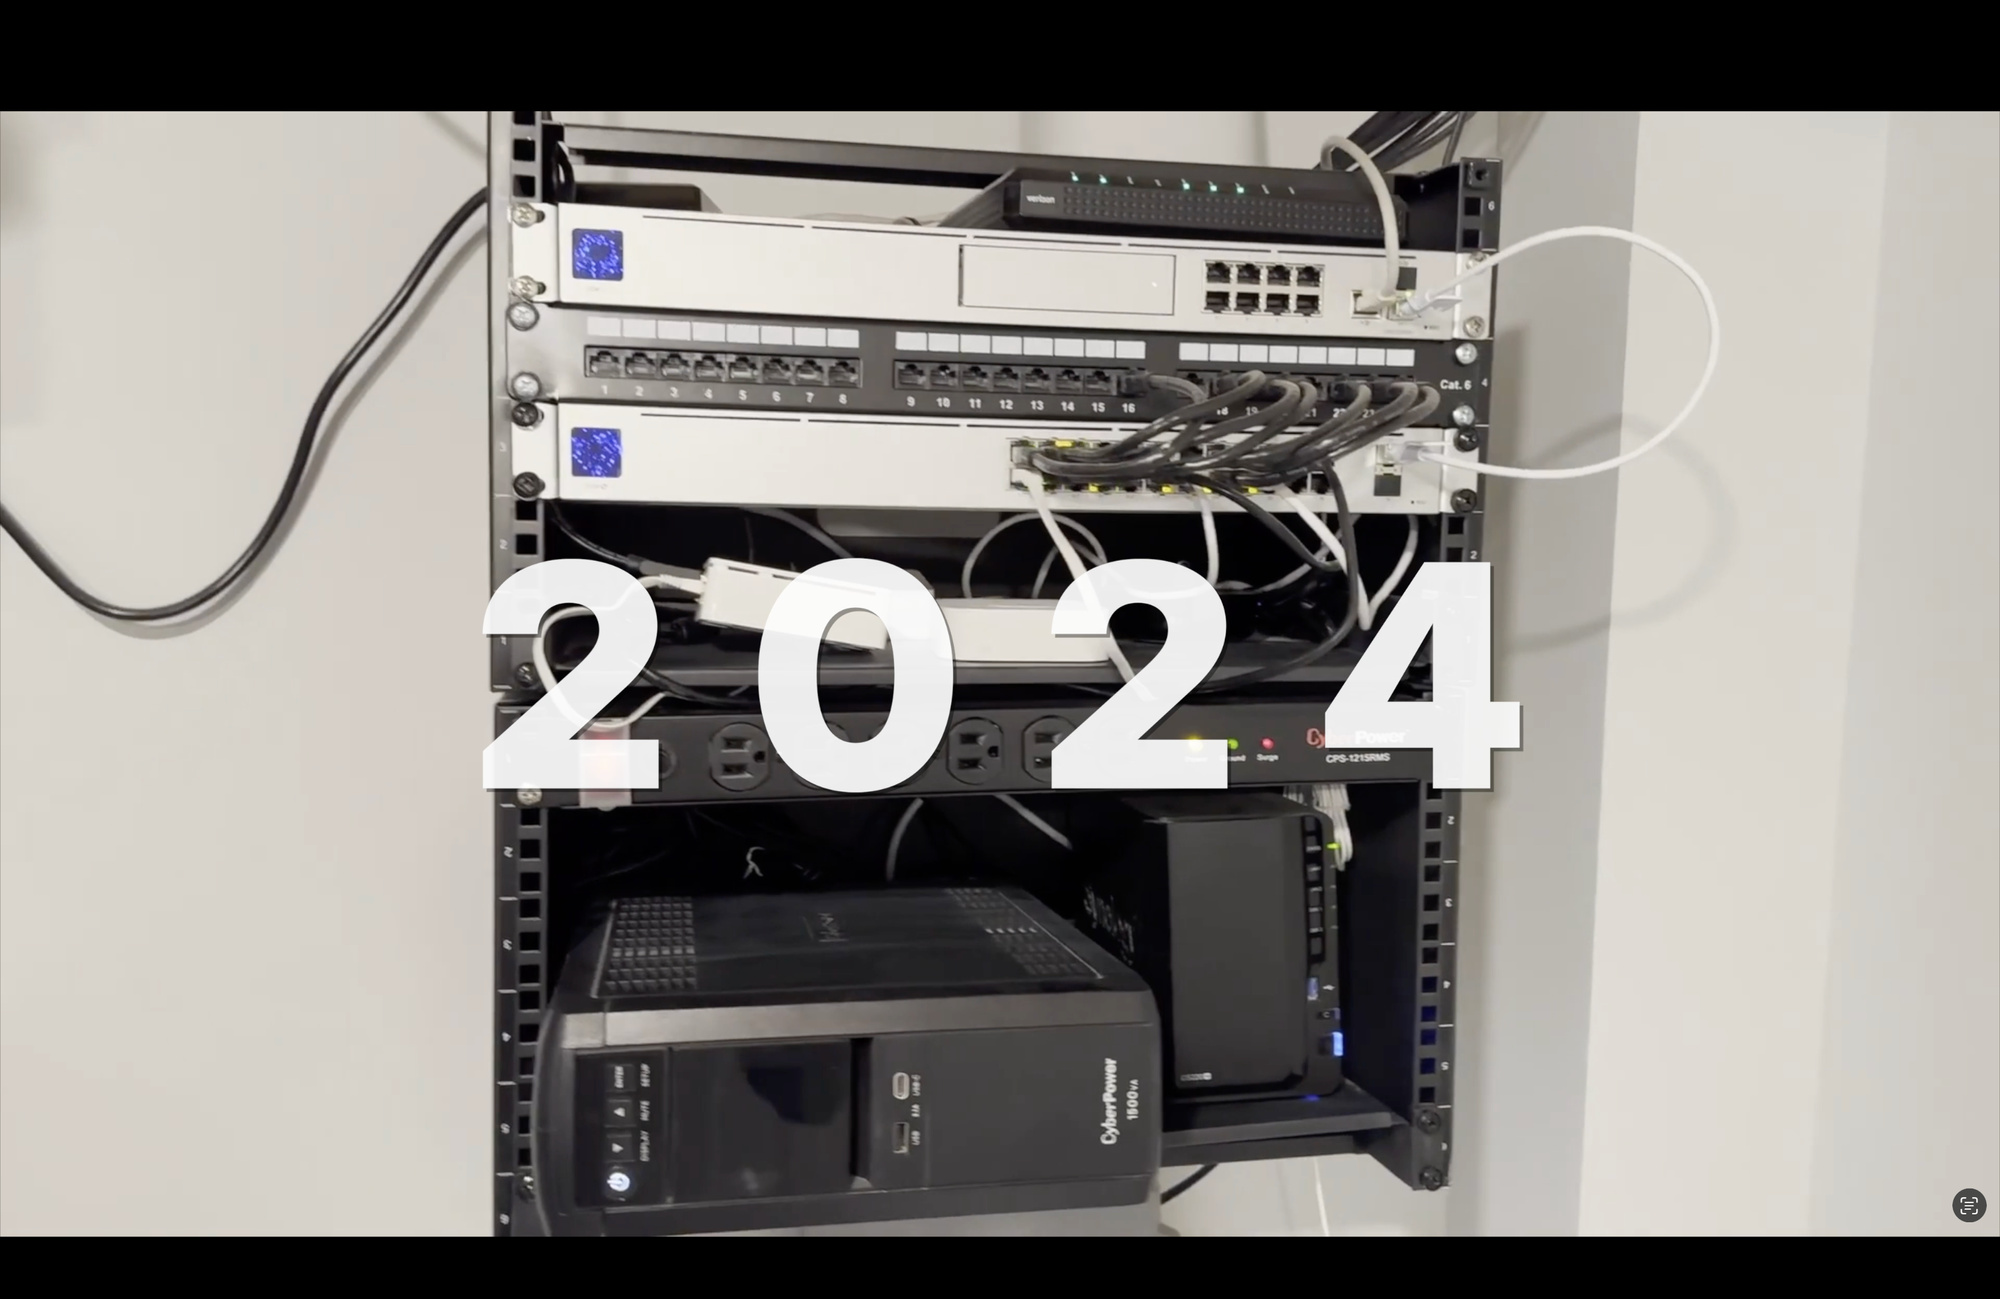
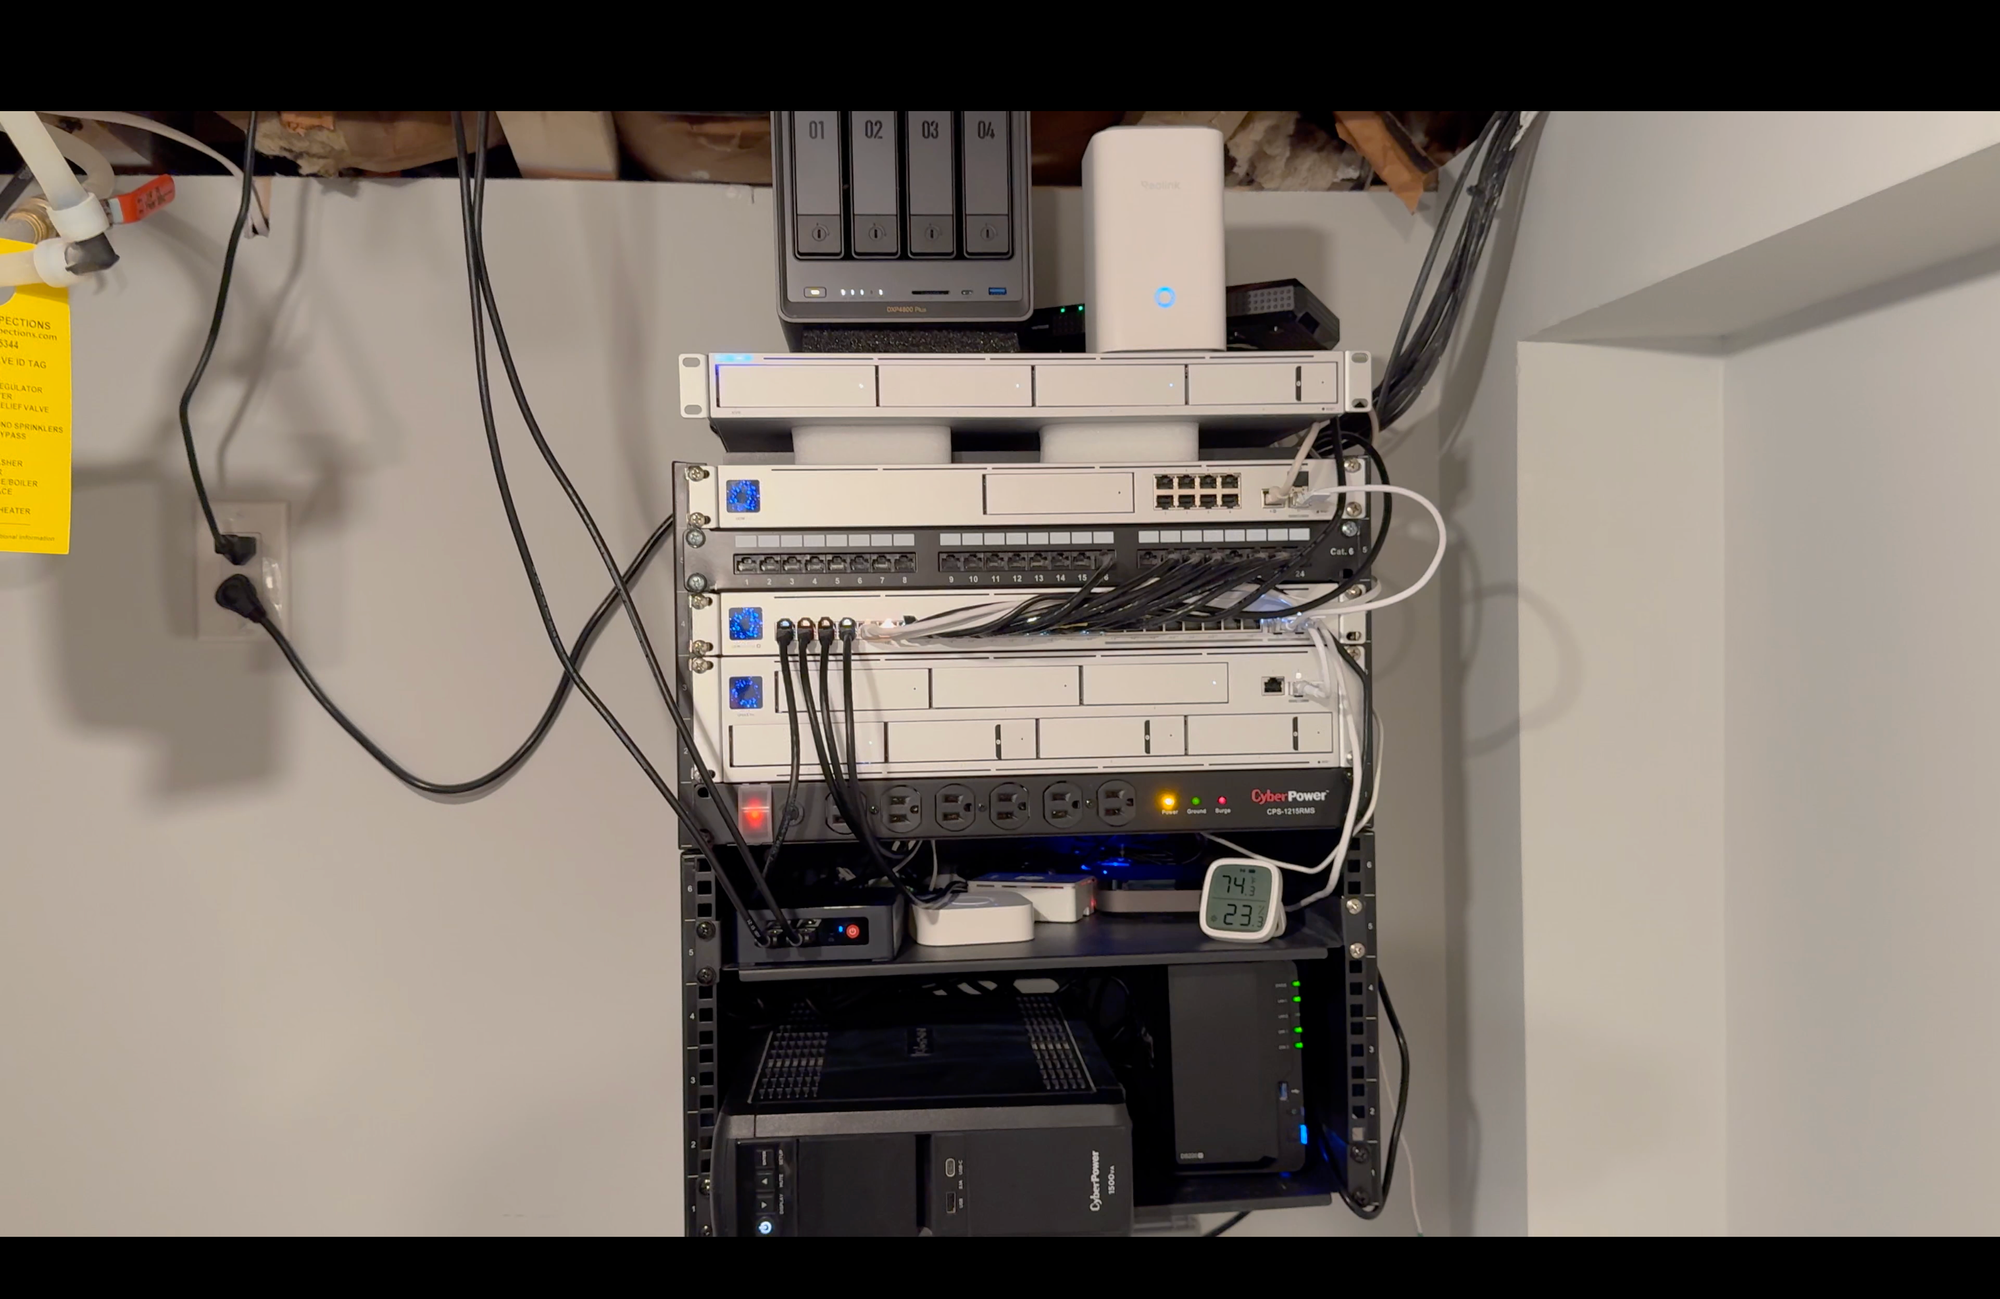
It’s been a year since my last rack update, and a lot has changed. For the last three years, I’ve been using Ubiquiti UniFi to power our home’s internet, and to access 24/7, subscription-free, security camera recordings. Between a centralized networking rack in our basement, and wireless access points distributed around our property, we have even and reliable internet coverage for over 100 connected devices. This networking setup is the foundation of our productivity and ever-expanding smart home.
I’m going to share my updated home network and rack setup for 2025, including all the hardware I’m using and how I keep it secure. I literally disconnected and took down everything on my rack from the year before to reset things with a clean approach, there’s a lot that’s new.
Main Points
Cloud Gateway
Some of the devices in my setup I purchased, and some were sent to me by for testing, but no one is sponsoring this video.
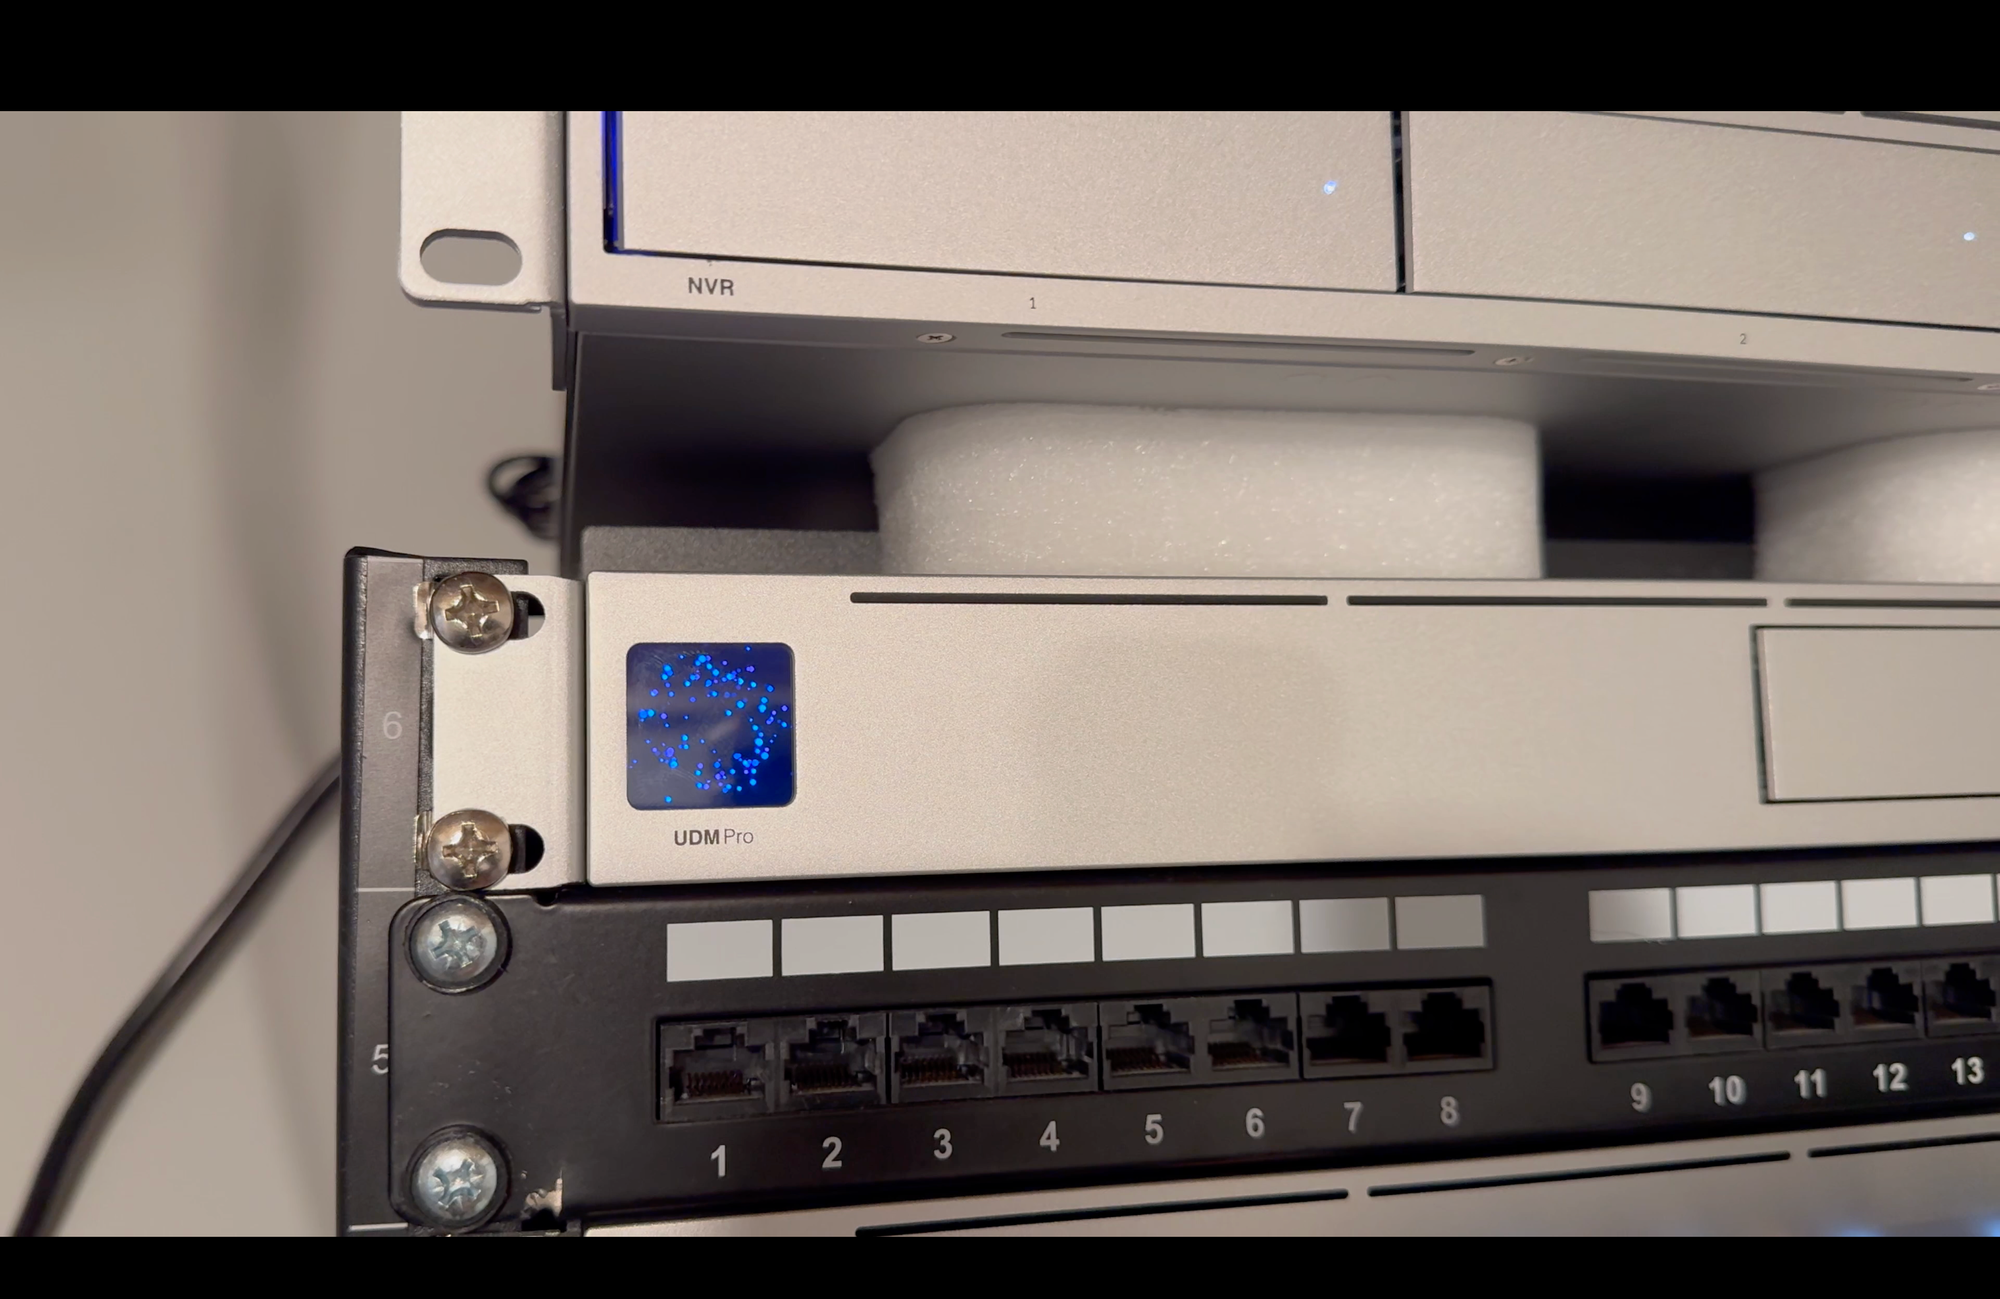
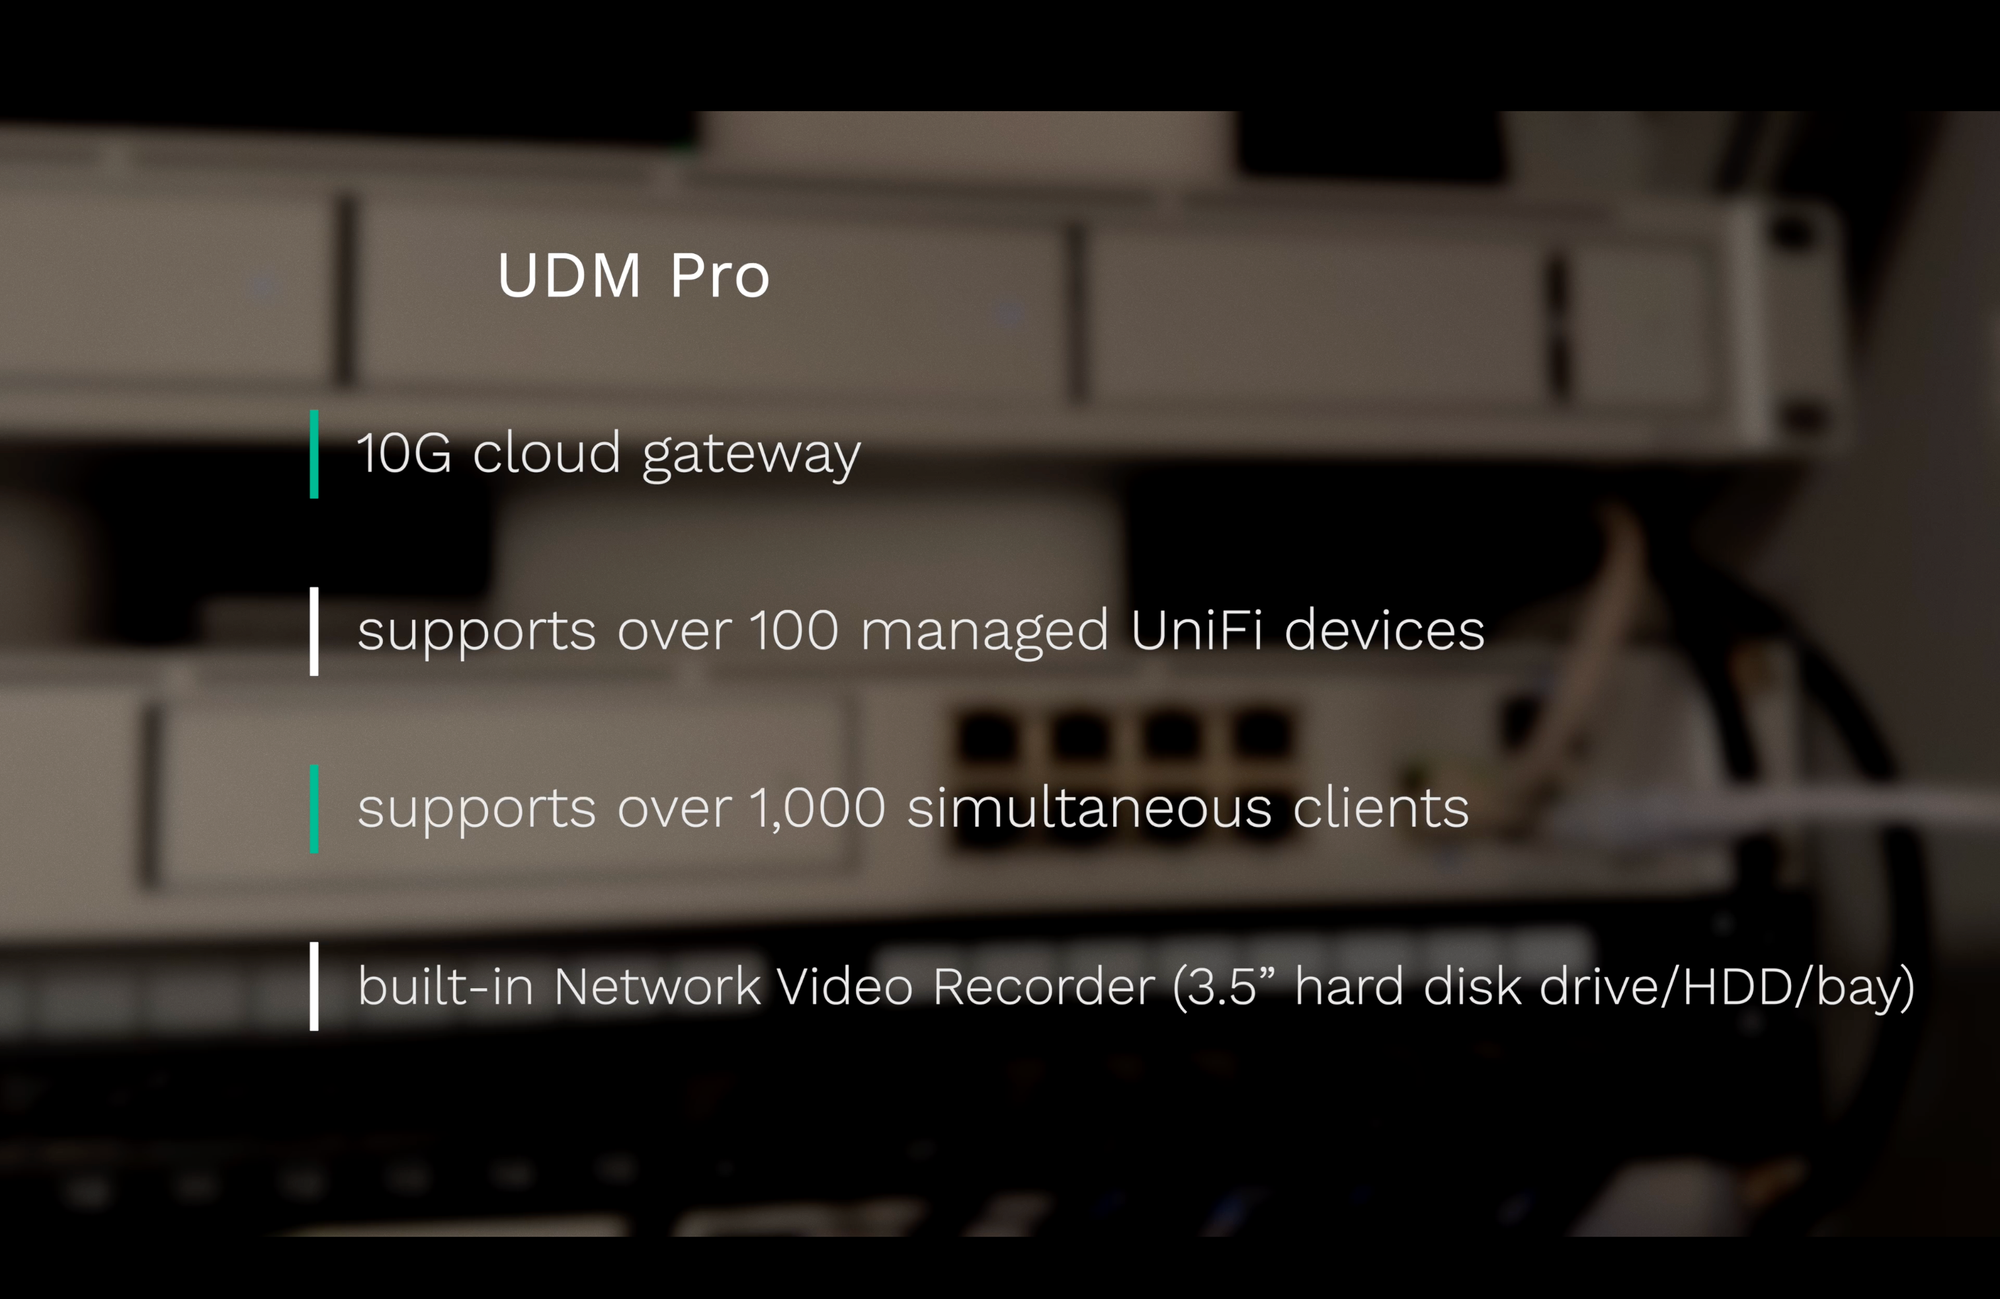
The backbone of my setup continues to be a UniFi Dream Machine Pro, or UDM Pro, which costs $379. This is a 10G cloud gateway that can support over 100 managed UniFi devices and over 1,000 simultaneous clients. It replaced the router from my Internet Service Provider, or ISP, and utilizes switch ports and wireless access points, or APs, to expand my system and my internet coverage. There is a built-in Network Video Recorder, or NVR, with a single 3.5” hard disk drive, or HDD, bay. This can be used to record and save footage locally from a UniFi Protect security camera. You will need to purchase your HDD separately, and I’ve always used Seagate or Western Digital for my 3.5” HDDs without any issues. The UDM Pro is downstream from my ISP’s optical network terminal, or ONT, which supplies our 1Gbps fiber optic internet speed, and connects to the GbE RJ45 WAN port on the UDM Pro.
Cloud Gateway
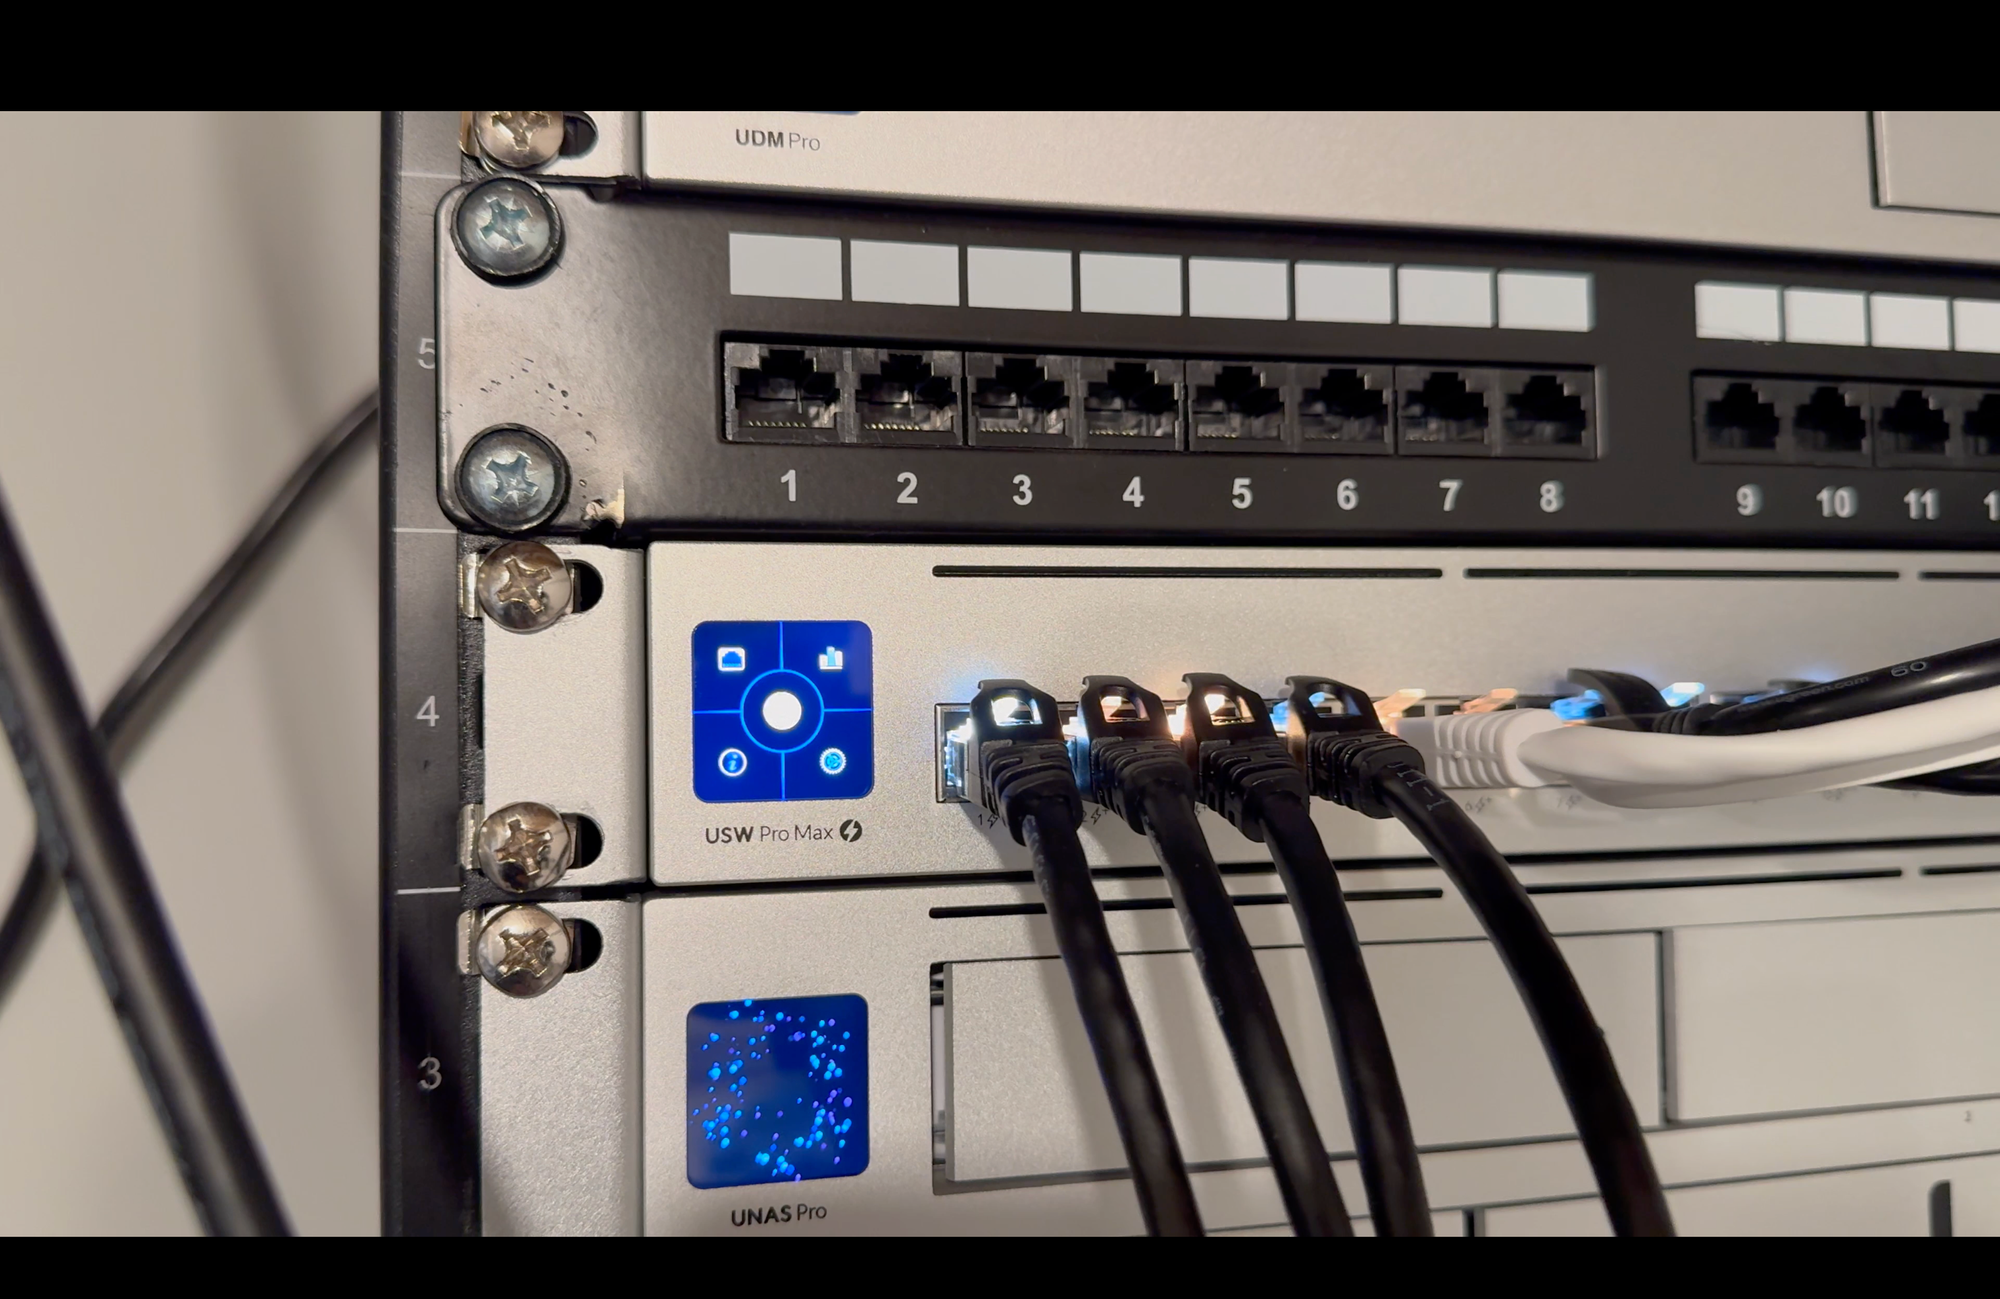
Switching
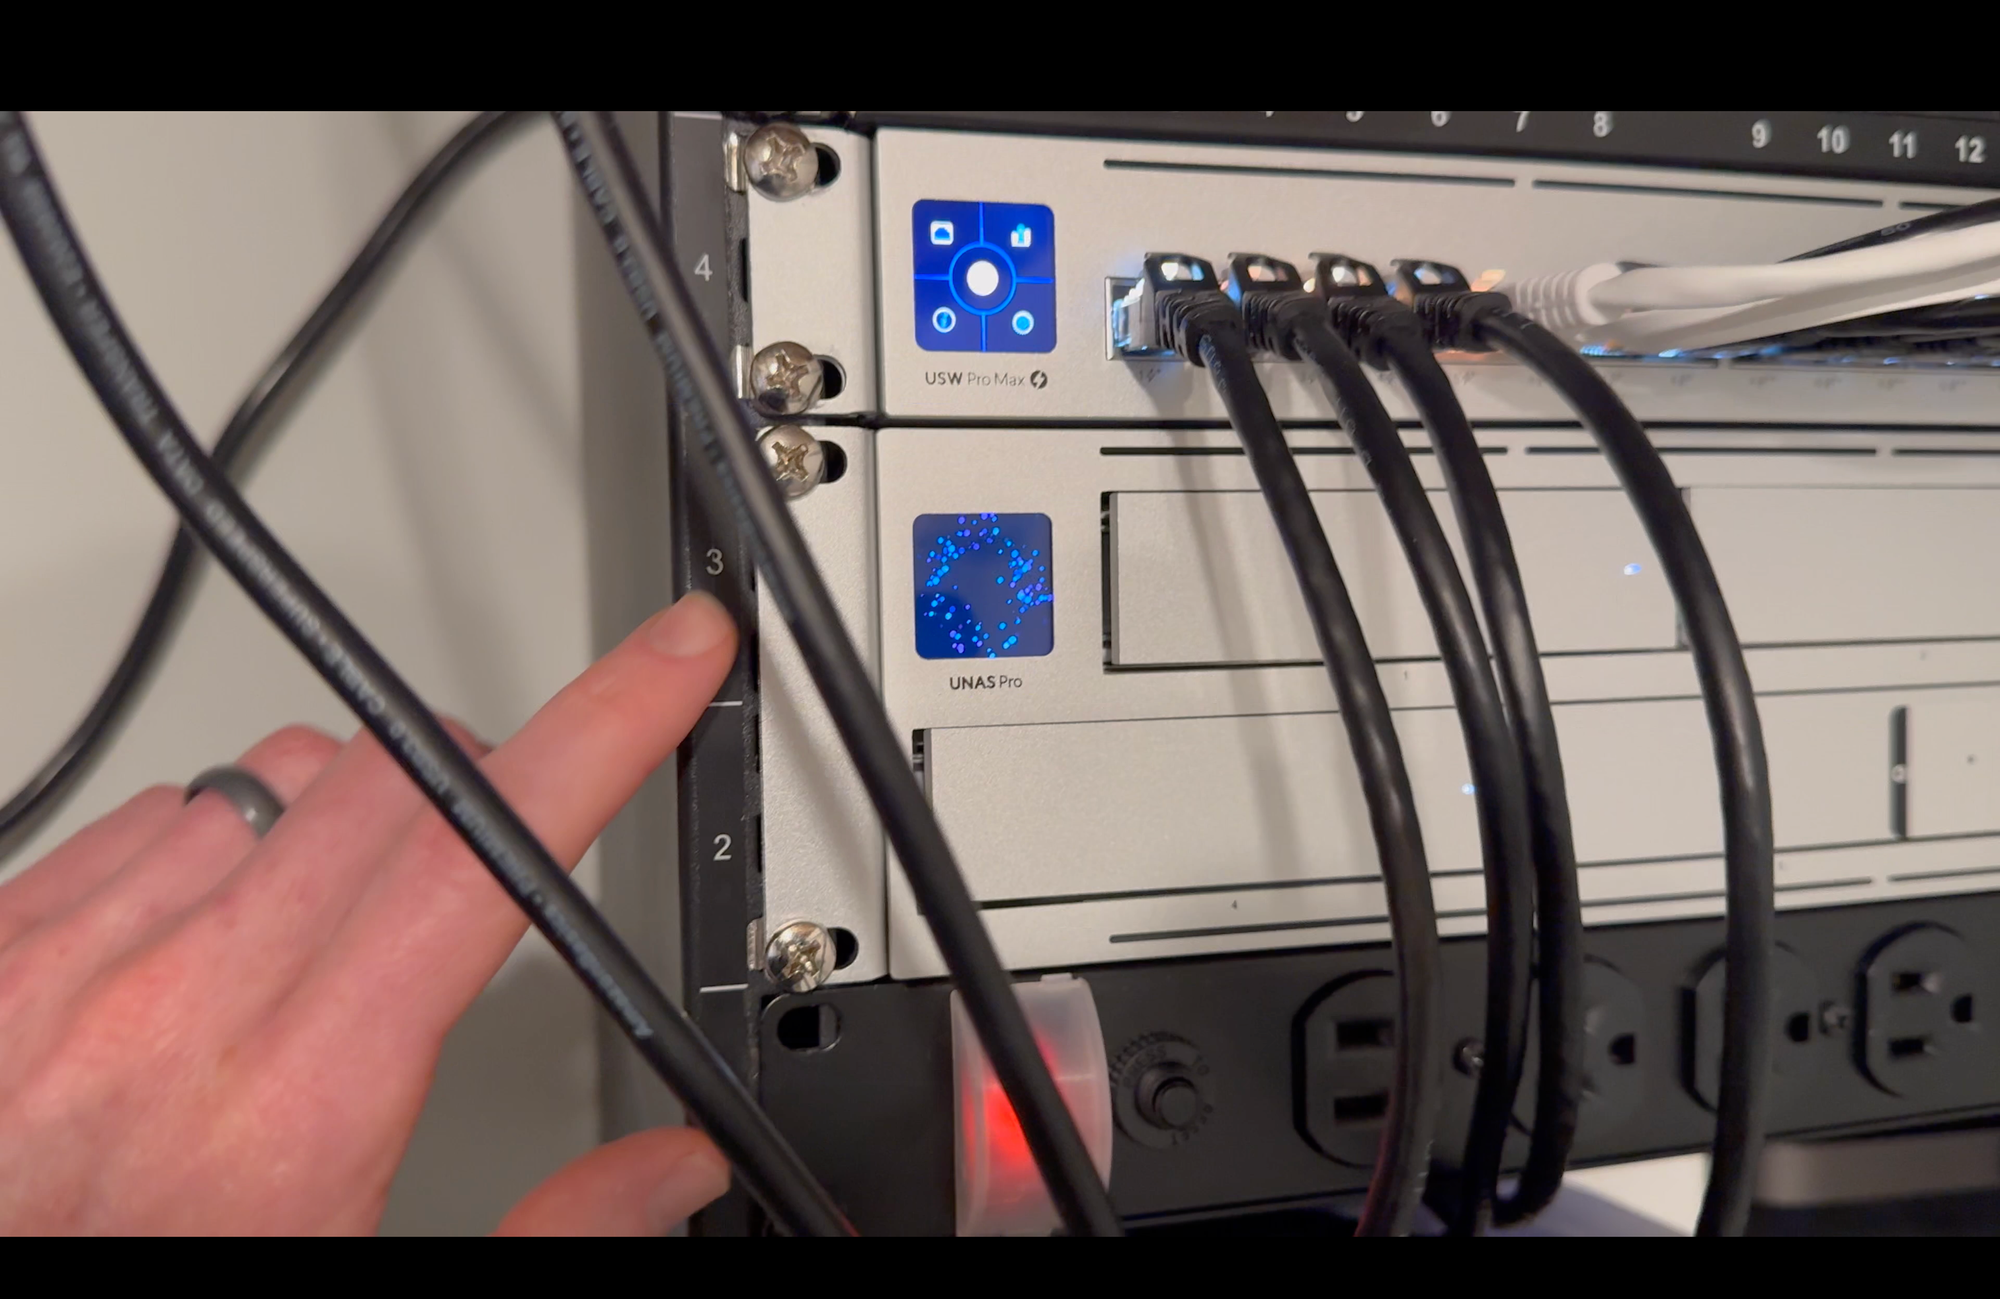
Connected to the UDM Pro is a UniFi Pro Max 24 PoE switch, which retails for $799. These two devices are connected by a 10G SFP+ Direct Attach Cable. The Pro Max 24 PoE switch is a new addition to my rack this year. As the name implies, it has 24 switch ports: Eight of the ports are GbE PoE+, eight are GbE PoE++, and eight are 2.5 GbE PoE++. PoE, PoE+, and PoE++ are standards for Power over Ethernet, allowing devices to receive data and power with just an Ethernet cable. PoE delivers up to 15.4 watts of power, whereas PoE+ supports up to 30 watts of power per port, while PoE++ supports up to 60 or even 100 watts. There are also two 10G SFP+ ports. One underrated thing that I really appreciate about this new switch is the new power cable. It sits mostly flush with the back of the switch, which is super handy in tight networking rack environments.
All 24 ports support Etherlighting, which uses color-coded lights to help manage network racks, but mostly just to make them look cool. You can customize the lighting color from the UniFi web interface. UniFi offers patch cables designed to show off these lighting effects. I am just using standard patch cables to connect UniFi devices coming into a 24-port patch panel with the Pro Max 24 PoE. A patch panel is not strictly necessary, but it helps to keep your networking setup clean and organized, with shorter patch cables connecting switches, routers, or servers, instead of long Ethernet cable dangling everywhere and in the way. While I feel decent about the organization of my rack, I know it could be even better.
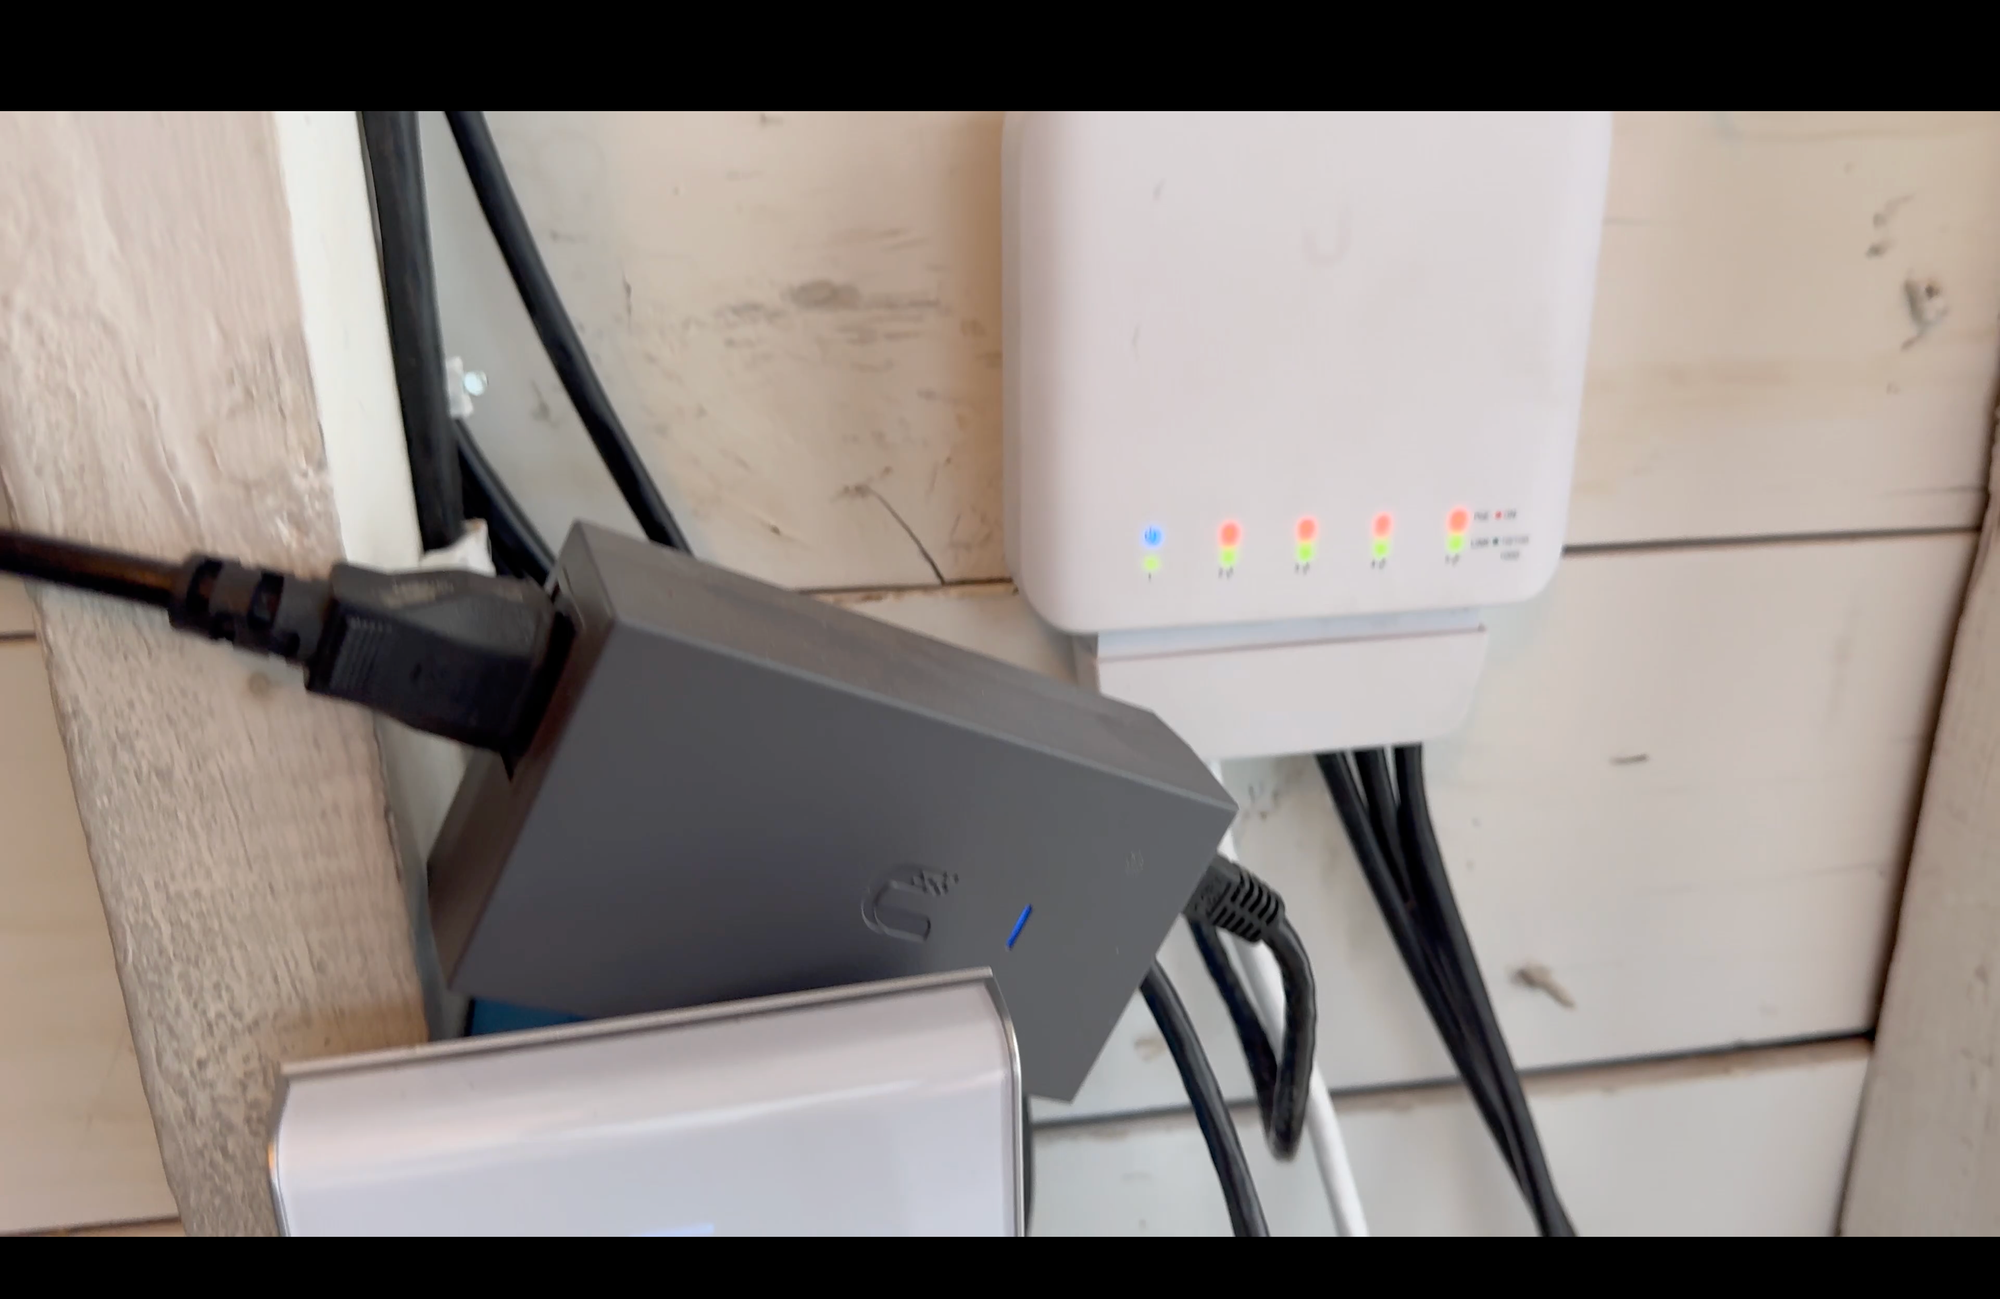
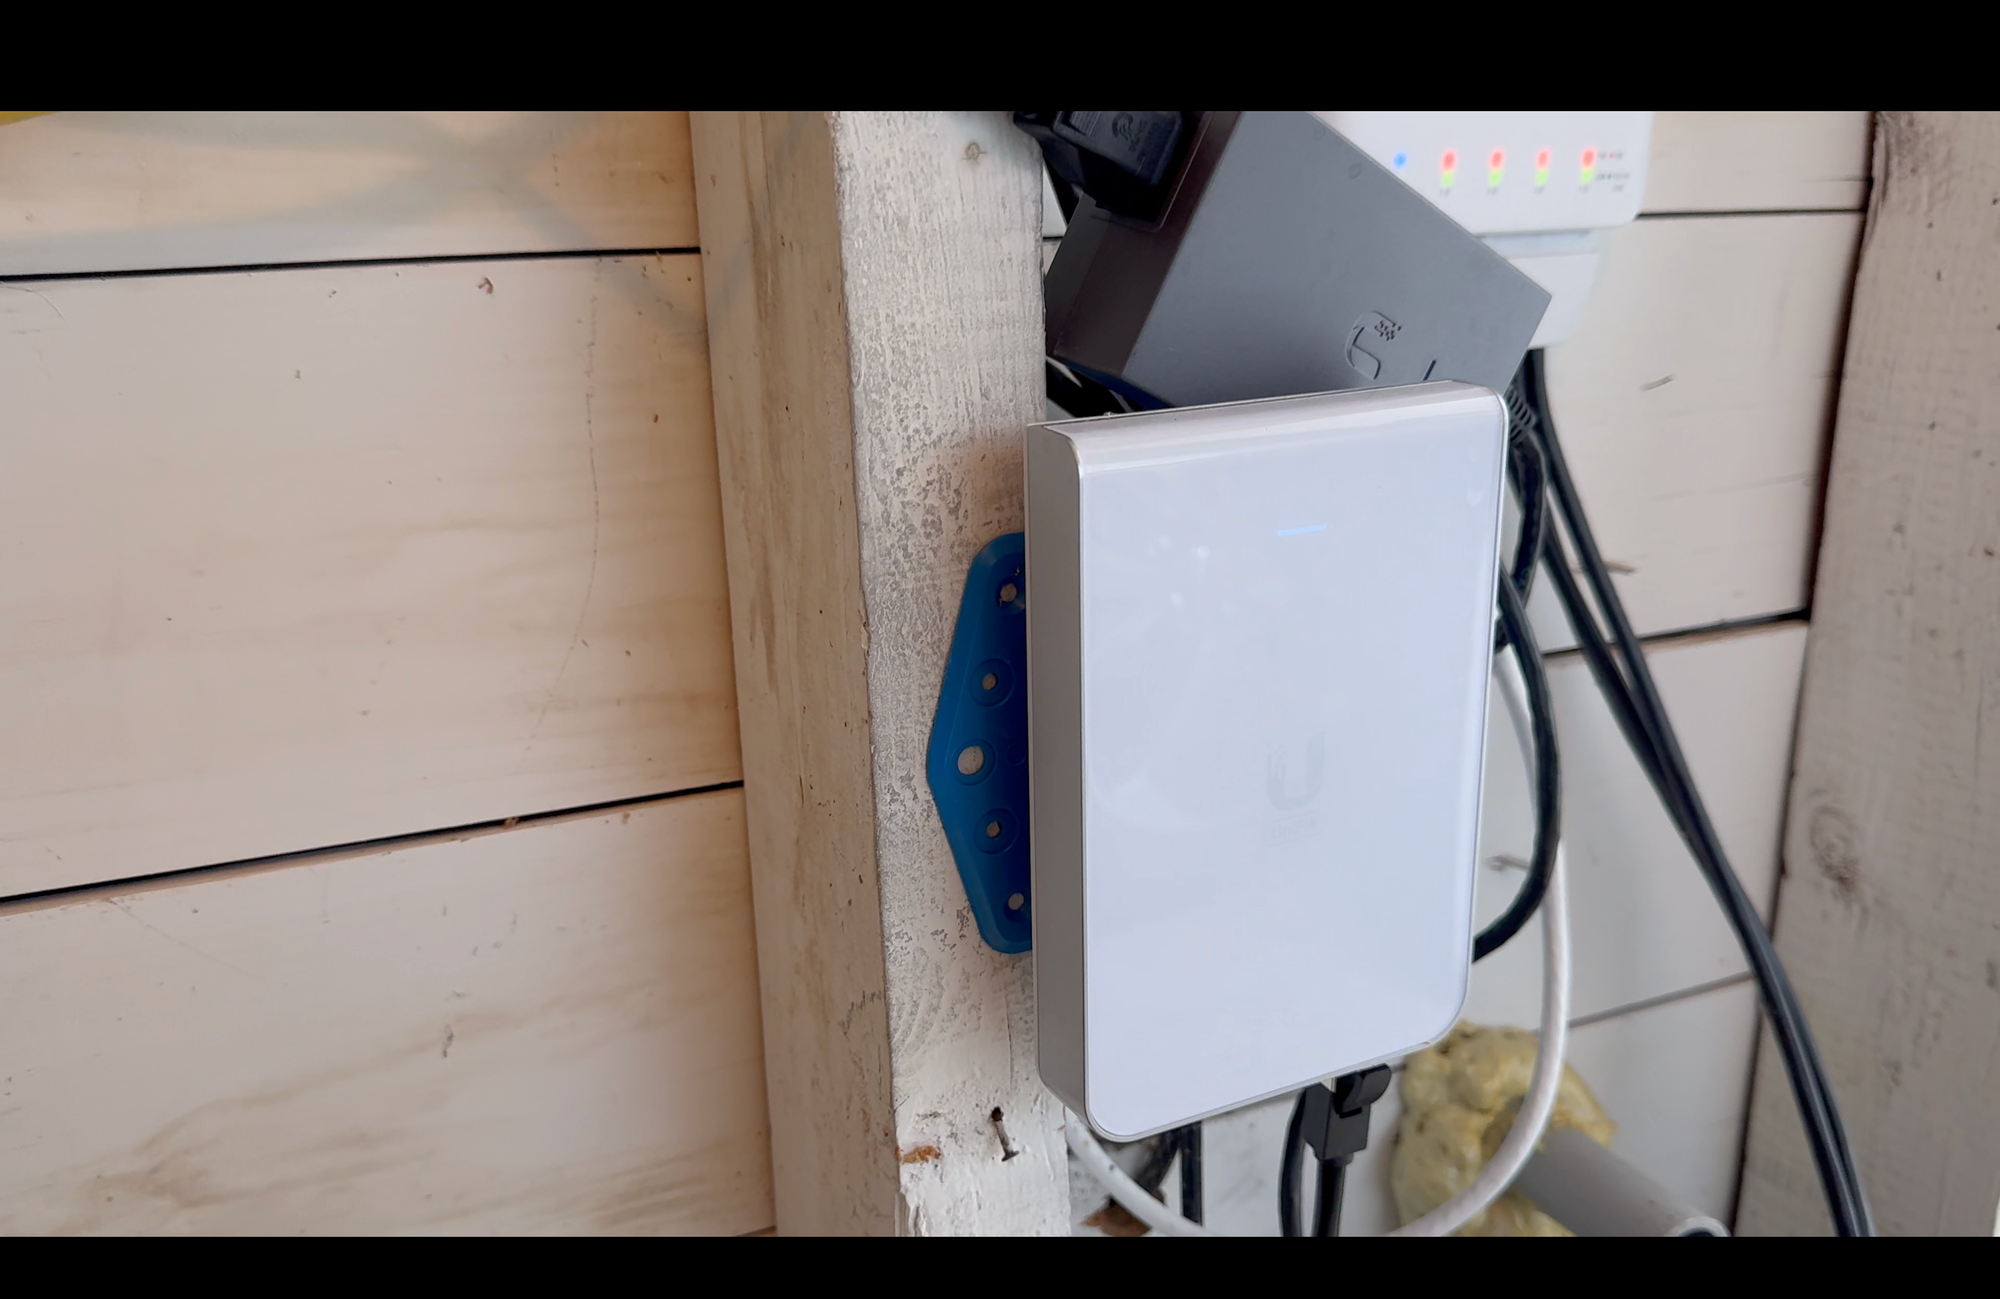
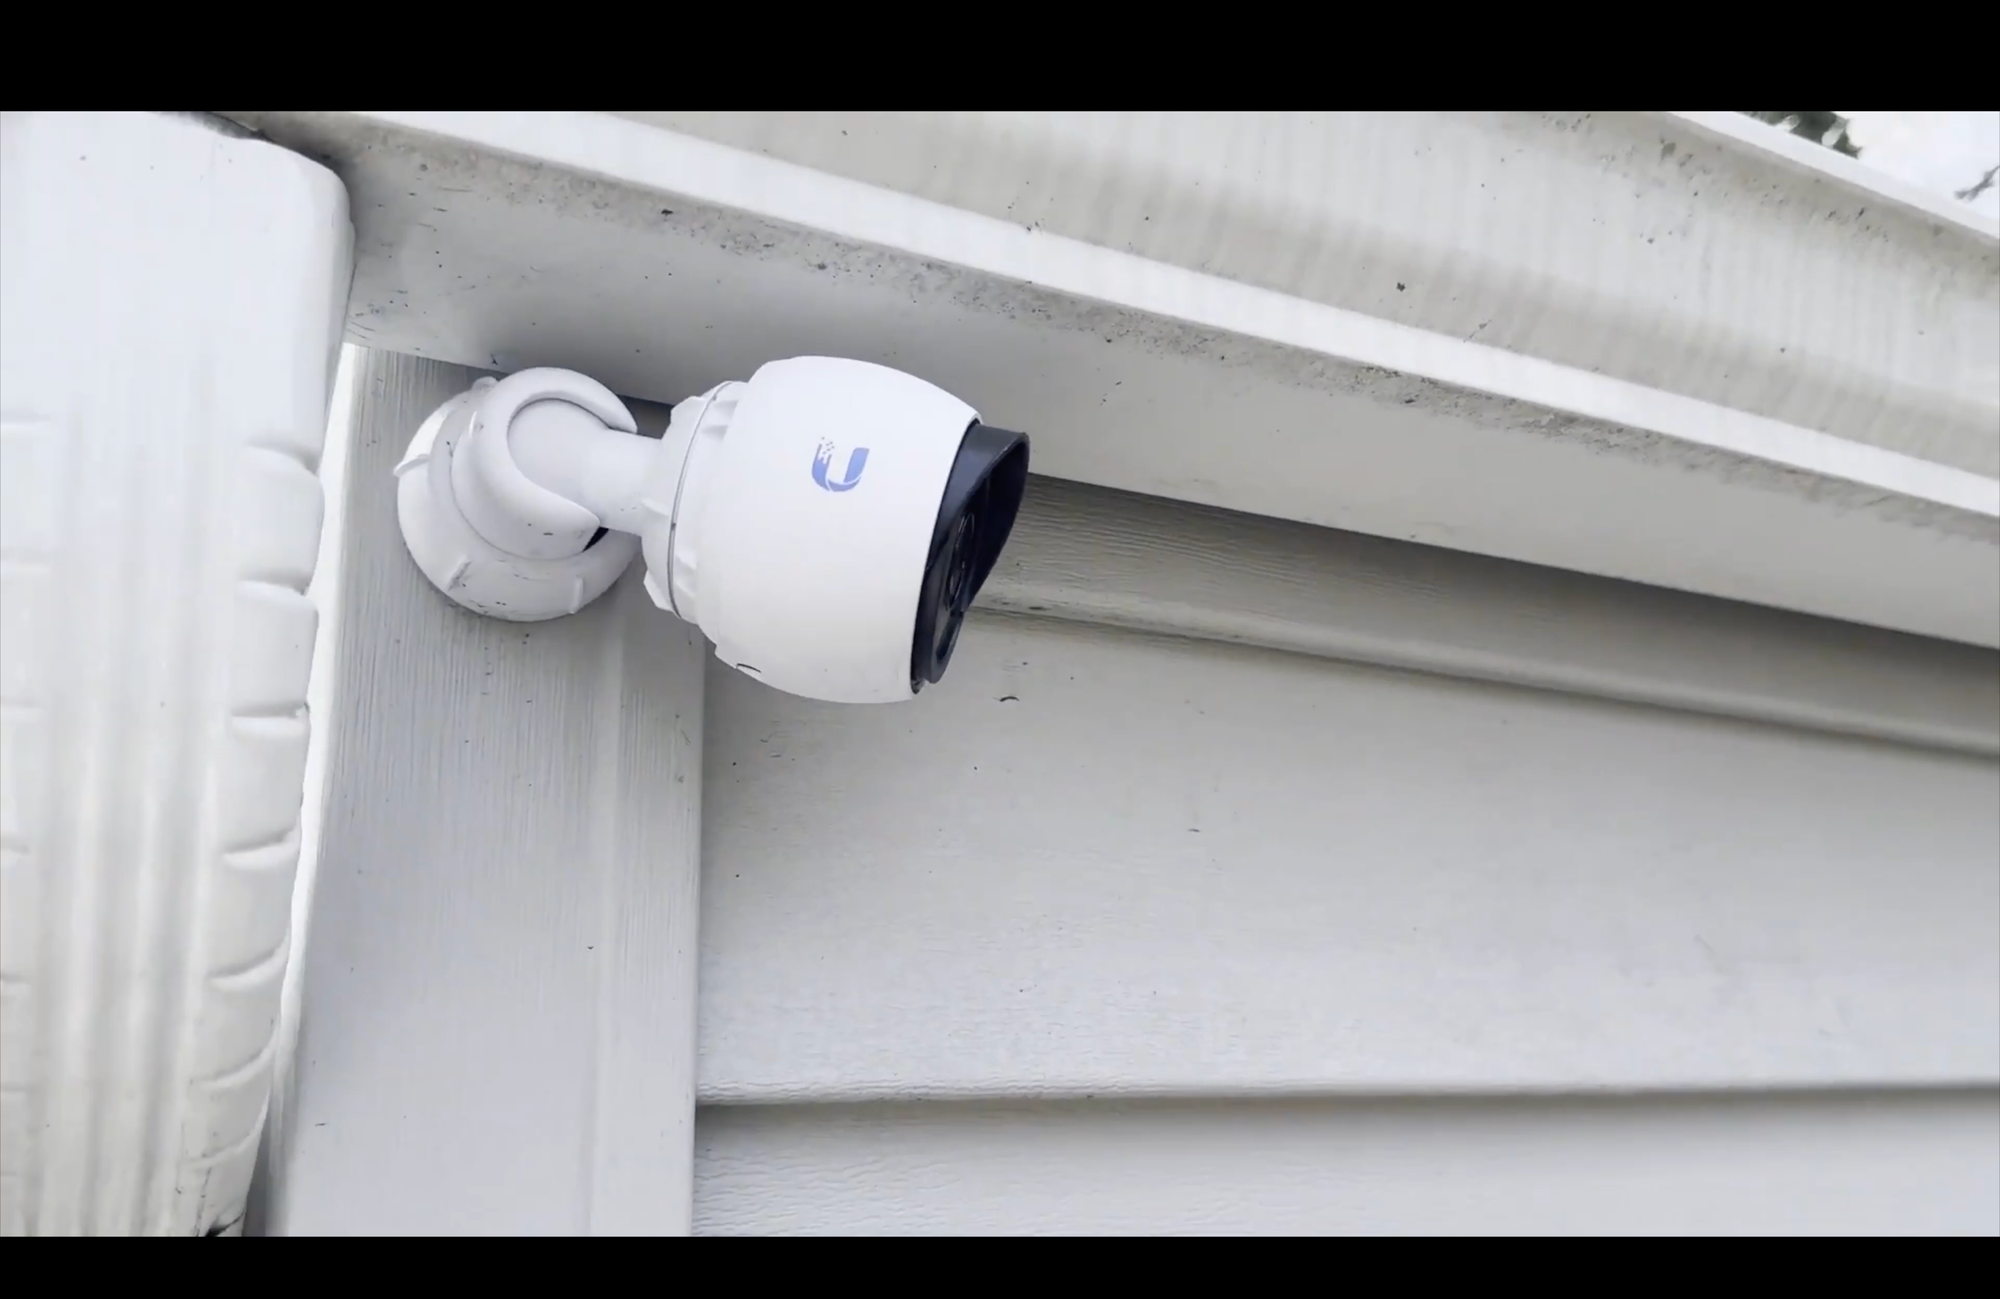
Downstream from the Pro Max 24 PoE is a UniFi Switch Flex. This $99 switch adds four additional PoE+ ports in our outdoor detached garage. This was a later addition to my networking setup out of necessity. Previously, I had dedicated Ethernet cables running underground to the garage for powering a WiFi access point and security cameras. Unfortunately, lightning hit our home and caused thousands of dollars in electronics damage, including everything in the garage, and frying one of the Ethernet cables. To avoid the complexity of re-digging a trench from the house to the garage to bury new Ethernet cables, I added the Switch Flex, and from there connect security cameras and a WiFi access point. Since the Switch Flex only supplies 46W of power, I added a PoE injector because I needed more power.
Switching
WiFi
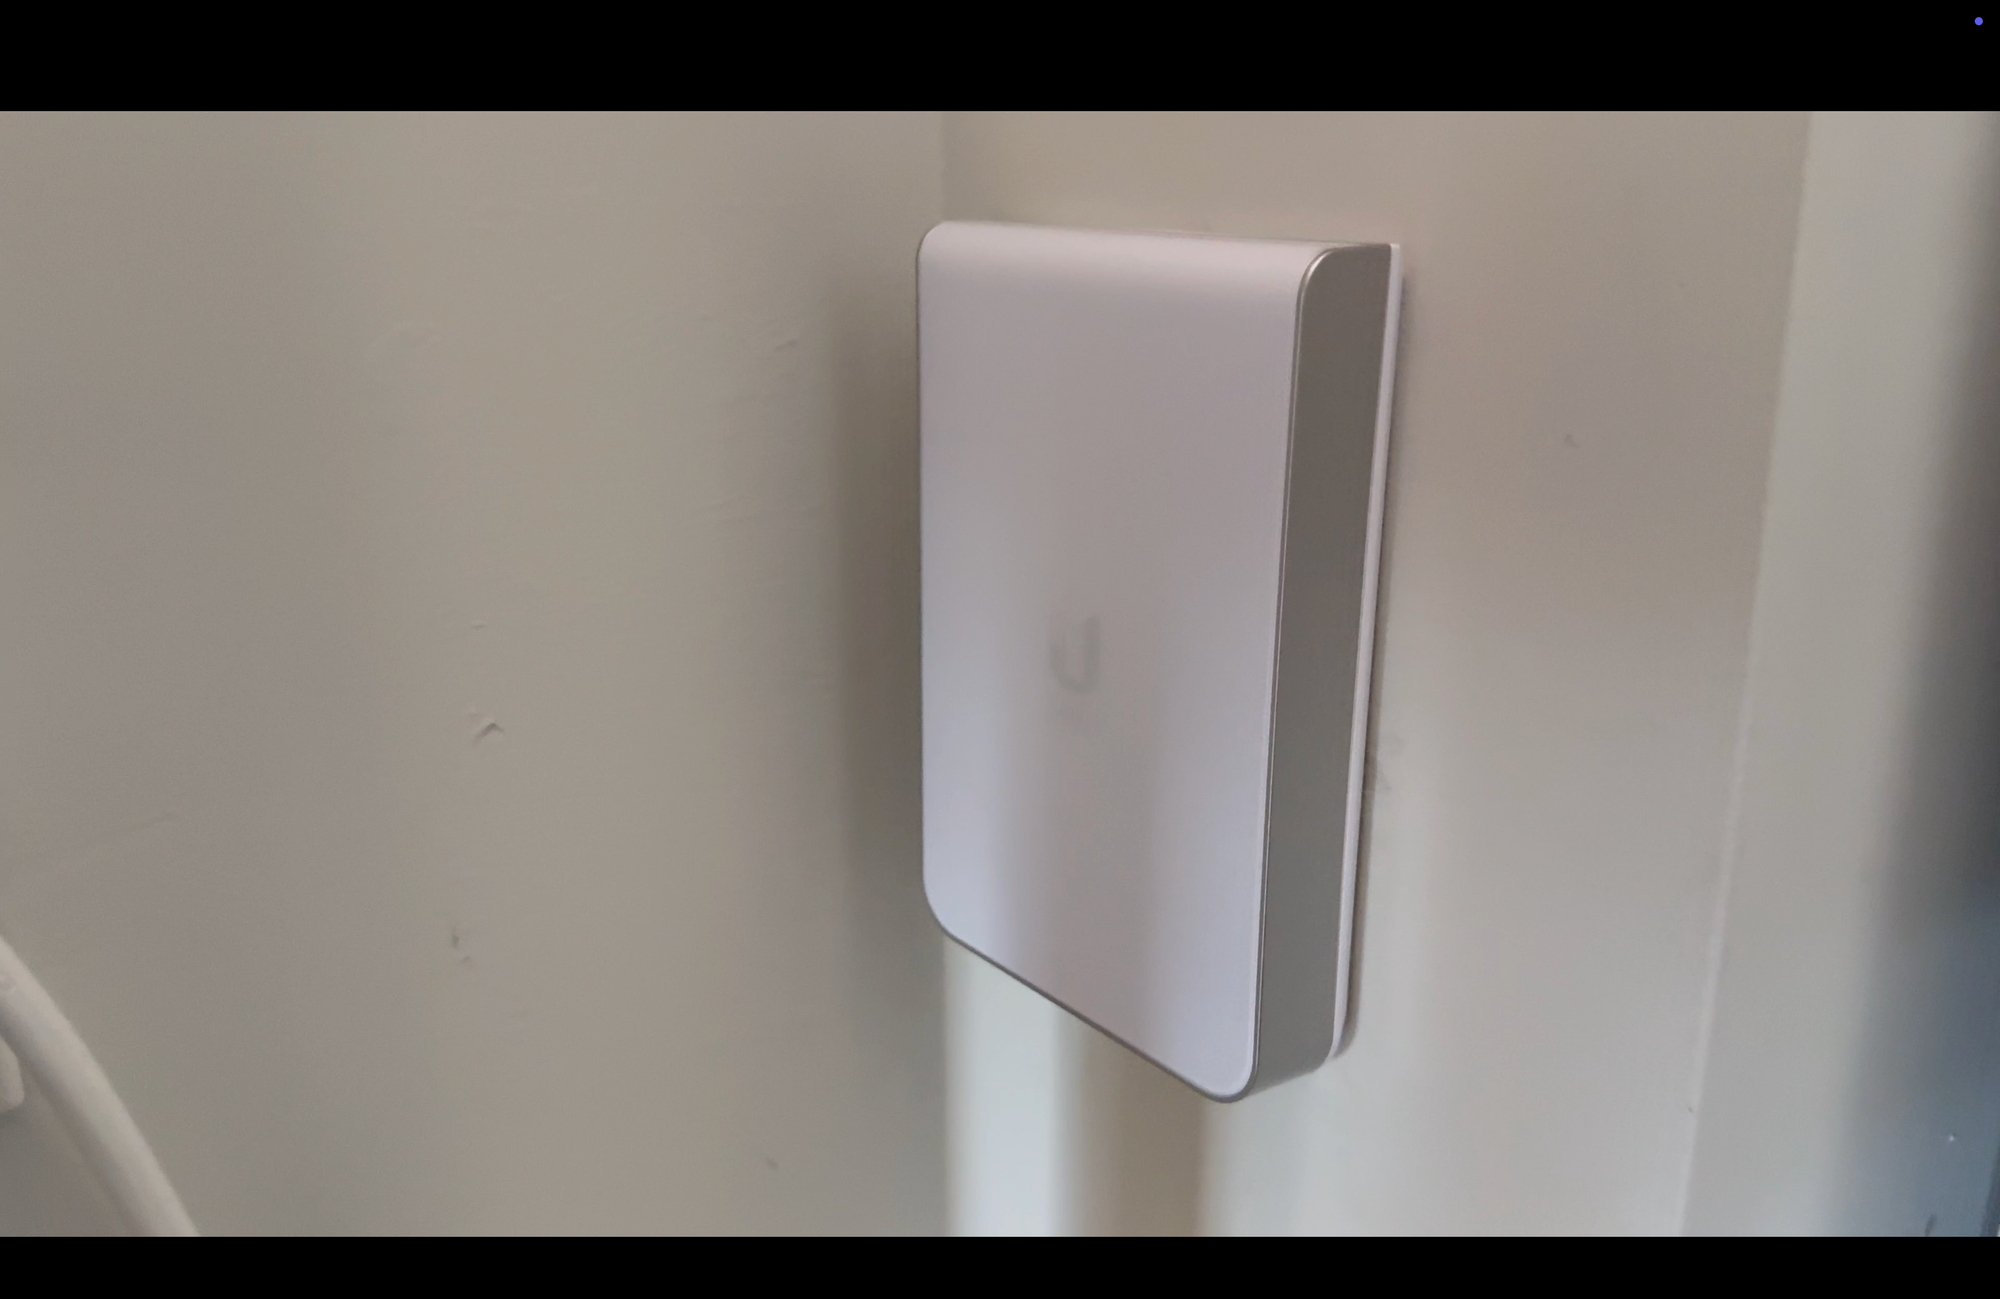
Also connected to the Pro Max 24 PoE is a combination of UniFi Protect security cameras, smart home hubs, and UniFi access points. Going from a single router broadcasting throughout my home, to a network with multiple APs was a game-changer for more even and reliable coverage. I have a ceiling mounted U6 Lite in the basement, a ceiling mounted U6 Long Range on the main floor, a U6 In-Wall upstairs, and another in our detached garage. Since each AP is hardwired into the switch via PoE, and these are spread out across my home, I’m able to get full strength WiFi no matter which AP my devices connect to. Each individual AP can have 300 or more connected devices. As we move around the home, our phones and laptops seamlessly transition from one AP to another depending on proximity and signal strength. I took the additional step of adding dedicated Ethernet ports to a few key places in my home, including my home office and behind our wall-mounted TV. This helps to maximize internet throughput for video conference calls and streaming TV and movies.

WiFi
Network Storage
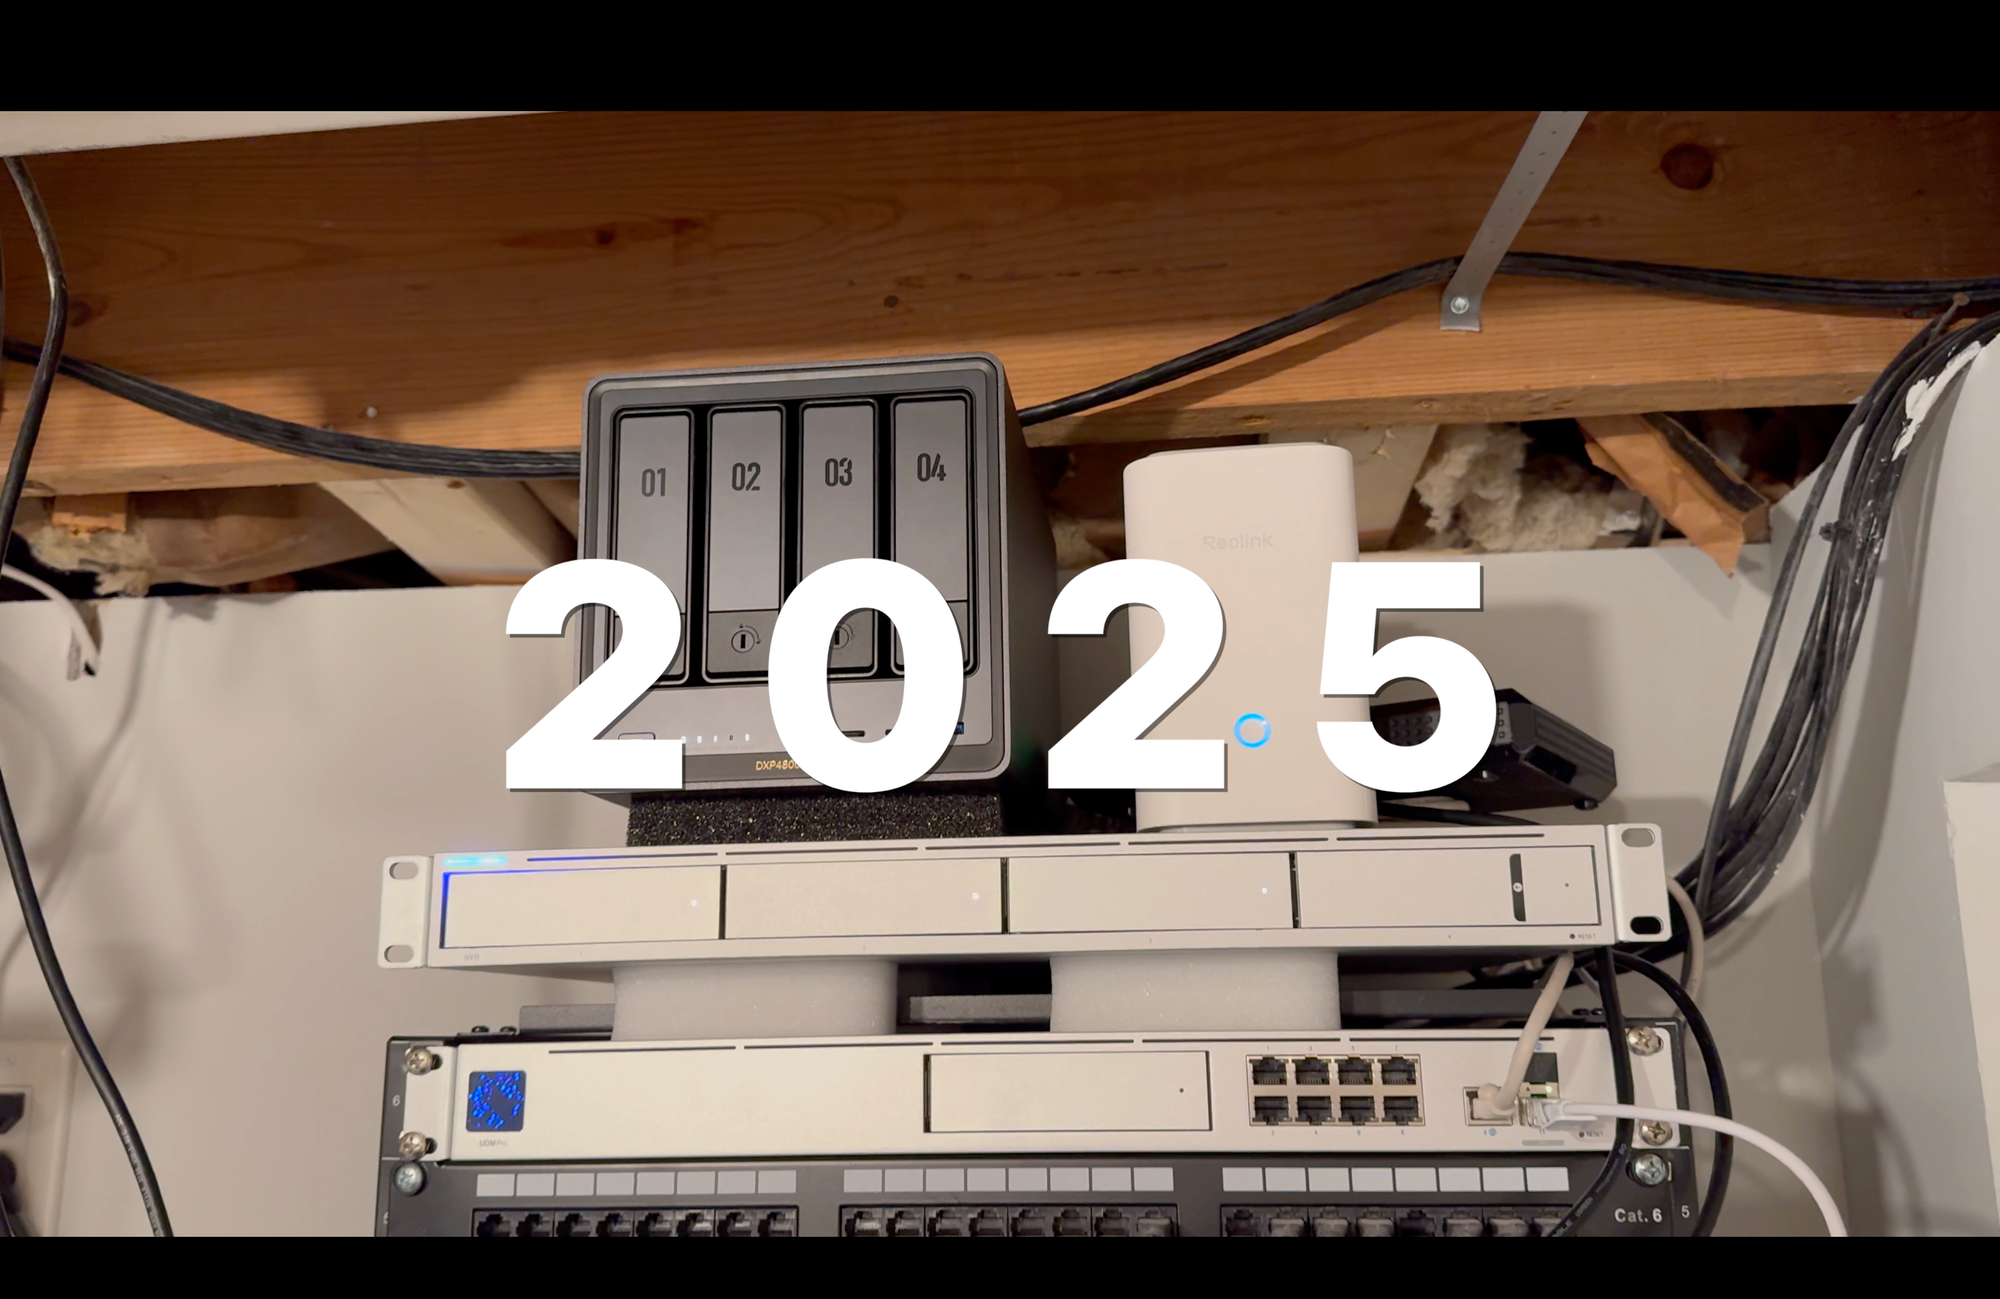
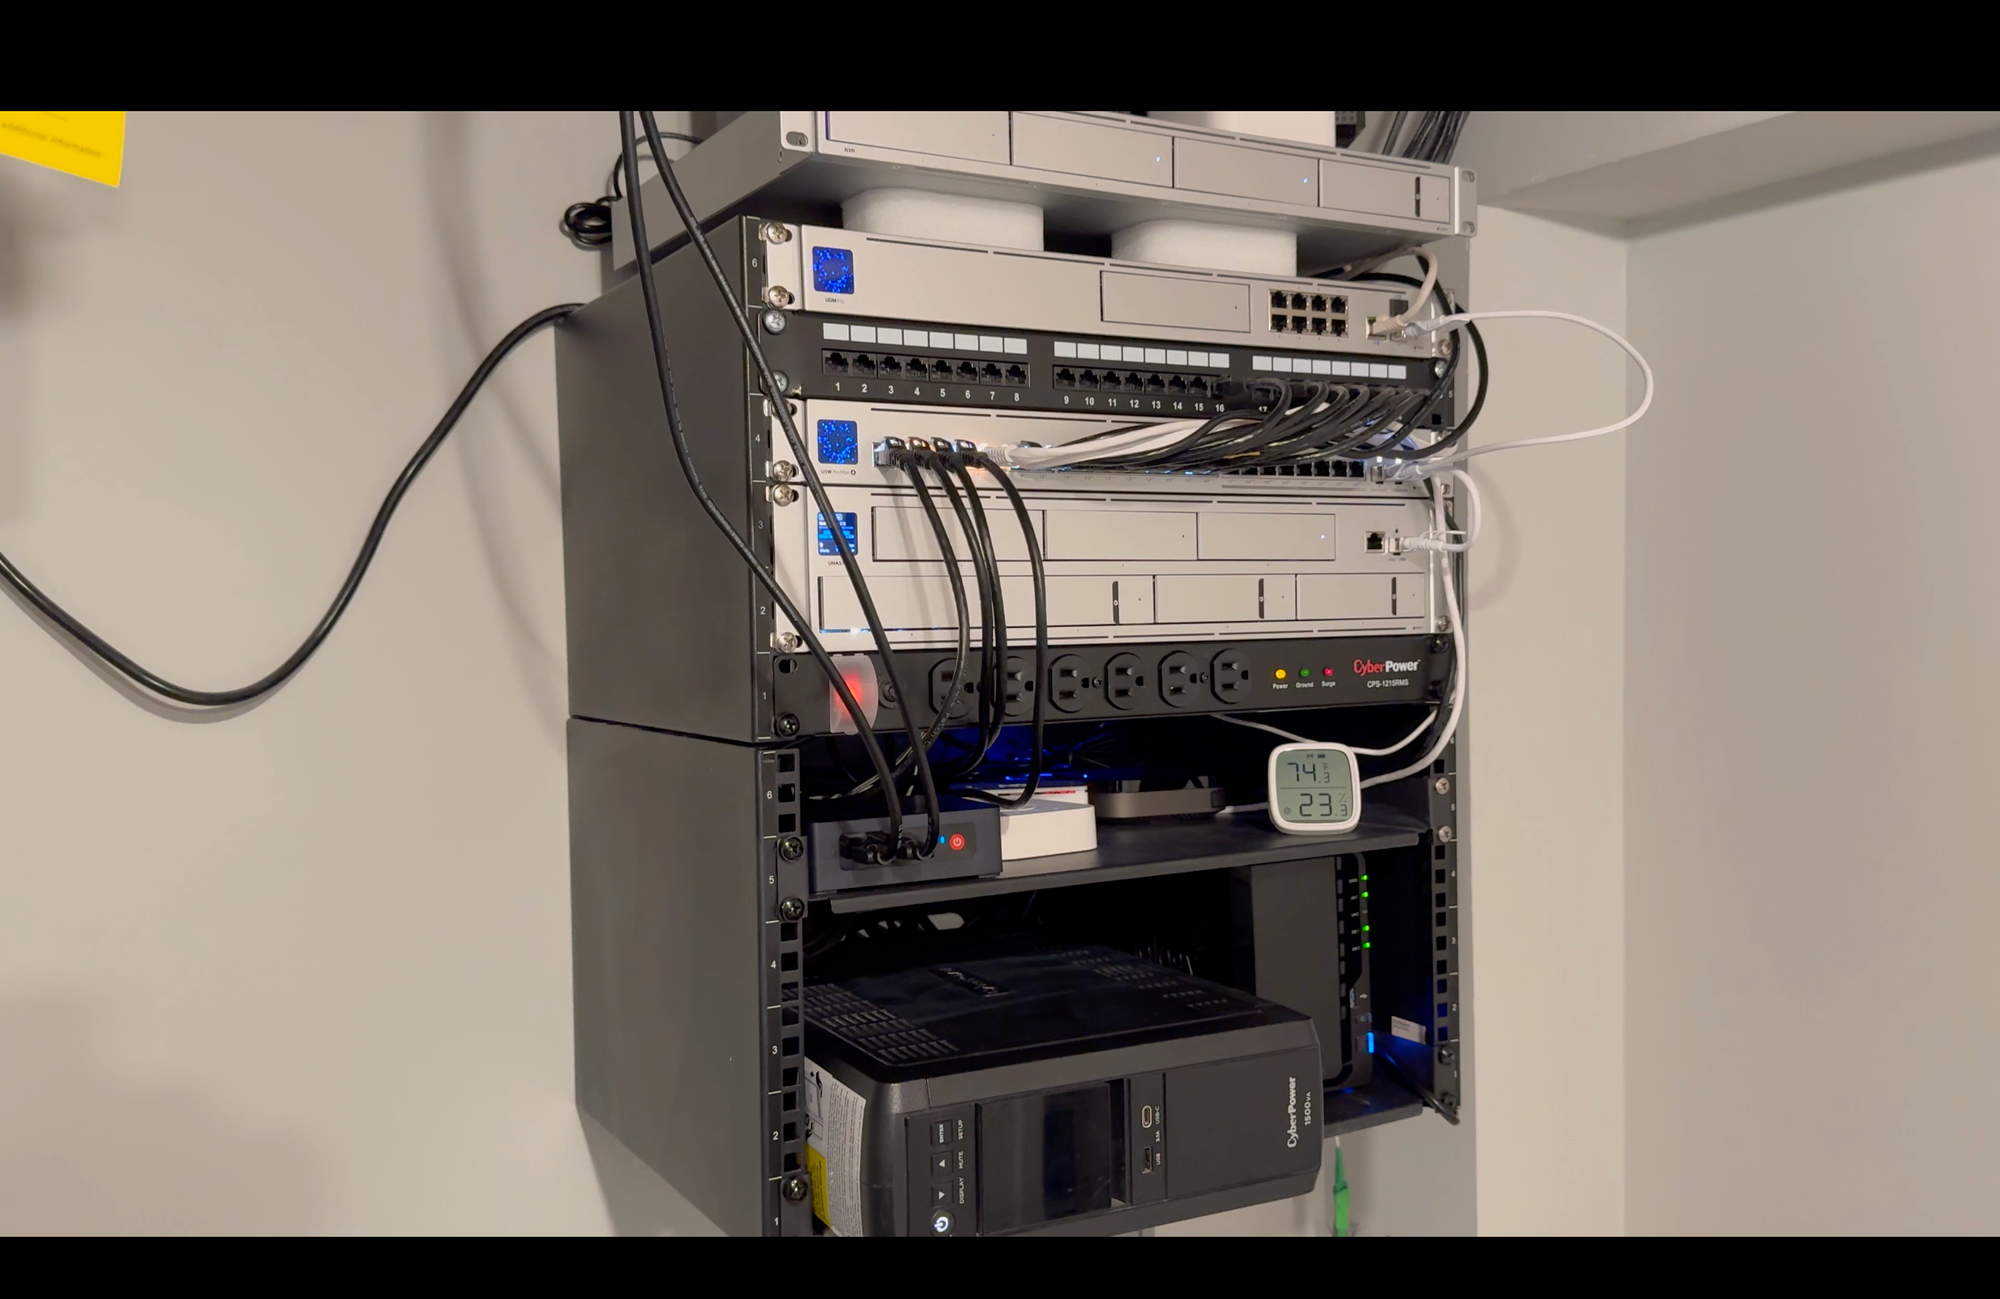
Beneath the switch is another new addition for my rack this year, a UniFi UNAS Pro, priced at $499. This 2U rack-mount NAS is UniFi’s first foray into network attached storage. It is connected to the Pro Max 24 PoE using a 10G SFP+ Direct Attach Cable, and has seven 2.5/3.5” drive bays with 10 Gbps for faster transfer speeds. For now, I’m using four of the seven bays each with a Seagate IronWolf 12TB HDD in a RAID-5 configuration. This means my storage volume is the sum total of three of those drives, and can withstand the failure of a single drive without losing data. Data on the UNAS Pro can be backed up to another UNAS, third-party SMB drives, or cloud providers, like Google Drive or OneDrive. If you use macOS, the UNAS Pro supports Time Machine Backups of your Mac. You can also mount network drives to your PC or Mac. UniFi doesn’t have the multi-decade history of brands like Synology when it comes to network storage, and I hope that the available applications and services for it will grow. But for their first effort into this space, I actually think it’s a decent value. And it also has the nice, new power cord like the Pro Max 24 PoE.
The UDM Pro, Pro Max 24 PoE, and UNAS Pro all have a 1.3” touchscreen for device management, though I prefer to use the UniFi app or web interface. There is even a setting that allows all screens to be synchronized, for a consistent screensaver effect.
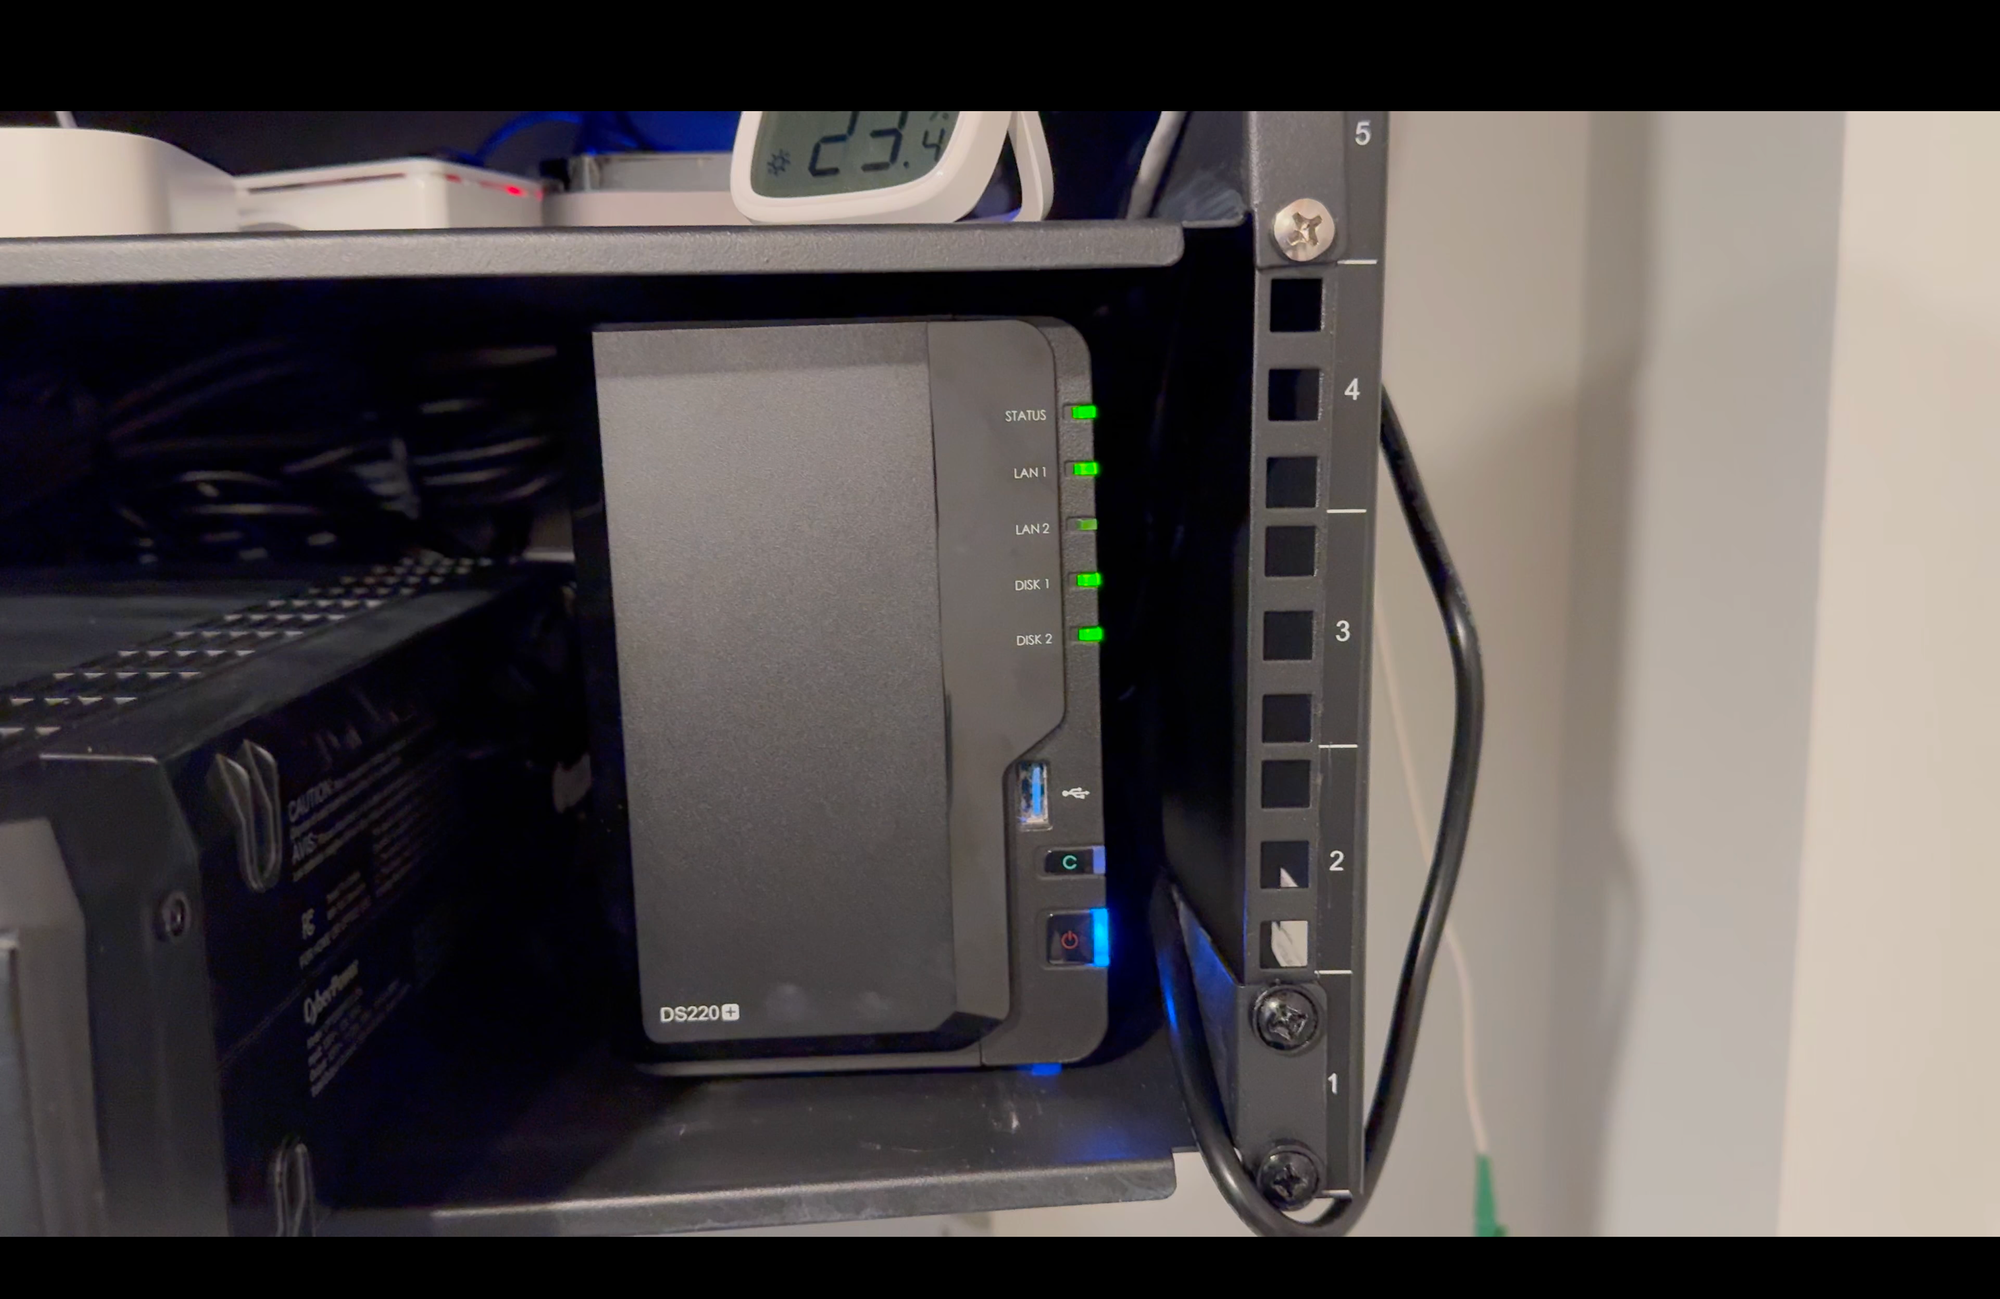
But, this is not my only network attached storage. On the bottom shelf is a Synology NAS 2-Bay DiskStation. Inside are two Seagate IronWolf 12TB HDDs in a Synology Hybrid RAID. The Synology DS220+ NAS was $240, and has served me reliably for four years, hosting Time Machine Backups from two Macs, and a Plex media library with thousands of music, movies, and TV shows.
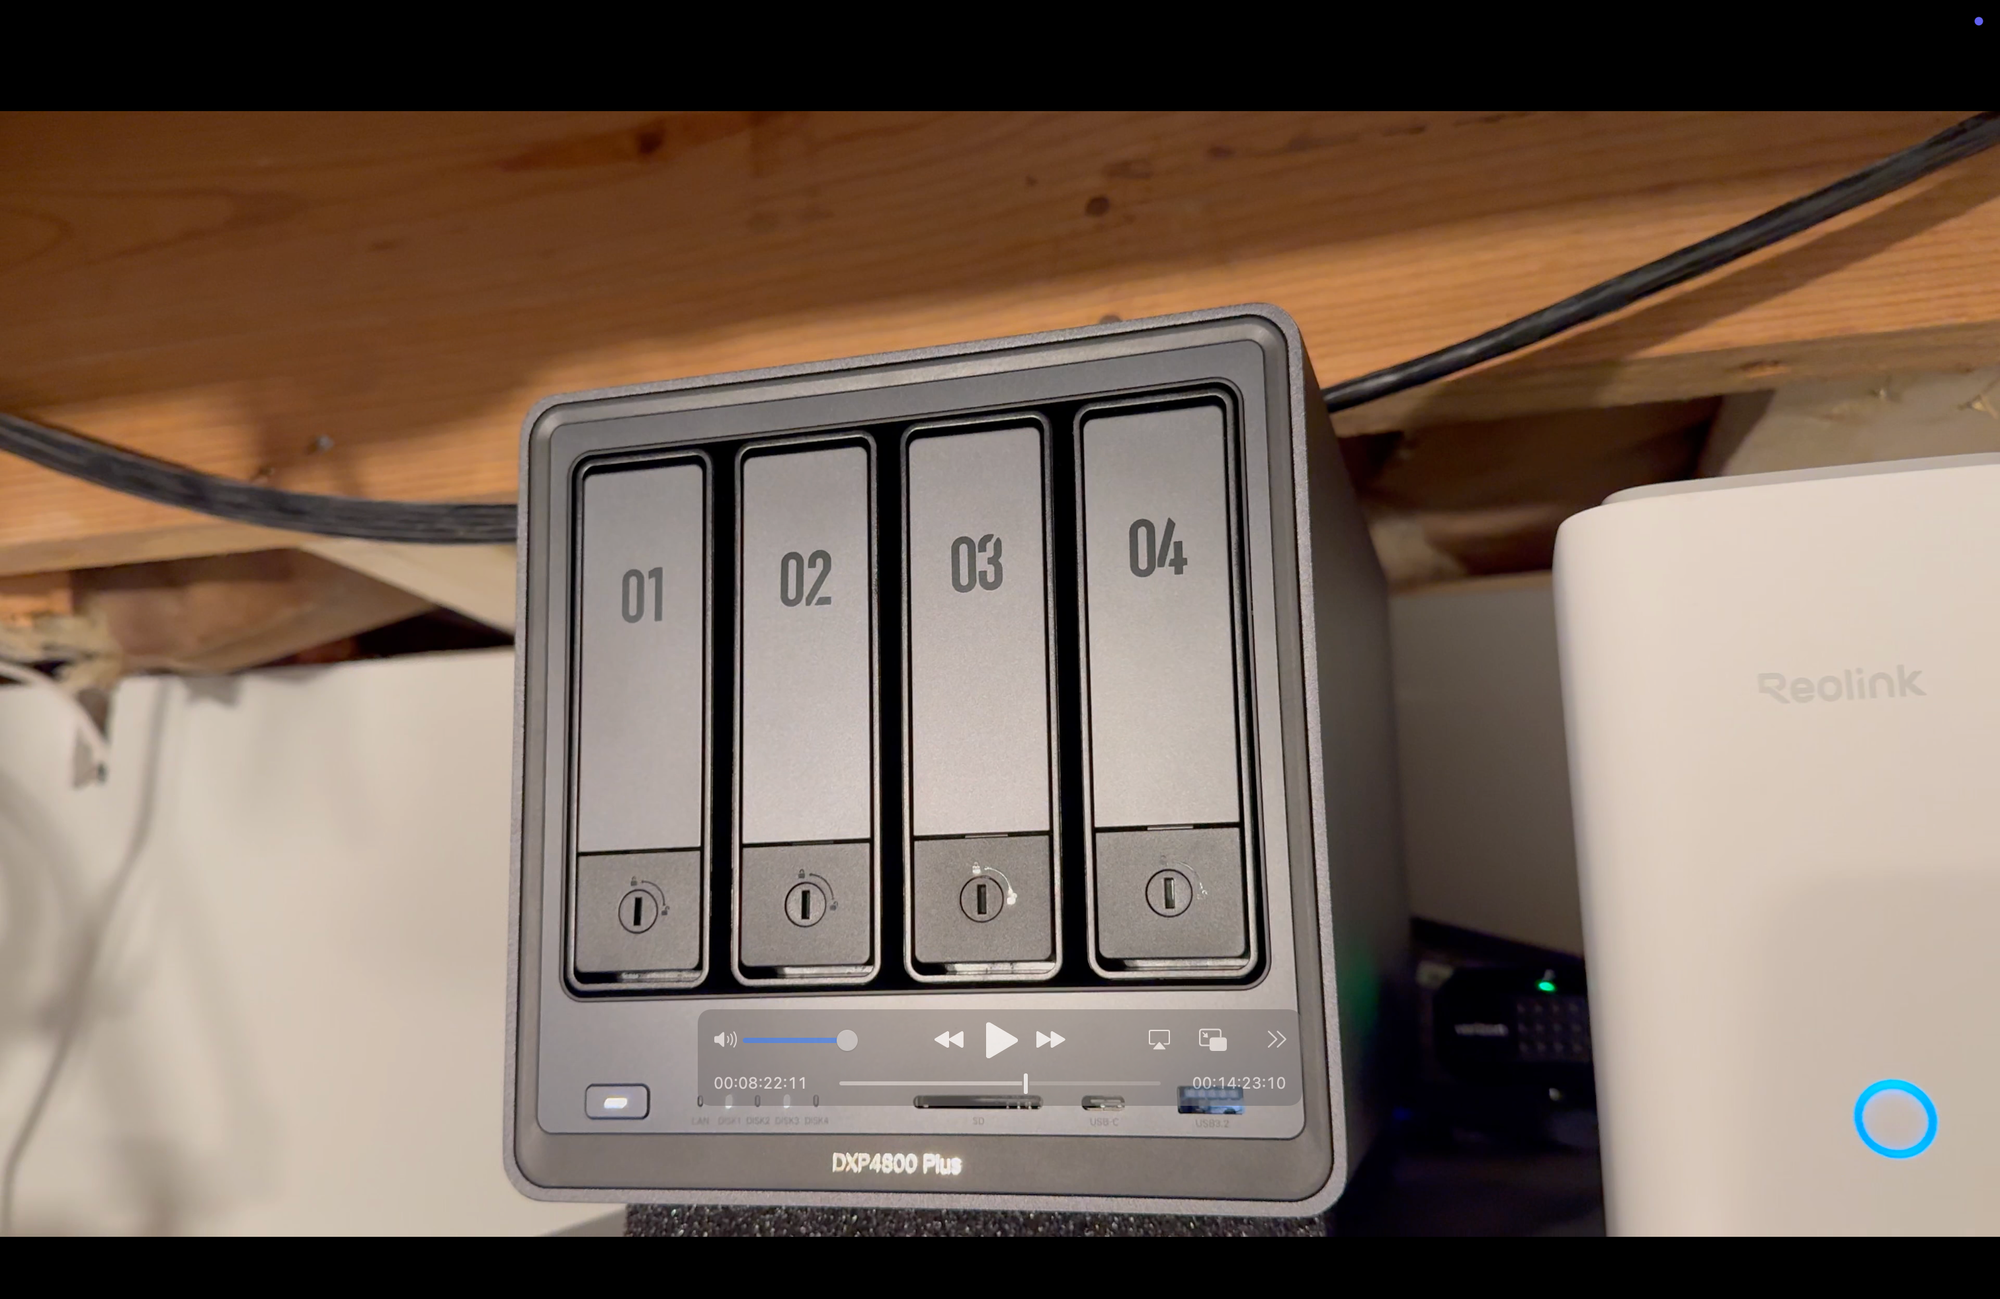
And on the very top of the rack is a UGREEN NASync DXP4800 Plus. This is a 4-bay NAS that costs $700, and has four Western Digital WD Red Plus 4TB HDDs in a RAID-5 configuration, similar to the UNAS Pro. I found this NAS really easy to setup and get started with. Clearly, I’ve got a thing for network storage.
Network Storage
Camera Security
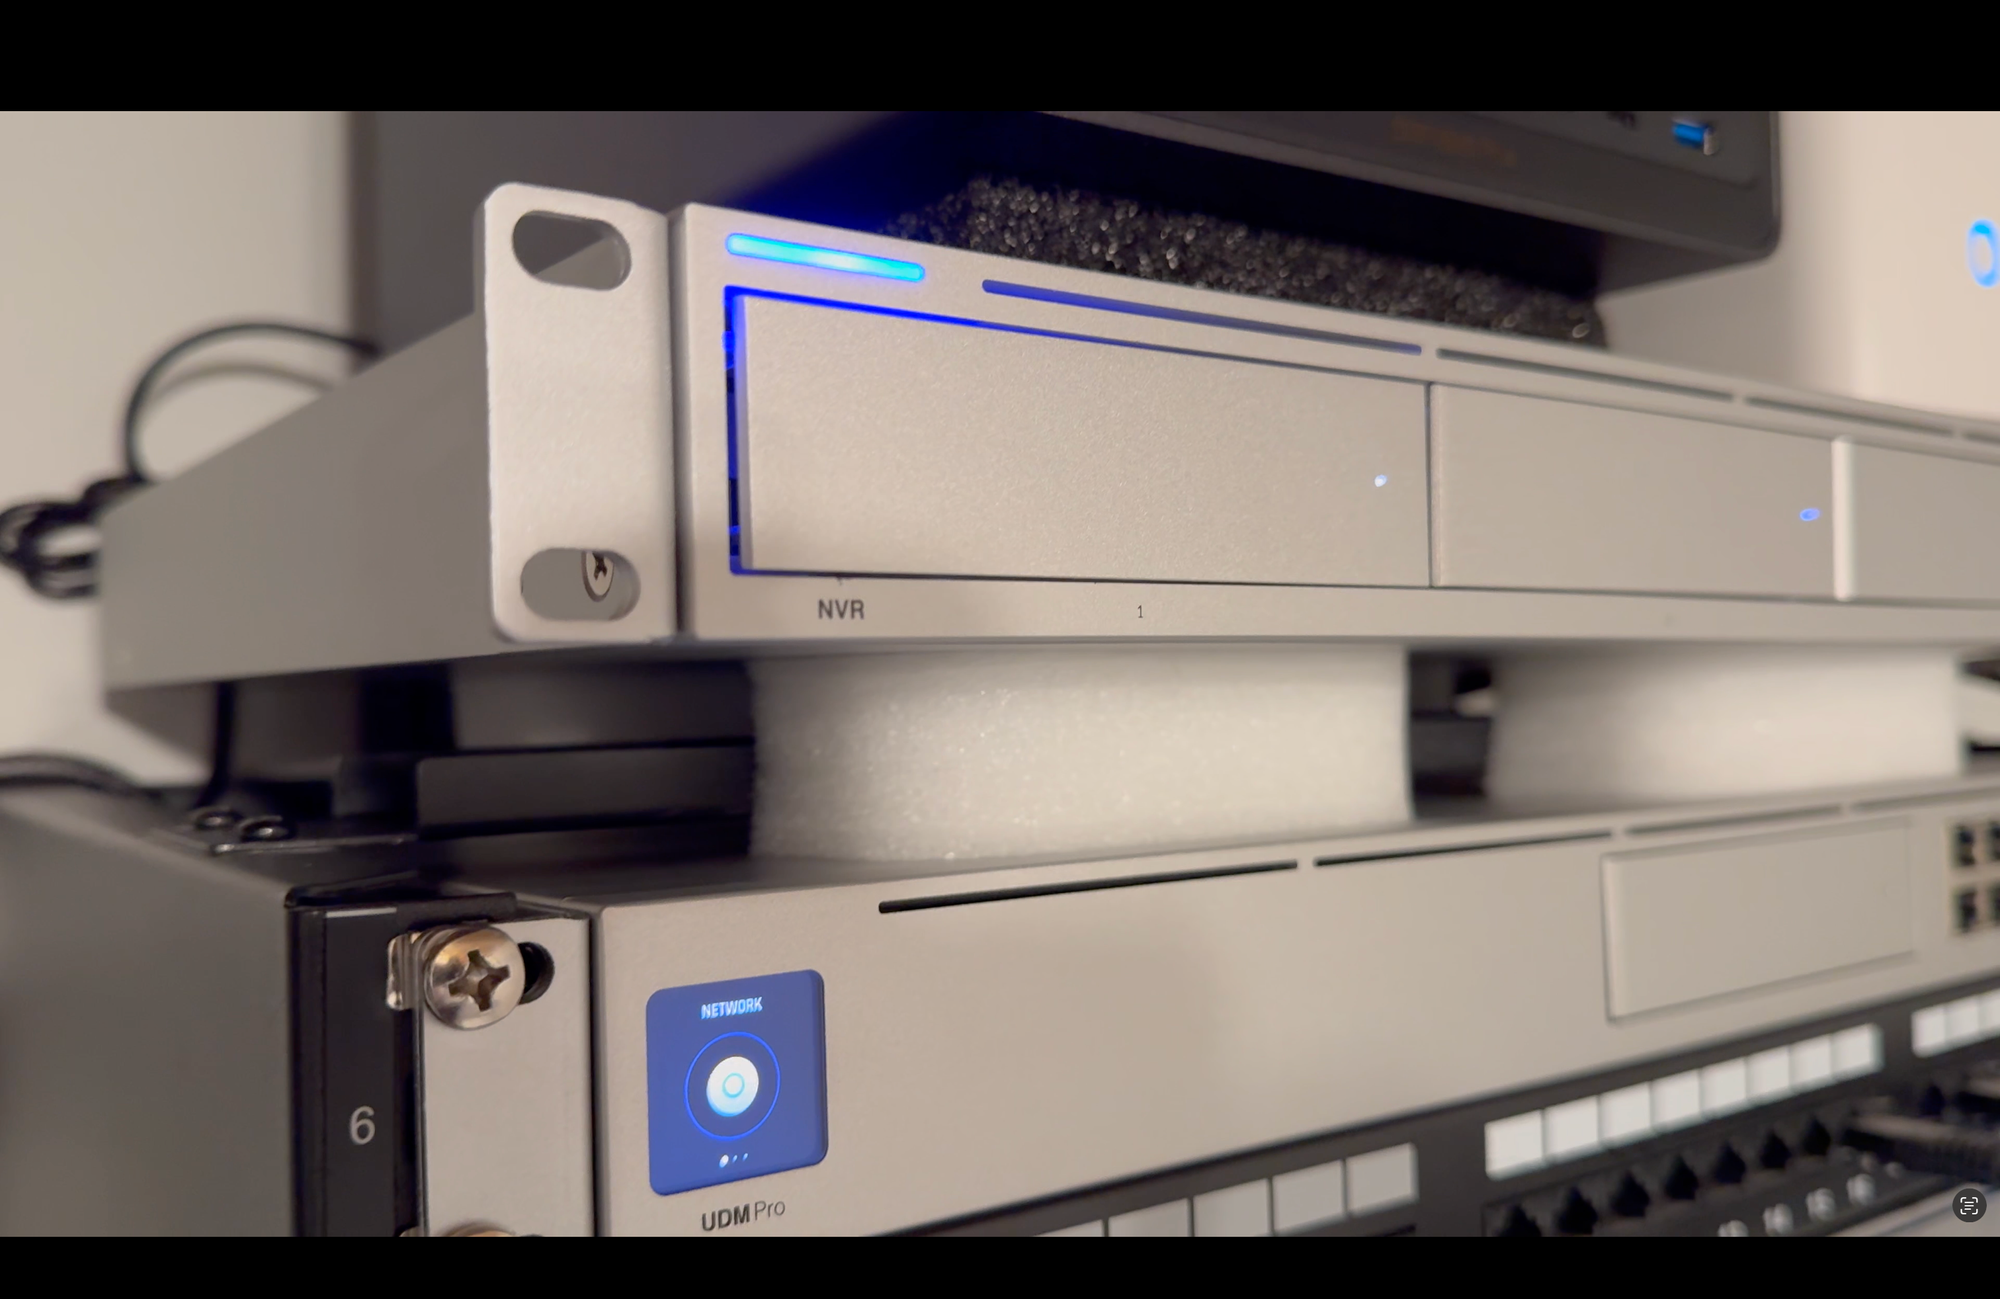
Staying at the top of my rack, I have a UniFi NVR, which sells for $299. You may be wondering why I have it just sitting on top like this. Well, I didn’t realize that its protruding power cord would make it too deep to be mounted on my rack. This is why I kept acknowledging the benefits of the newer power cord design on the Pro Max 24 PoE and UNAS Pro. I’m sure I could also just pick up another power cord. Maybe for next year’s rack update I’ll get around to addressing this. The NVR is a video recorder with four 2.5/3.5” HDD bays. UniFi says it can support up to 30 days of storage for 18 4K cameras, or 60 Full HD cameras. My setup has about a dozen UniFi Protect cameras, and I currently have three Seagate SkyHawk 8TB HDDs inside.
The NVR is connected to the Pro Max 24 PoE via a GbE RJ45 on the back of the NVR. There is also the option of using a 10G SFP+ port, but since it’s on the back, the Direct Attach Cable that I had on hand could not reach the switch. I wish these ports were on the front, though I suppose that would limit it to three HDD bays. If you are currently use battery-powered, WiFi cameras, the experience is much smoother with PoE cameras that record data to your own NVR and never need charging. I’ll leave a link to a dedicated video on my UniFi Protect camera setup if you want to check it out. And let me know in the comments if you’d like a tutorial on how to move your UniFi Protect from a UDM Pro to a UNVR.

Camera Security
Surge Protection and Battery Backup
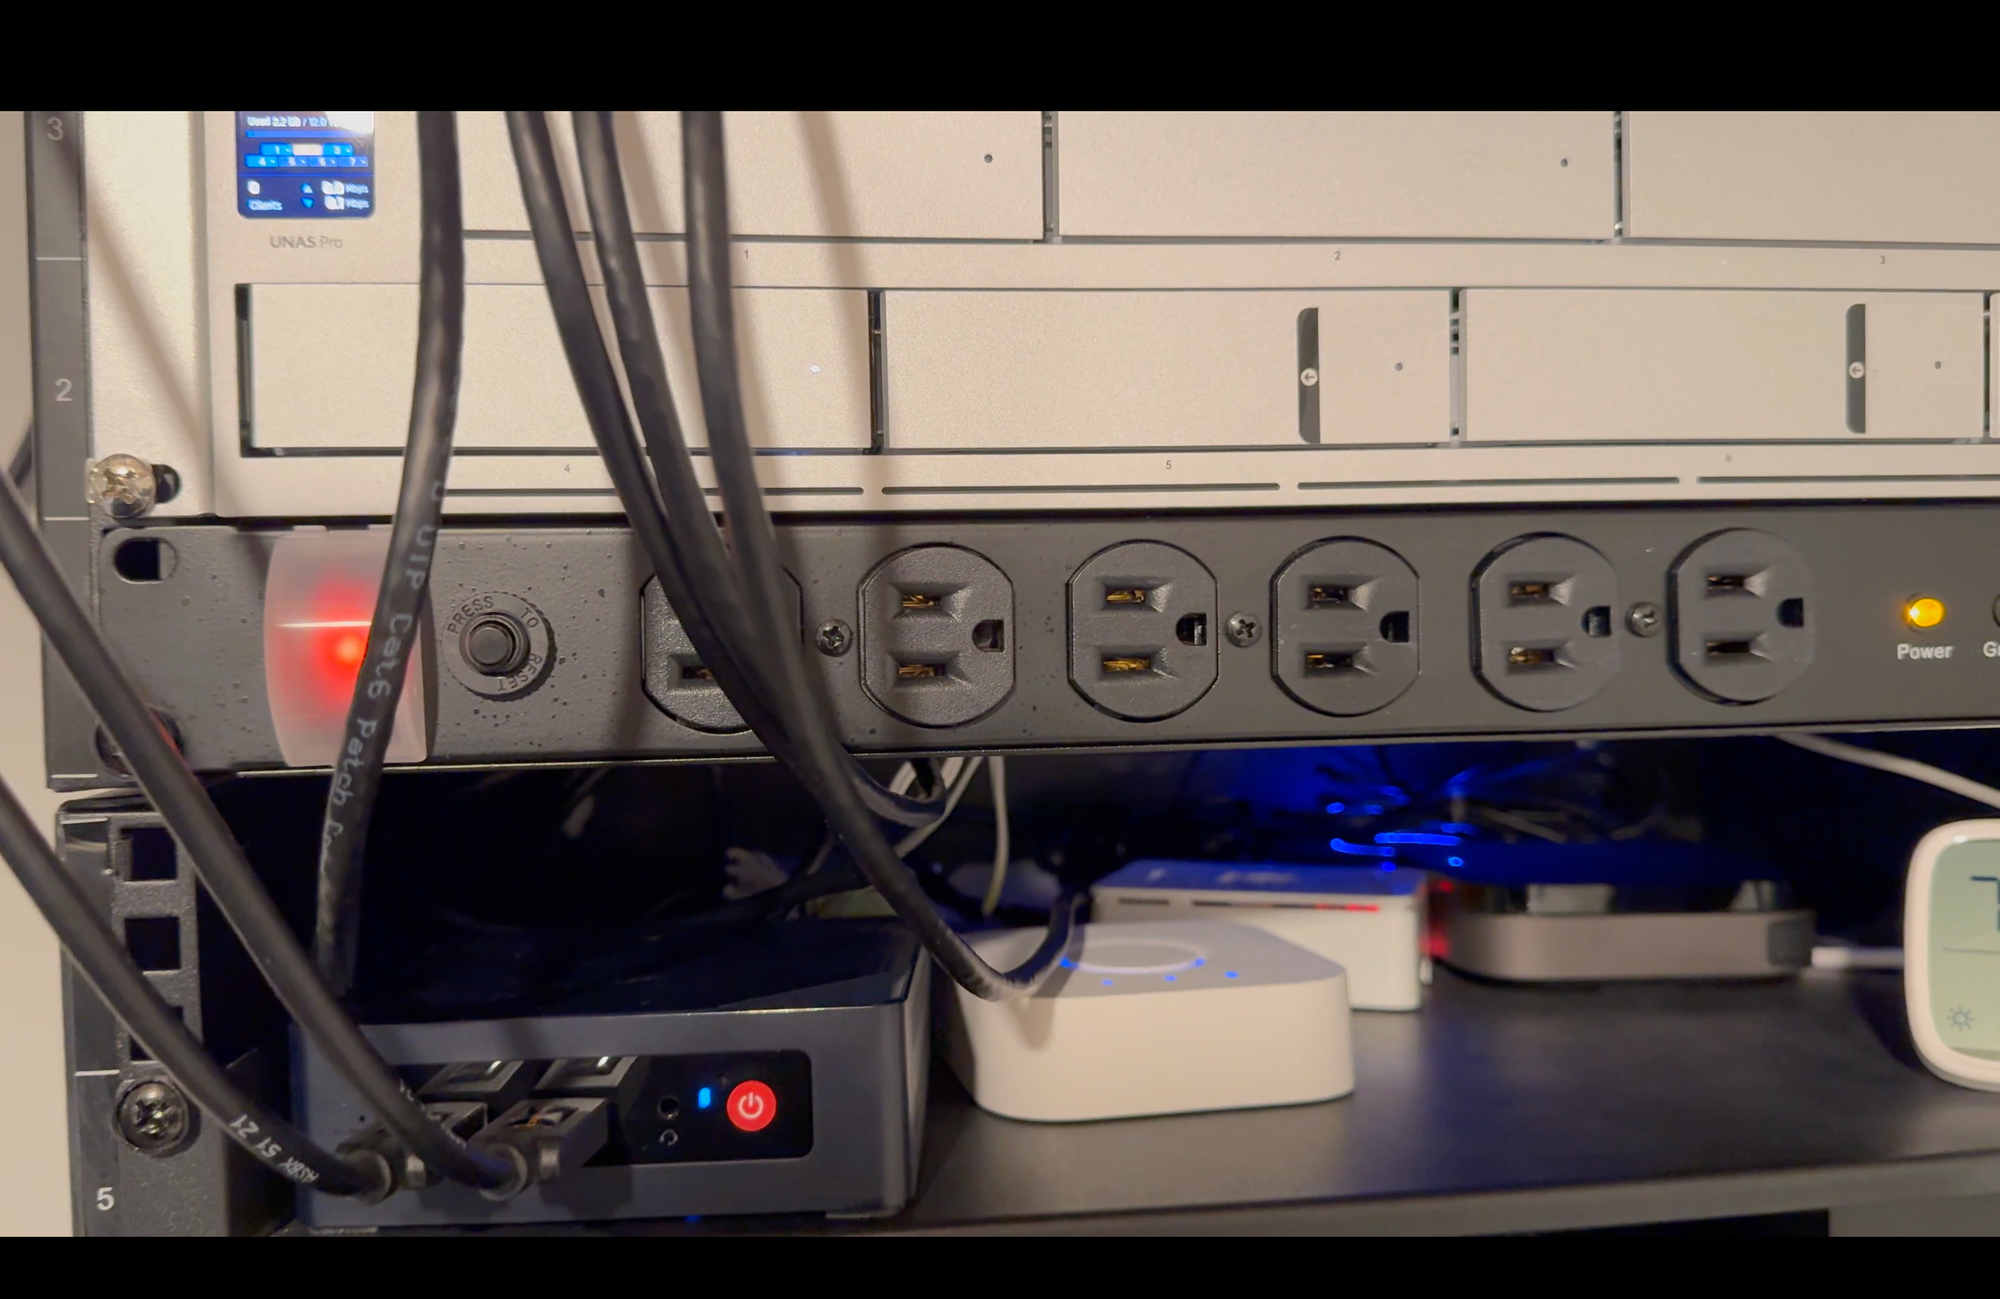
Moving down to the lower half of the rack, I have a CyberPower Rackmount Surge Protector priced at $65, which is connected to a CyberPower UPS System that was $236. The UPS, or Uninterruptible Power Supply, is 1500VA/1000W with 12 outlets. Combined, these two CyberPower devices offer surge protection and battery backup of the most sensitive and critical electronic equipment in my home. When we had the lightning strike the stuff plugged into it was spared, except for the switch since that was directly connected to the electronics in the garage.
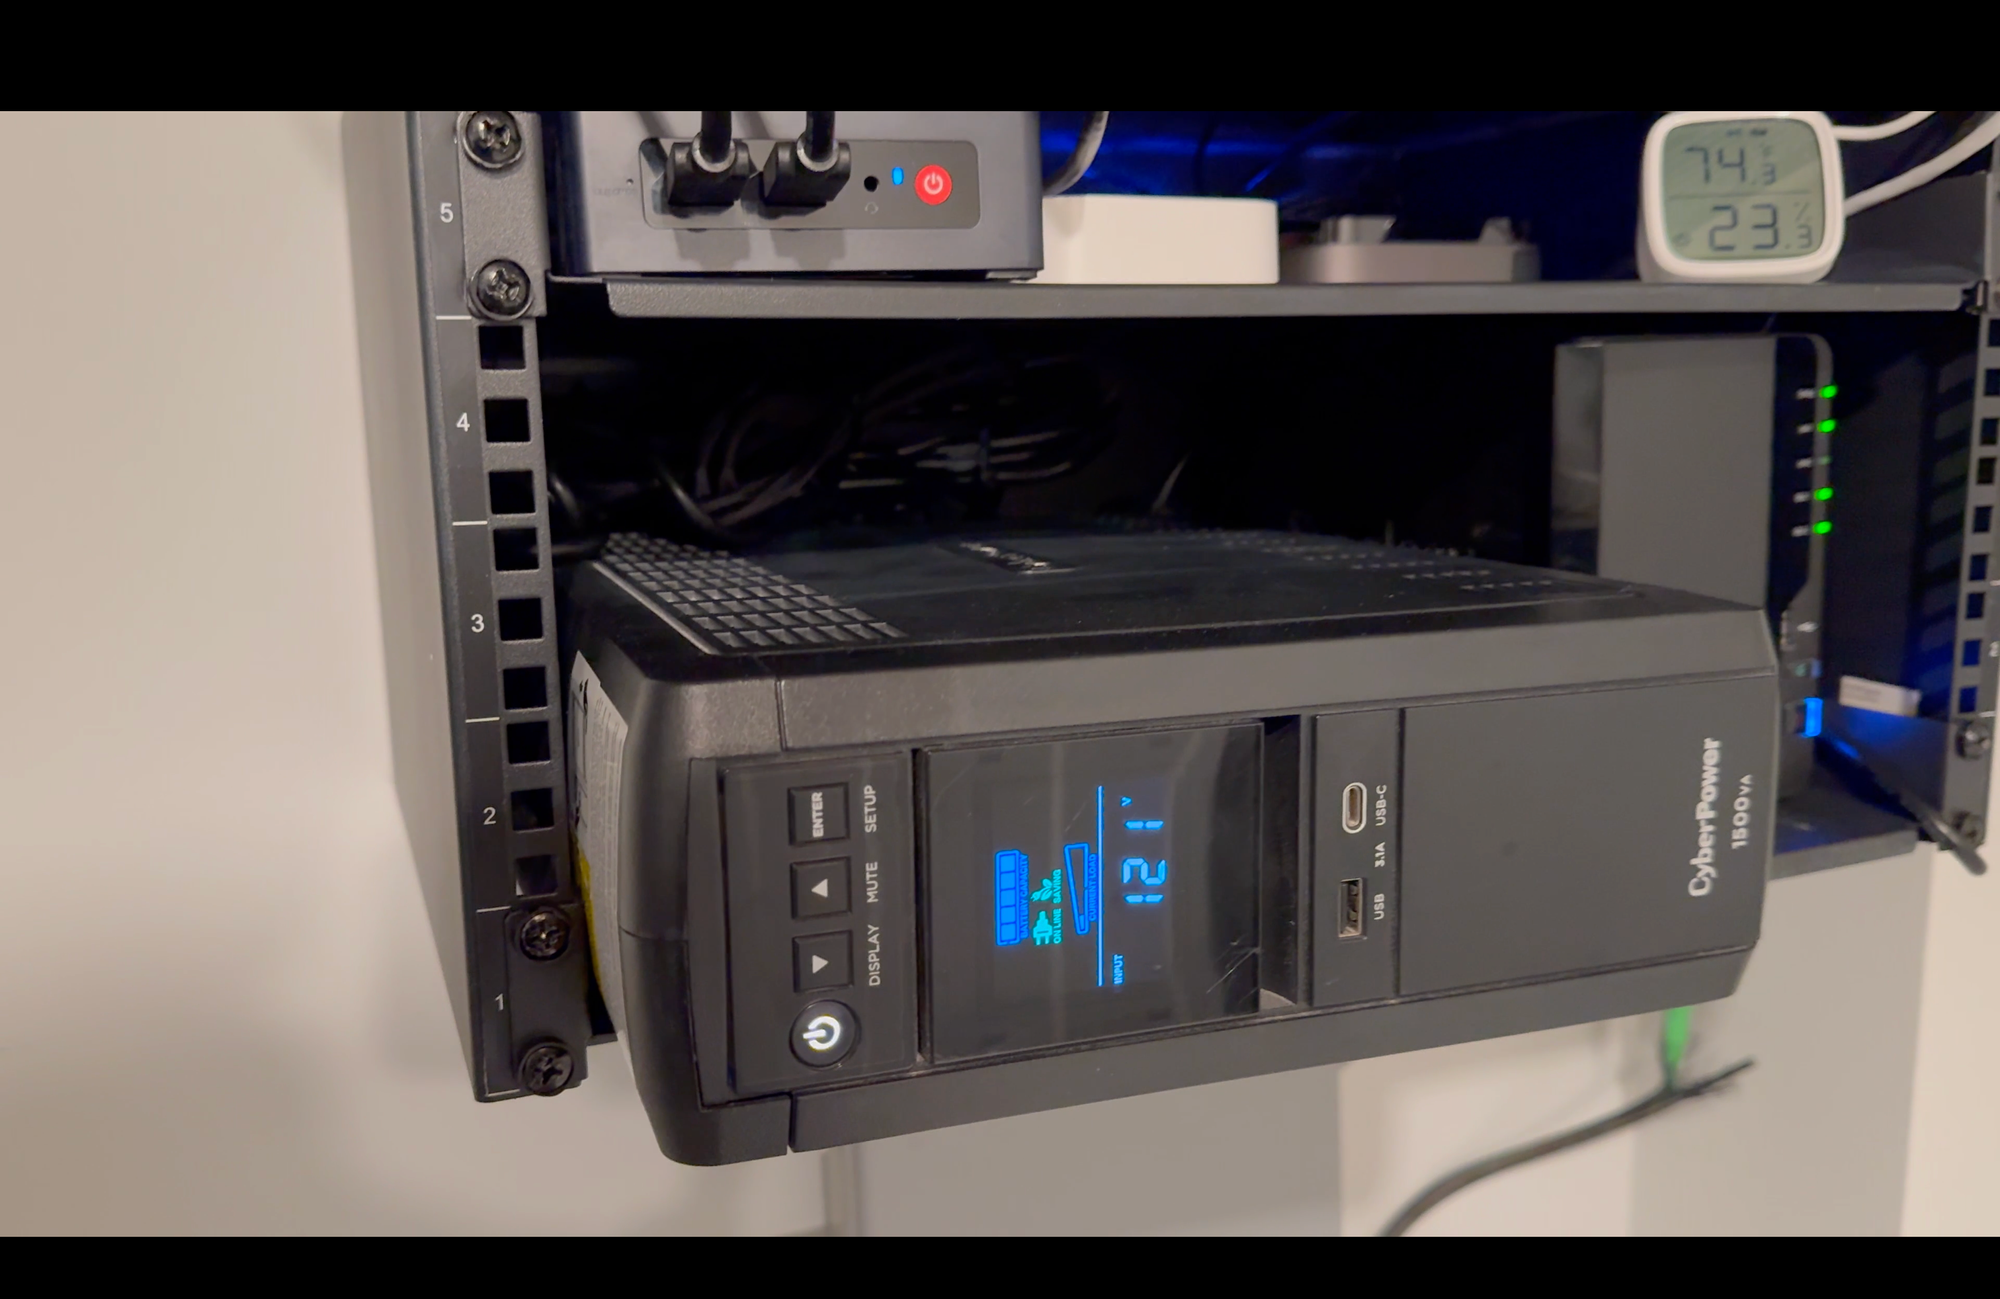
Surge Protection and Battery Backup
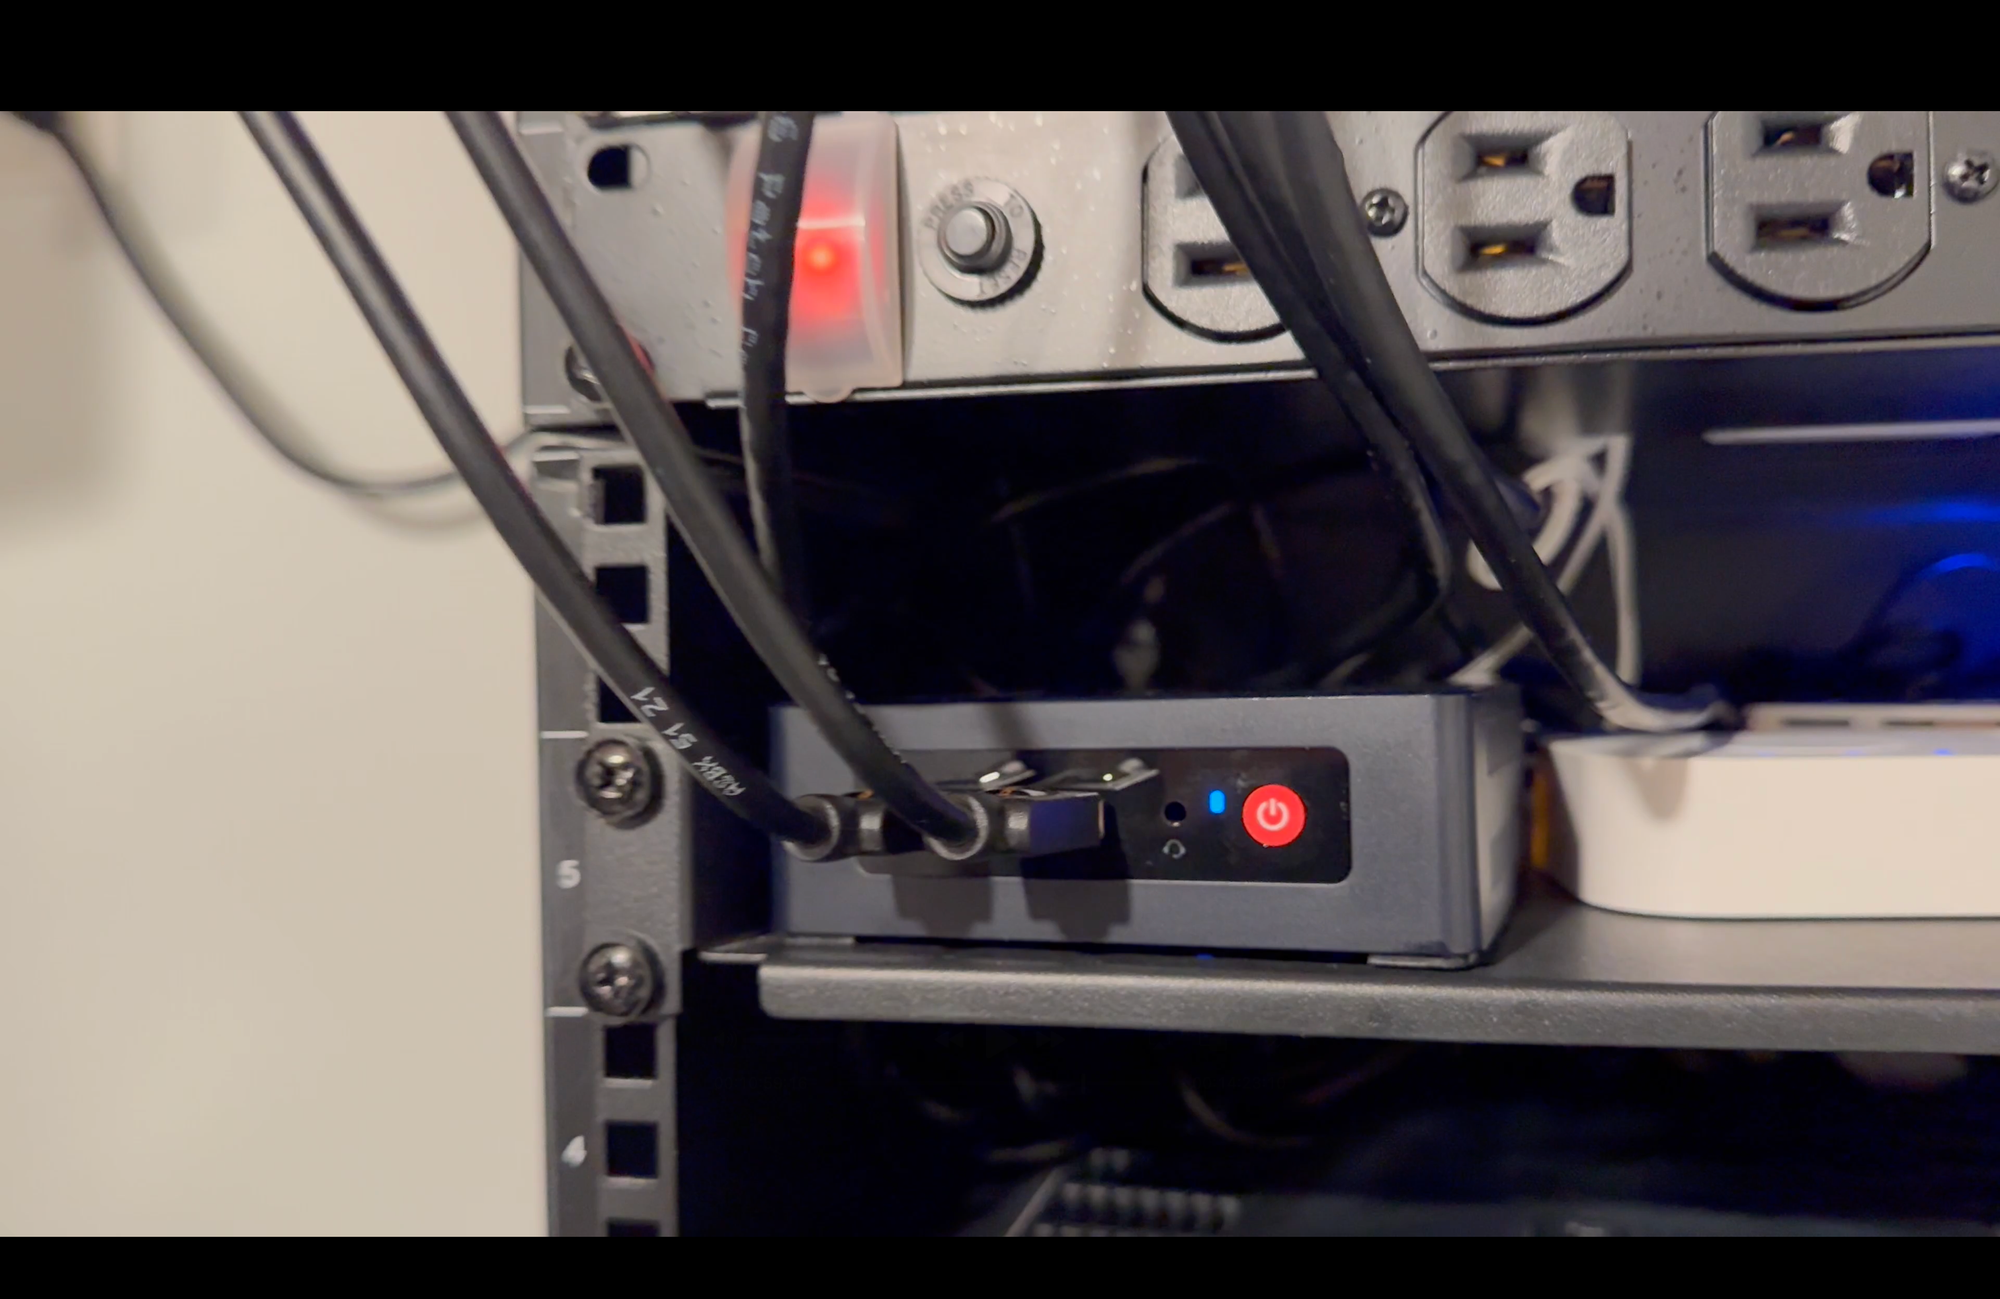
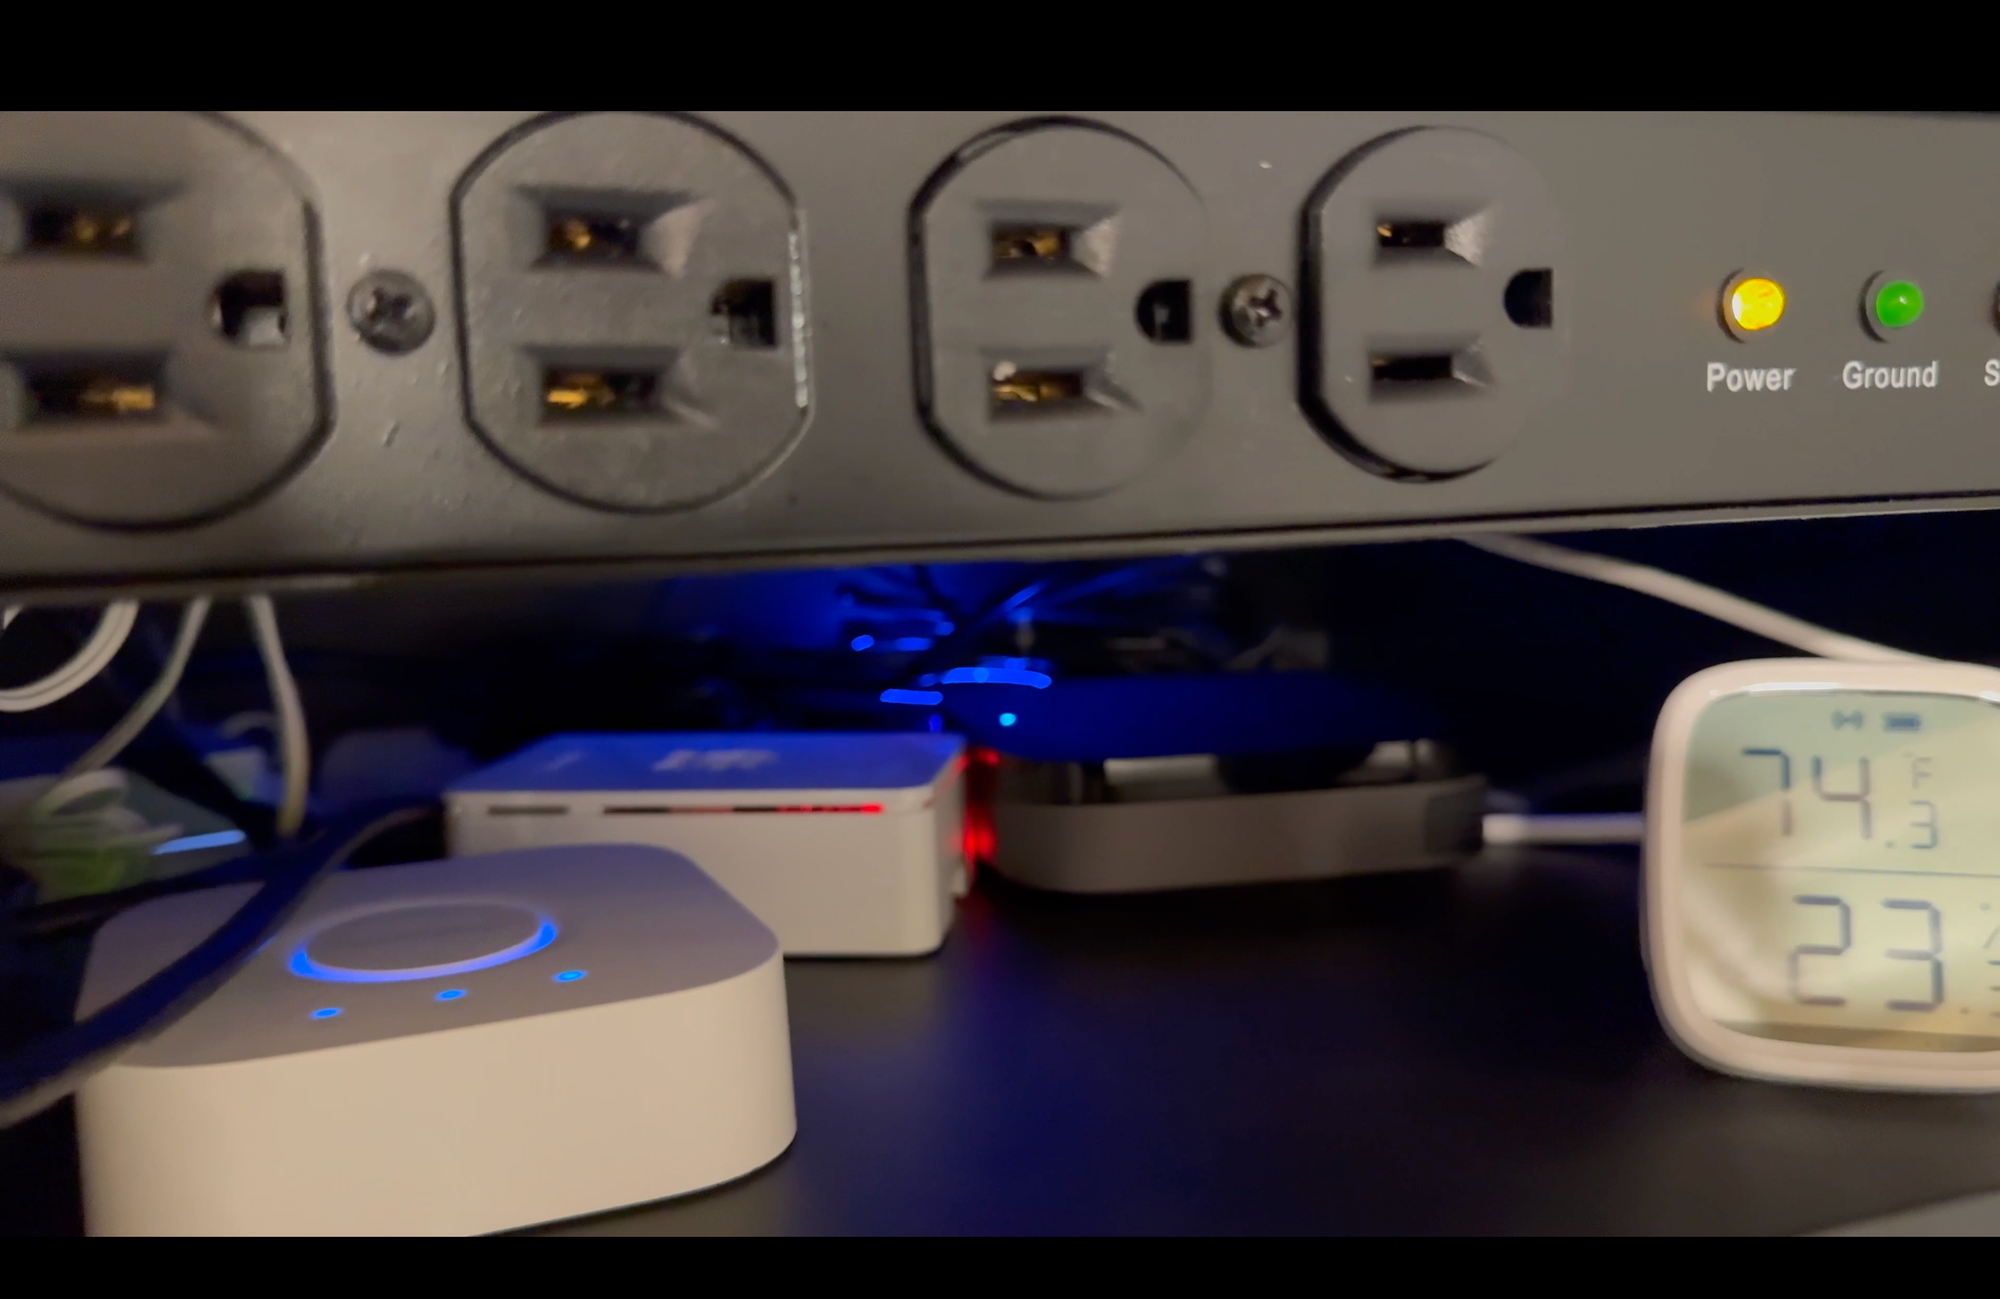
Smart Home Hubs
The shelf in between the rack-mount surge protector and UPS holds all of my smart home hubs. Well, some of them at least. I have a whole drawer of additional hubs beyond what you see here. On the rack is a Beelink S12 Pro N100 Mini PC and a Raspberry Pi 4 that are running the production and development environments, respectively, of Home Assistant, my home automation server. Connected to the mini PC are two, long USB extension cords with SONOFF Zigbee and Zooz Z-Wave coordinators, which offer local control for dozens of smart home devices in Home Assistant. It’s good to keep these coordinators at distance from the networking equipment to avoid signal interference. Back on the smart home shelf is also a Lutron Smart Bridge and Philips Hue Bridge for connecting and controlling smart switches and lights, a Bond Bridge for automating our ceiling fans, and an Aqara Hub M3. I also have a Reolink Home Hub, but that’s on the very top because of its height. Also on the smart home hub shelf is a SONOFF SNZB-02D LCD Smart Temperature Humidity Sensor, so I can keep an eye on any potential overheating anomalies, though it’s not necessary. I have all of the smart home hubs connected to the left side of the Pro Max 24 PoE to help with organization.
Smart Home Hubs
Network Rack
The rack itself holding all of this equipment consists of two, StarTech 6U Wall Mount Network Racks. Each is 14” deep and accommodates a 19” patch panel. There’s nothing particularly fancy or special about this rack. I got it simply because it was fairly inexpensive at $120 for combined 12U of space. Though, I am at the point where I would definitely benefit from an even larger server rack given this one is busting at the seams — maybe next year.
Network Rack
VLANs, Traffic, and Firewall Rules
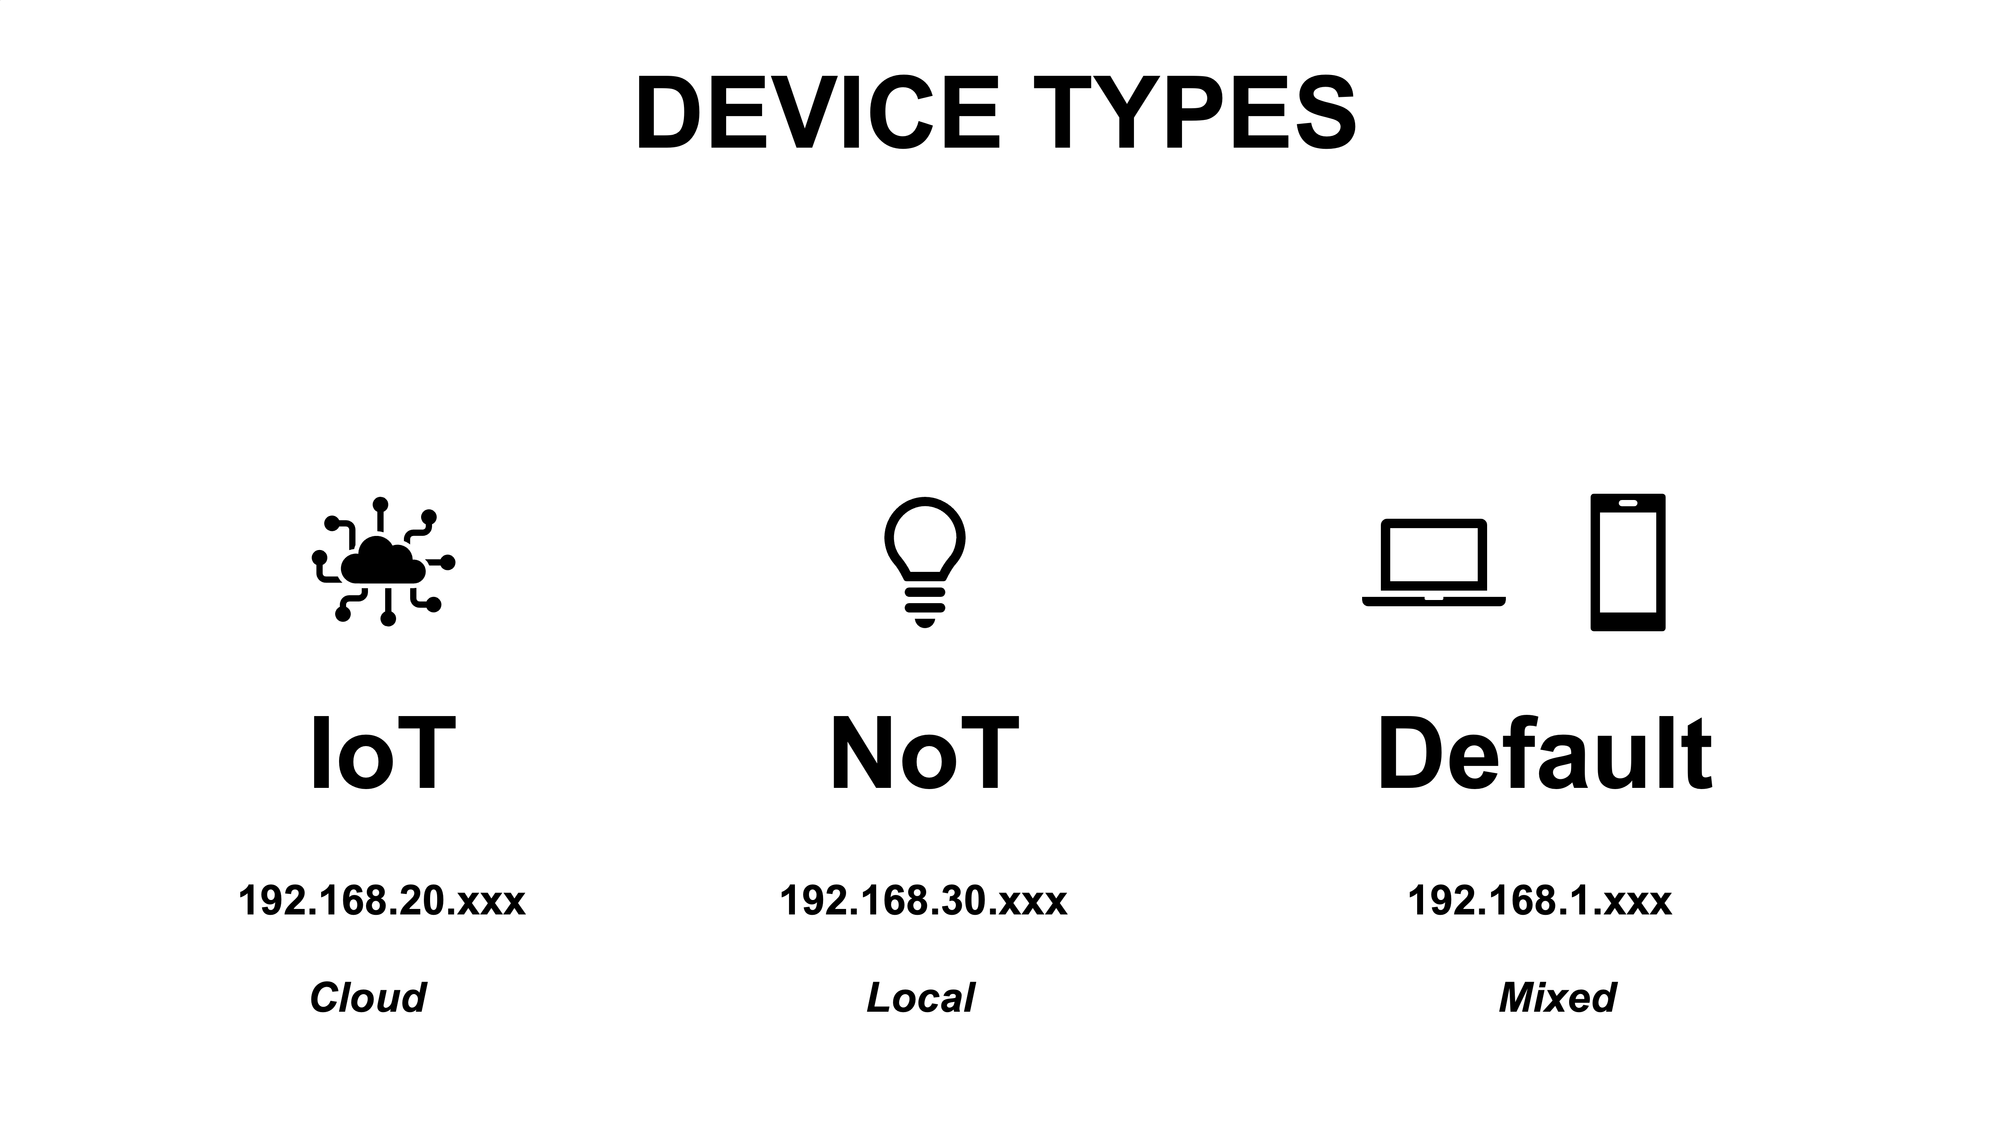
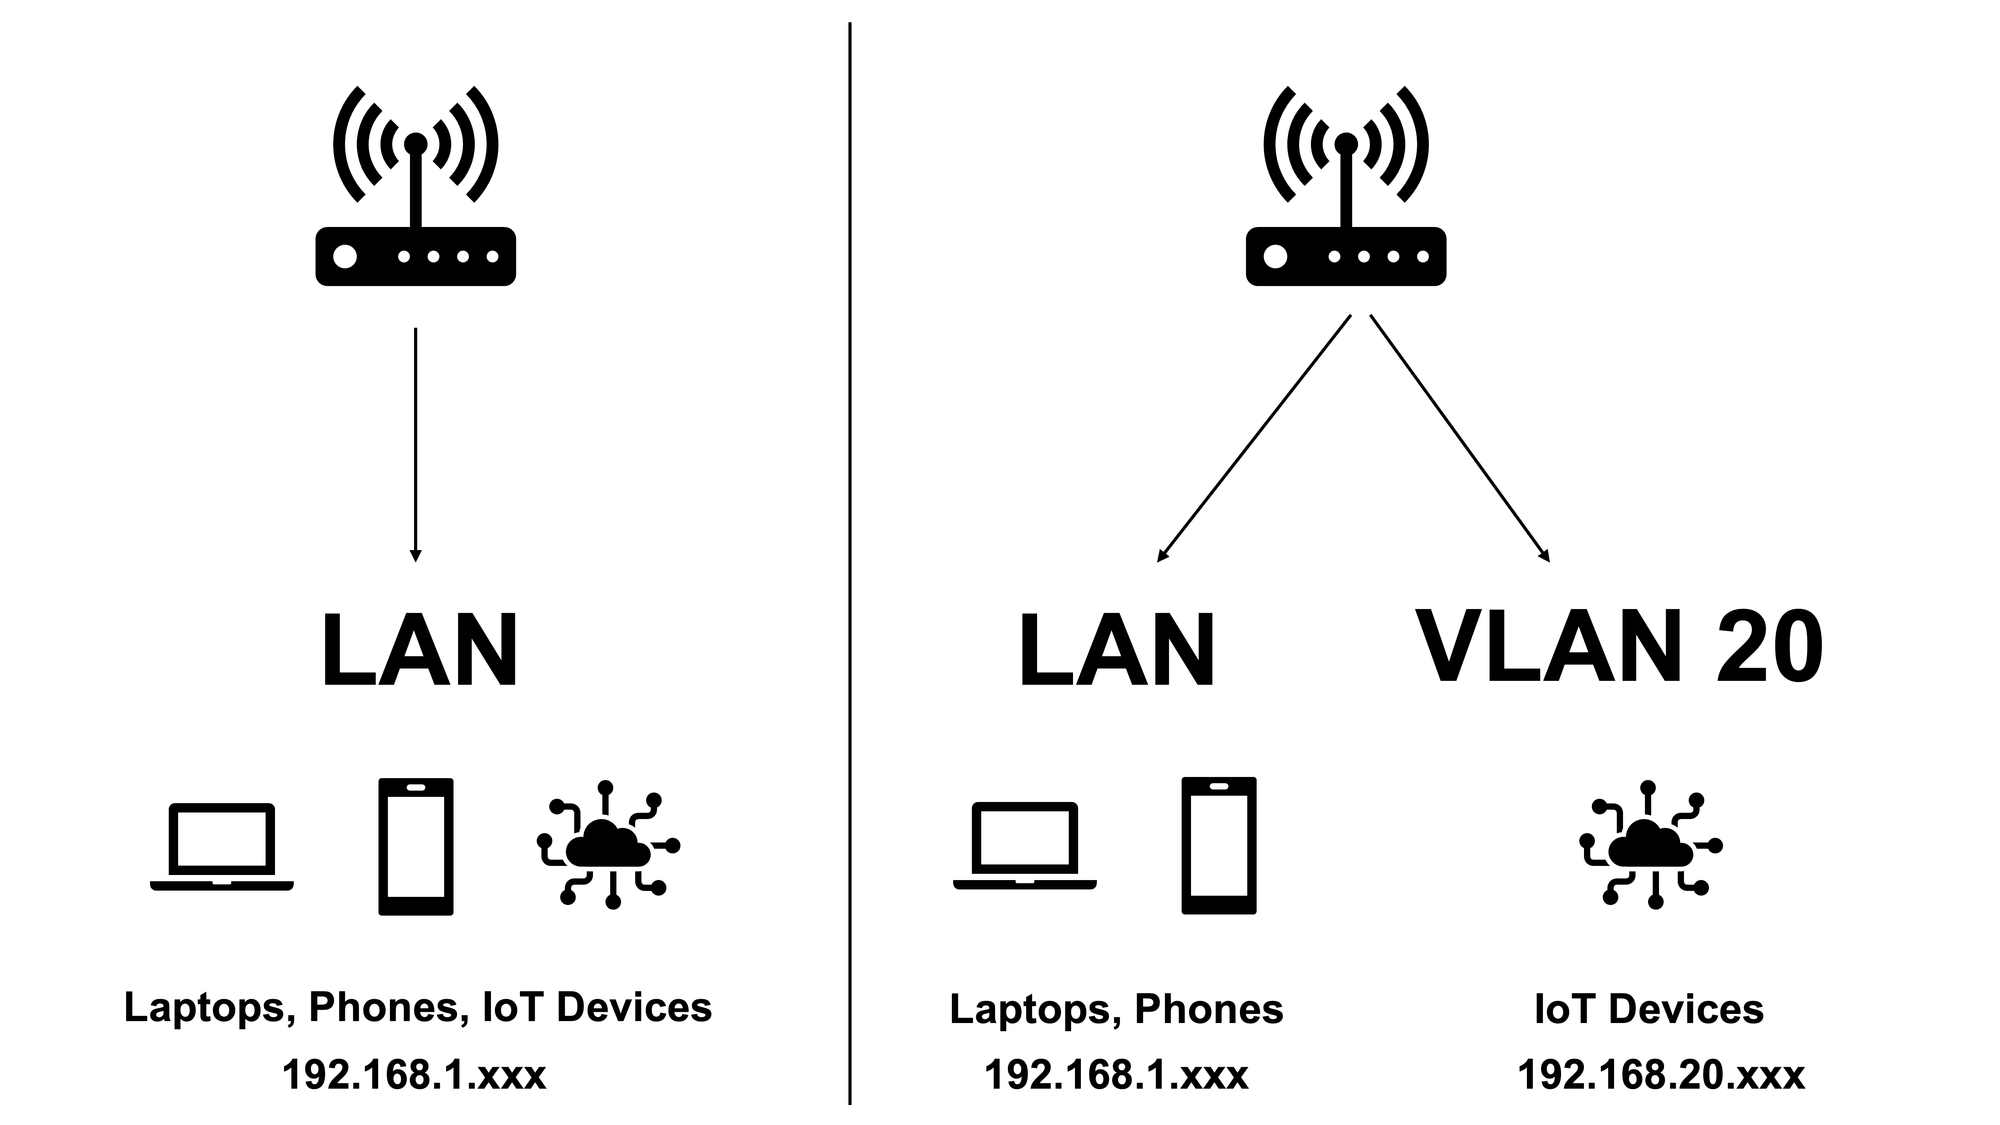
For a more secure albeit more complex networking setup, you can configure VLANs, and traffic and firewall rules. The UniFi controller on the UDM Pro makes this really easy to do. By default, your home network will operate on one LAN, meaning all devices can talk to each other and make requests. With VLANs, each is given an ID or a tag, which logically groups a network of devices together in their own subnet regardless of the physical network they are connected to. For example, you can group all of your IoT, or Internet of Things, devices, like a smart garage door controller that speaks to the cloud, into one VLAN, and separate those IoT devices from the devices on your main LAN, like smartphones and laptops. If someone hacked the IoT device’s cloud service, that could be an entry point to the IoT device on your network, and then the hacker could potentially see the computers on your network. By separating devices using VLANs, you can mitigate this risk.
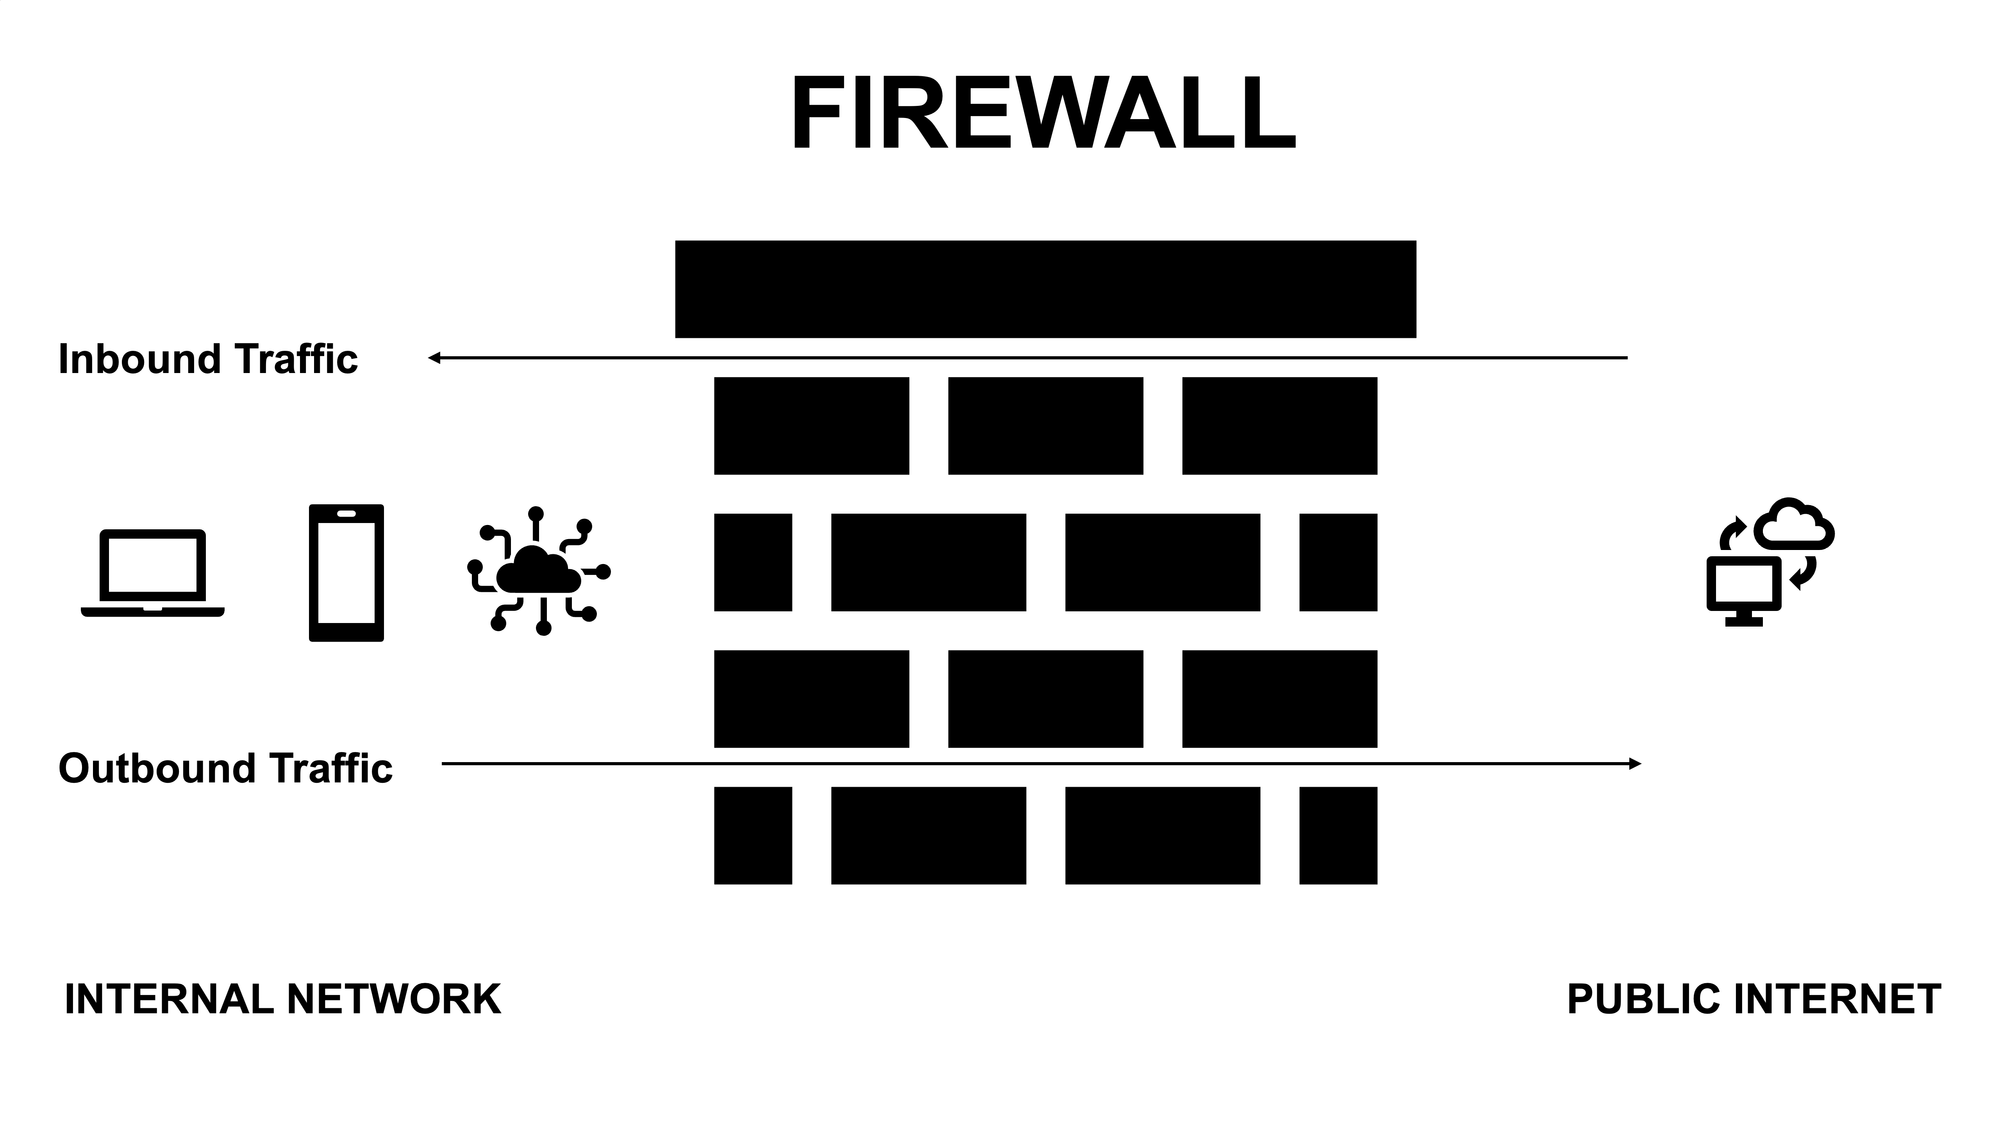
However, VLANs on their own aren’t as useful from a security standpoint unless you impose traffic and firewall rules. Firewall rules are logical controls that determine which types of traffic are allowed in and out of the network. I use firewall rules to decide what my IoT devices are allowed to communicate with, and what can communicate with them. I’ll leave a link to a dedicated video I made on my VLAN and firewall setup if you want to check it out.
VLANs, Traffic, and Firewall Rules
Final Thoughts
It was a lot of work disconnecting and re-building my entire home network rack from scratch this year, but I’m really happy with out it turned out. I think it’s much cleaner than it was previously, plus I am loving the additional storage space from the UNAS Pro and UNVR.
Replicating my same setup is not cheap, and is not for everyone. For me, it was absolutely worth it. The benefits have included reliability, customization, expansion, and security. No matter how many devices I throw at my network, it doesn’t break a sweat. I can customize the setup for my home environment, device types, and unique needs, and build a system that grows with me. And I can easily configure things like VLANs and firewall rules for increased security, while keeping all of our security camera recordings local, and most importantly, without any subscriptions.
But what about you — what does your home internet network setup look like, or how would you like to update it? Let me know down in the comments.
Watch on YouTube
Featured Tech
Ubiquiti UniFi Dream Machine Pro: https://go.michaelsleen.com/udm-pro
Ubiquiti UniFi Pro Max 24 PoE: https://go.michaelsleen.com/usw-pro-max-24-poe
Ubiquiti UniFi Flex: https://go.michaelsleen.com/switch-flex
Ubiquiti UniFi U6 Long Range: https://go.michaelsleen.com/u6-lr
Ubiquiti UniFi U6 In Wall: https://go.michaelsleen.com/u6-iw
Ubiquiti UniFi UNAS Pro: https://go.michaelsleen.com/unas-pro
Ubiquiti UniFi Network Video Recorder (NVR): https://go.michaelsleen.com/unvr
CyberPower Rackmount Surge Protector: https://amzn.to/3T8j3IZ
CyberPower USP (battery backup): https://amzn.to/3IxUpwF
Synology NAS 2-Bay DiskStation: https://amzn.to/3Ugu77A
UGREEN NASync DXP4800 Plus NAS: https://amzn.to/3DcMUw8
Seagate IronWolf 4TB NAS Internal HDD: https://amzn.to/4aeuTsa
Seagate IronWolf 8TB NAS Internal HDD: https://amzn.to/3TBetoa
Seagate IronWolf 12TB NAS Internal HDD: https://amzn.to/3W22zUl
Seagate Skyhawk AI 8TB Video Internal HDD: https://amzn.to/4hWcnZF
Western Digital 4TB WD Red Plus NAS Internal HDD: https://amzn.to/41CijS5
Western Digital 8TB WD Red Plus NAS Internal HDD: https://amzn.to/3DbgoKG
Western Digital 12TB WD Red Plus NAS Internal HDD: https://amzn.to/4bjNPr4